Wednesday, 30 November 2011

Soft Slider Buns

Beautiful soft buns

Also known as.... the buns that nearly didn't get made!

It's been ages and ages since I last posted a savoury bread recipe that is new to me, but I've been having a love affair with soda bread and various other tried and true breads, and haven't felt the need to experiment too much. However, when Dan's recipe for slider buns was published in the Guardian a few weeks ago I just couldn't resist making them - such a lovely picture, and the promise of soft white rolls and the added intrigue of custard powder.

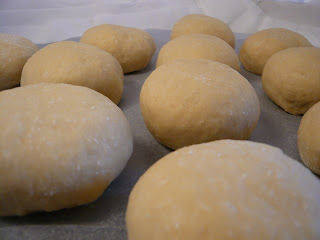
Before prooving

Yes, custard powder. You did indeed read that correctly! These buns are based on a roux method where the liquid (milk) for the recipe is mixed with a starch and thickened before then adding the remainder of the flour, yeast and salt and proceeding as normal for a bread recipe.

After prooving

The roux technique is not new to me - I think I first used it in the black pepper rye bread a couple of years ago, and inspired by this recipe my go-to recipe now involves boiling the water and pouring it over 1/4 of the flour in the recipe and then allowing to cool a little before proceeding. It's a technique that seems to work really well so I wasn't in the slightest bit doubtful about using it again here. I wasn't even concerned about using custard powder, after all, it's just cornflour and a bit of colour and flavouring, which would surely be drowned out by the addition of all the flour....

Lovely crumb

No, the real problem came when I realised that I had made custard. I love custard, big time! And realising that I had just made custard I had to try extremely hard to not just pour it into a bowl and eat it as it was, rather than continuing with the recipe. Fortunately self restraint prevailed and I added the flour.

A pile of floury, delicious rolls

As I followed the recipe exactly I won't reproduce it here (it's the easiest thing ever - make custard, mix ingredients in, leave, knead very briefly, leave for ages, shape, proove, bake) but will instead direct you to the Guardian page here. My only concern whilst making them was that my yeast still seemed to stay in the little rods it comes in rather than becoming invisible, even as late as the shaping stage. It didn't seem to matter in the end though, and there wasn't a yeasty taste or appearance or aroma. Just a quirk I guess. I chose to make them 50g size, and only made a half recipe, getting 12 buns. I also baked for a little longer at a lower temperature because I'm not a fan of a dark crust on white breads.

Gorgeous even, golden crumb

These were everything I had hoped they would be and more - soft and slightly sweet from the milk and a beautiful golden colour. The crumb was soft and tender, and almost tore in the way that enriched doughs do. I dusted them with flour rather than egg washing because I didn't want shiny tops to my buns, and because I had deliberately placed them close together during the prooving stage, some of them had started to join together batch-style, giving lovely soft edges too.

I didn't have any cute little burgers or falafel or anything to put in them, but I will make these again because they're delicious. Thoroughly enjoyed for breakfast and lunch. Thanks Dan, for another great recipe!

Friday, 25 November 2011

Pear and ginger creme fraiche cupcakes - Tea Time Treats


These are a different, but equally seasonal take on the clotted cream cupcakes I first blogged just over a year ago. I've made and blogged about them since, noting down how I had changed the recipe and I decided that it was time for them to have another outing, with a few more changes.


I guess that really it was a combination of ingredients looking at me that decided the final recipe, but I think it was a pretty good decision. It's also perfect as my submission this month to Kate and Karen's new challenge - Tea Time Treats. This is pretty much perfect for my blog as everything I make would be lovely at tea time, so I'm really looking forward to participating! The challenge is going to be hosted alternate months by Kate of What Kate Baked, and Karen of Lavender and Lovage. This month is Karen's turn and the theme is Ginger and bonfire treats. I think that with the combo of seasonal pears and warming ginger, these cupcakes are a great submission! You can find more info on the challenge here.


I had pears and creme fraiche and where the original recipe uses jam, I had a jar of ginger conserve and because pears and ginger are such a good match, better than any of the jam I had open and to hand (although actually, I think I have some rhubarb jam somewhere that would be a good combination.... hold that thought!) I decided to go with pear and ginger.


Pear and ginger creme fraiche cupcakes
Ingredients
50g butter, softened
115g full fat creme fraiche
150g caster sugar
2 eggs
300g plain flour
2 tsp baking powder
2 tsp ground ginger
2 pears, peeled, cored and chopped small (mine were very ripe) - see method
115g ginger conserve
milk (optional, see method)

Method
- Preheat the oven to 190C/Gas 5. Line a 12 hole muffin tin with papers.
- Beat together the butter and creme fraiche, mine was still rather lumpy, and remained so throughout.
- Add the sugar and beat well, then add the eggs one at a time, beating well in between adding the eggs.
- Add the flour, baking powder, ground ginger and a good slosh of water (you could use milk, but I didn't have any open) and beat well to combine.
- Add the pears and mix in. I actually waited until this stage before peeling and chopping them, to prevent them browning too much.
- Divide half of the mixture between the cases, then top each with a blob of the ginger conserve. Finish by dividing the remaining mixture between the cases.
- Bake for 25 minutes until risen and golden.
- Allow to cool on a wire rack.

I topped these with a simple water icing, as I wanted a little extra sweetness, but nothing to compete with the flavours of the cupcakes.


They were really nice, the ginger conserve stayed put in the centre of the cupcakes, which is exactly what I wanted. My only slight issue with them is that they weren't gingery enough! Next time I'll add some more ground ginger to the cupcakes, and perhaps use either chopped crystallised stem ginger to perk up the conserve, or just use some chopped stem ginger and mix it with a little of its syrup to put into the middles, for a real ginger hit! I must also remember that much as I like pear, it does have a tendency to disappear when baked into this kind of cake. Next time the chunks might be a little bigger, and I'll try and remember to use under-ripe rather than over-ripe pears as I think they'll keep their shape and texture in the final cake.

Tuesday, 22 November 2011

Apple, Spice and Chocolate Tealoaf - We should Cocoa


This month Chele has set the We Should Cocoa challenge, and she admits herself that it's a tough one. Keeping it seasonal, the choice this month is apples. Like I'm sure many other people have found this month, there seems to be a distinct lack of apples and chocolate pairings in recipes out there.


Many other fruits pair extremely succesfully with chocolate, including that other seasonal gem, the pear. But apparently not the apple. I really love apples - so many different types out there and so many subtle variations in flavour and texture, so easy to just grab and go, and forgiving of being (slightly) manhandled. But I think the thing about the pairing of apple and chocolate is the texture, well it is for me anyway. When I think of chocolate and fruit I think of the soft, luscious juicy fruit and the chocolate and quite often apples either remain slightly hard, or fall to mush, neither of which immediately appeal to me in combination with chocolate.


Which is my rather longwinded way of saying that this month I've chosen the fall back option, the safe recipe rather than pushing the boat out. There was something I had in mind (and I still want to make it, and still have it in mind) but I've run out of time this month, so it'll have to be postponed to a more leisurely time. This month's bake is both apple and chocolate, yet neither of them. Neither the apple nor the chocolate is the star here, but both contribute to the flavour and texture of the final cake.


My loaf is based on a recipe to be found on the BBCGoodFood website, for Apple and Spice Tealoaf. The apple is grated into the cake to provide moisture, and I added a chopped up 100g bar of (unusually for me) milk chocolate to the cake. I decided on milk as I thought it would complement the dried fruits and general sweetness of the cake better than my usual preference of dark chocolate. I think I chose well! The other substitutions I made were to use 100g raisins and 100g dried cranberries for the specified 200g dried mixed vine fruits, and I substituted the specified ground almonds for more plain flour. I also used 1 1/2 tsp mixed spice in place of cinnamon and nutmeg. The baking of the cake is slightly odd - 45 minutes at a higher temperature followed by 45 minutes covered with foil at a lower temperature. I didn't add the sliced apple topping, but I did follow the timings given. I found this slightly odd and although I'm sure it's to stop the apple topping burning, I'm not sure it did the cake any favours.


This is a very substantial cake. Once baked it felt very heavy for its size and I was concerned that it would be dense and dry. Thankfully not. The combination of the dried fruits and sweet milk chocolate was lovely, and it was a really good cake to enjoy at teabreak time at work I don't think it will become an everyday cake, it was nice, but nothing outstanding but it fulfilled the chocolate apple combo, and so I am going to submit it. For more details of We Should Cocoa see here.

Monday, 21 November 2011

Food Bloggers Unplugged


Having been tagged twice, by Kate at What Kate Baked and Suelle at Mainly Baking, for Food Bloggers Unplugged, I thought I had better get on and think of some answers. The idea of the ten questions is to learn a little more of the person who writes the blog and it was started by Susan of A Little Bit of Heaven on a Plate

So here are my answers....

1. What, or who inspired you to start a blog?
I clearly remember the first food blog I ever looked at - I was searching for a Nigella Lawson chocolate cake recipe that I knew I had seen in a book borrowed from the library, and wondered if I could find it online. I stumbled across A Spoonful of Sugar. It sort of went from there - I read blogs for a while, and then decided to take the plunge and start my own, with some trepidation - I wasn't sure I could keep it up, but three and a half years later I'm still here!

2. Who is your foodie inspiration?
I don't think I really have one foodie inspiration. I think lots of people and things influence me - other bloggers, television chefs, lots and lots really.

3. Your greasiest, batter - splattered food/drink book is?
I do try really, really hard not to splatter my books, but the prize here defnintely goes to Nigella Lawson's How to be a Domestic Goddess. I bought this book a very long time ago, after seeing it at my Grans and repeatedly reading it and wishing for my own copy. This was before Amazon and cheap supermarket books on offer so it was an indulgent treat. It was also before I started earning my own money! It has been well used and is a little spattered but it had a rather unfortunate meeting with a hot hotplate and was only rescued when we all wondered what the disgusting smell was.... it's never quite been the same since, but I still enjoy looking through it!

 
4. Tell us all about the best thing you have ever eaten in another country, where was it, what was it?
As a slight understatement, I am not an adventurous foodie. I have been lucky enough to go to some lovely places on holiday (although not far-flung exotics) but am never very adventurous. However, my stand out delicious dish was a pizza I ate in Bologna a couple of years ago. J and I had wandered down some back streets and came across a little restaurant. As we walked past we could see the wood fired oven in the kitchen and made a note to come back for dinner later. I had a pizza with the most sublime aubergine on it, which made me realise just how meltingly soft and delicious aubergine can be, and there was parmesan on my pizza too, which was amazing. I wish I were back there now!

5. Another food bloggers table you'd like to eat at is?
Hmmm, do I have to choose just one? I'd like to eat at Celia's table because everything she produces looks absolutely delicious and I'd love to be part of her family's conversations! But I'd equally well like to eat at Joanna's table, because her food all looks amazing too, and I'd love to verify that her bread tastes as fabulous as it looks (I'm sure it does). And who wouldn't want to meet Zeb?

6. What is the one kitchen gadget you would ask Santa for this year (money no object of course)?
Um, if money is really no object would Santa mind an entire new kitchen (to replace the nasty falling apart mess that currently masquerades as a place to cook) please? Or is that just too cheeky? Honestly, I'm not sure, I'm rubbish at asking for Christmas presents!

Random flower to break up my wordy post and remind me of lovely Italian holidays!

7. Who taught you how to cook?
I don't really do cooking; I do bake though. I picked up bits from my mum mostly and then just added other things myself.

8. I'm coming to you for dinner what's your signature dish?
See the answer to question 7! How do you fancy bread for your main followed by cake for dessert? I could run to spreading the bread with some really good butter though... I don't really think I have a signature dish I can be proud of!
 
9. What is your guilty food pleasure?
I don't think it's a guilty food pleasure, because I don't feel guilty, but I eat a lot of chocolate. And I really do mean a lot.

10. Reveal something about yourself that others would be surprised to learn?
When I was little I wanted to eat honey straight from the jar (well, via a spoon rather than Winnie the Pooh like) and my mum said I wouldn't like it. Well, I did and I do. Quite often. Actually this might have been a better answer to number 9 really mightn't it!

Best pizza ever!

I'm supposed to tag five other people now, but lots of the blogs I visit have already been tagged so apologies if you've already been tagged and please don't feel obliged to participate but I'd like to tag

Lou at Please Do Not Feed the Animals
Celia at Fig Jam and Lime Cordial
Joanna at Zeb Bakes
Katie at Apple and Spice
and... The Caked Crusader (whose identity shall never be revealed!)

Sunday, 20 November 2011

Top Teacakes - Short and Tweet


I love a good tea-cake; toasted, lavishly buttered and enjoyed with a good mug of hot chocolate on a chilly winter's morning, it's the perfect way to start the day. Well, we haven't got the chilly mornings yet (not that you'll catch me complaining about that - I hate the cold!) but that just means that I'll have to make these again when such mornings roll around.

This week's 'Short and Tweet' challenge set up by @EvidenceMatters was to make Dan's Top Teacakes, to be found on page 88 of Short and Sweet or here, from the Guardian Guide to Baking.


I'm really glad that these were chosen for the challenge because I probably wouldn't have got round to making them otherwise. After all, I have been meaning to make them since November 2007, so I obviously needed an additional push! I think it was the scale of the recipe that put me off them - there is only me here to eat my baking efforts (although actually, my colleagues might quite like these!) so any bread recipe requiring 600g flour in addition to lots of other add ins and three eggs is going to take me a long time to get through. I decided to make 1/3 of the recipe (recipe uses three eggs, hence not halving it!) and also decided to make the teacakes much smaller. The recipe says nine, but I got six out of my 1/3 recipe, so mine are half of the recommended size. Having said that, these are still substantial buns, the original size must be massive!


I followed the recipe pretty closely (for me) - my kneading wasn't quite spaced as Dan instructed and I probably left the dough for about 1 1/2 hours in total for the first stage, and then nearly two hours at the second stage after shaping. My kitchen wasn't very warm, so I decided that after an hour I would encourage them a little by very briefly preheating my oven, turning it off and sticking them in there. This technique worked well, and I'll do it again.

For the ingredients, I used white chocolate, not beef dripping, raisins (roughly chopped) rather than currants, as I often find currants either seedy or stalky (whichever, they sometimes have nasty crunchy bits in them) and then used 1/4 tsp each ground ginger and mixed spice for the spices. Then, out of necessity rather than choice I used chopped dried cranberries instead of mixed peel. I discovered a while ago that whilst I hate chopped mixed peel, I really quite like candied peel that you can chop yourself. Sadly I haven't seen any in the supermarkets this year, and I'm upset that they seem to have stopped stocking it. If anyone has seen any, please let me know otherwise I'll have to investigate making my own!


I baked at 200C rather than 220C, (Gas 6 rather than Gas 7) because I always find these sweet, fruited breads colour too quickly when I bake at such a high temperature. That is also the case here, the buns are darker than I like, perhaps next time I'll try Gas 5. To compensate I baked for 20 minutes, turning the buns upside down after 15 minutes to brown the bases. It just means that they'll only need toasting on one side!


They're very tasty buns, but I do wish I hadn't darkened the crusts quite so much, I'm not a fan of dark crusts on sweet breads. The spice is very subtle, next time I might increase this a little more. The texture of these isn't the same as shop bought tea cakes, which are very light and fluffy. These are denser, but in a good way - after all, you need a good weight of bun to hold the melting butter and these are just right... There is plenty of fruit in the buns which is a good thing in my view, but again, I wish I had been able to get some mixed peel, there's just something delicious about the contrast of the slightly bitter mixed peel, the sweet bun and the rich melty butter.... mmm, melting butter!


Thanks to EM for picking these, and also to Jo for saying how lovely they were, without both of these prods to make them, I probably would still have left them.

Sunday, 13 November 2011

Buttermilk Oatcakes - Short and Tweet


Again, I'm only just going to get my post up before the Sunday 6pm deadline!

These are the second item I've made from Dan Lepard's new book, Short and Sweet, for the challenge set up by Evidence Matters on twitter and the Short and Tweet blog. Check it out for more information.

This week there was a choice of recipes, we could make either the cheese and black pepper buttons (p258) or the buttermilk oatcakes (p259). Or both of course! I chose to go with the buttermilk oatcakes, I can't find a recipe for them online, but if you fancy making the cheese and black pepper buttons, you can find the recipe here. This was a good challenge because I'd never have made these otherwise, and would have missed out on a good recipe, very quickly made yet pleasing and impressive.

The method involves grinding oats to oat flour/powder in a blender (I love this step, it's so satisfying!) and then mixing the flour with bicarbonate of soda, a little sugar and salt, a little butter and buttermilk or low fat yogurt to mix to a paste. I used low fat yogurt because that's what was in the fridge! These were really quick to pull together, and would be very impressive to serve guests with a cheese board - they need never know that you hardly had to put any effort in at all!


My oatcake dough was really quite soft and sticky, I'll be interested to find out how other people found it. I baked for the specified 25-30 minutes until they were starting to go slightly brown round the edges. The finished oatcakes were still quite soft in the middle, rather like a soda bread type texture rather than the crisp oatcakes you can buy from the shops. Not unpleasant at all, just not quite what I was expecting, although given the combination of yogurt and bicarb, plus the softness of the uncooked dough, I'm not sure why I was expecting them to be crisp!


They are actually quite sweet on their own, which surprised me, because for the half batch of dough I made, I only added 10g of sugar (recommended amount 15-23g). I'm quite pleased with them, because although they will go well with cheese and chutney, they will also be tasty on their own, and I do rather love the taste of oats. I think if you're a fan of porridge you'll like these, because the flavour is the same, but don't be put off if you don't like porridge - these are obviously biscuit texture, not soft and sloppy!!! I made 19 small oatcakes from half a batch.

I hope I manage to make next week's top teacakes, but I may well run out of time!

Thursday, 10 November 2011

Vegan chocolate banana brownies


After making Dan Lepard's banana muffins last week, I had some very ripe bananas left over and wanted to find a home for them. A standard banana bread wasn't appealing to me so I decided to search for brownie recipes.
I was very happy to discover that a book I already owned (Vegan with a Vengance) contained a recipe that someone else had adapted, and that I have adapted further. Thanks to Sara at the Veggie Eco Life for posting this delicious recipe!


Chocolate banana brownies
Ingredients
120g 70% cocoa chocolate (I used Lindt)
30g dairy free margarine (Pure Sunflower here)
1 tbsp light olive oil
2 large very ripe bananas, mashed
220g caster sugar
1tsp vanilla extract
90g plain flour
25g cocoa powder
1/4 tsp bicarbonate of soda
Method
- Melt the chocolate (I actually did mine over a pan of hot water, because I had different thicknesses of chocolate and wasn't sure about using the microwave for it - the irony of using a Lindt chocolate bunny for making vegan brownies hasn't escaped me...). When melted stir in the margarine until melted. Leave aside to cool for a bit.
-  Combine the mashed banana, vanilla extract and olive oil in a large bowl. Add the sugar and beat well to combine. The mixture will be very runny.
- Sift in the dry ingredients and then continue to mix until all combined. The mixture will now be much thicker.
- Spoon into the prepared tin and bake for 40 minutes. A cocktail stick/toothpick inserted will not come out clean.
- Allow to cool a little and then turn out.


Baker's notes
- I used my bundt tin (another idea from Sara), and lined it as best I could. I'm glad I made the effort because these stuck like anything to the tin, which was annoying! The brownie did come out in one, but wouldn't have had I not lined bits of the tin. It then broke up. D'oh!
- I reduced the sugar from the original recipe but these are still very sweet!

Deliciously chocolatey. It looked like the edges had risen up and baked more quickly than the middle, which appeared a little sunken. No matter, this made the brownie all squidgy and delicious with a fairly substantial chewy crust - just how I like my brownies. One of my colleagues said that she was surprised by how banana-ry these were, even though they were labelled 'Banana Chocolate brownies'. Something to do with not expecting the banana flavour, what with them being chocolate coloured! They were pronounced generally delicious.


Grateful thanks to Sara at the Veggie Eco Life for bringing this recipe to my attention. The original recipe calls for a topping layer, and I would never have thought to adapt this to miss off the topping. I think this is another of the occasions where lack of pictures in a recipe book means that I would otherwise have missed a really good recipe. I would definitely make these again, and next time I might try them in a more standard shape tin.

Baker's confession: I scraped all of the stuck bits off the tin and popped them straight into my mouth when no-one was looking. Mmmm, stolen bits!

Sunday, 6 November 2011

Dan Lepard's Olive Oil Potato Flatbread - Short and Tweet


Short and Tweet is a new baking challenge being set up by Evidence Matters. There is a new blog dedicated to short and tweet here, check it out. I'm going to be fairly brief here, largely because I need to post this soon if I'm going to make the 6pm deadline for entering the challenge!

The idea is that a group of people make the same (nominated) recipe out of Dan Lepard's recently released book Short and Sweet so that we can all compare notes on how it has gone. There isn't an obligation to opt in or to join a group, and this suits me perfectly because although I want to make lots of the recipes in the book, there will be some I have already made and don't want to remake, weeks where time just runs away with me, and other weeks where the ingredients of the recipe just don't appeal or I can't substitute the nuts for something else because the recipe depends on them.


Thankfully, this week was something I really, really wanted to make, and have done for ages. I think this was first published by Dan in the little booklet that was given away with the Guardian one Saturday four years ago. I still have my paper copy of this booklet, well thumbed and in danger of falling apart so it's a good job that it's still available online, here! The recipe we are using this week is here. The only difference is that the recipe in the book has 50ml less water.


I was worried about making this dough for a number of reasons - last week I made bread that turned out like a house brick and was worried that my yeast was having a sulk and wouldn't work. I wasn't too concerned about the softness of the dough - plenty of olive oil is always helpful, and in this case adds to the flavour of the bread.


After I tipped my bread onto the baking tray and pushing it out as far as I could, I left it about 15 minutes to relax and then stretched it further. I don't think I went nearly far enough though, because mine is less of a 'flat'bread - the clue should be in the title, and mine is pretty puffy really! I added dried rosemary to half of my loaf because I cannot countenance making a foccacia style loaf without at least some of it being rosemary flavoured - I just love it, and the way that the olive oil and rosemary complement each other.


Baking notes:
- I used a splash more water to get my dough to come together and was concerned that it would be too dry to do the folds specified in the recipe, but all was well, and the folding worked well.
- Next time I would bake at gas 7 for only 10 minutes and complete the rest of the baking at the lower temperature - my loaf browned very quickly indeed, and I had to cover it with foil to stop it burning during the remaining time, which isn't ideal really.
- As I cut into my loaf I thought of the foccacia challenge on the Great British Bake Off this year, and how Paul Hollywood cut into the contestants loaves and pronounced them too dry or that they had added too much flour, or that the crumb structure was too tight and close without the characteristic air holes. I'm pretty proud of my loaf - all of the folding must have really helped to create a lovely light open structure with lots of the desired air bubbles!


I'm sure there will be lots and lots of loaves out there, but I've seen Joanna's leek rarebit version over at Zeb Bakes, and it looks gorgeous. I can't wait to see all the different loaves and how everyone found working with this dough. The little piece I've tried already was delicious - chewy and moist, I think my bread will be perfect for lunches with lots of roasted med veg, yum, I'm looking forward to it already!

Saturday, 5 November 2011

Honey not-nut raisin banana muffins


These are Dan Lepard's recipe from his fabulous series How to Bake (from which the recipes in the recent Short and Sweet are taken), published last week. I was lucky enough to be able to find some relatively ripe bananas in the supermarket so I was able to make them straight away.


As a no-nut person, I substituted the nuts for 100g raisins. Luckily I like raisins (well, obviously, otherwise I wouldn't have put them in) because I do like to be able to substitute something to provide the textural contrast that the nuts would have done. The texture of raisins is obviously soft and chewy rather than crunchy like nuts, but I like this in my muffin, and to my mind, raisins are a great flavour combo with bananas, cinnamon and honey.

As I followed the recipe as written, aside from the aforementioned substitution of 100g of raisins for the specified 125g nuts and the use of light olive oil rather than sunflower so I will leave you to find the original recipe and method here. I used a fairly bog-standard runny honey.


These smelled very strongly of cinnamon while they were baking, and they weren't massive movers in terms of rising. They did rise, but are a wholesome muffin, more suited to breakfast-on-the-run rather than a cake to be eaten daintily with afternoon tea. I'm sure though, that this was the intention of the recipe, and for this purpose it suceeded entirely. I didn't really taste the honey in them, but then I did use a very mild honey, and the raisins were a good substitute for the nuts, providing little bursts of sweetness and juiciness in the muffin. Yum.

A good recipe for muffins as a substitute for breakfast, but not as a light and airy treat.

Tuesday, 1 November 2011

World Vegan Day - Vegan Chocolate Cupcakes


Disclaimer - the little sugar rose is sadly not vegan - I forgot to buy vegan-friendly decorations and since most of my recipients are not vegan I guessed they wouldn't mind!

Well, the clue is in the title - these are indeed vegan chocolate cupcakes to celebrate world vegan day, which is held each November 1st, to celebrate the founding of the world's first vegan society in 1944 by Donald Watson. Information shamelessly taken from the homepage of World Vegan Day. Check it out for more information! World vegan day has only been going since 1994 though!


I am not vegan, I am not even vegetarian (although the frequency that meat or fish appears on my plate is vanishingly small!) but I am a complete magpie - I like to be able to pick and choose the things that appeal to me most. October has just been VeganMoFo, a celebration of the massive variety of amazing vegan food produced and eaten by a talented, imaginative and committed group of people. VeganMoFo, the Vegan Month of Food is designed to showcase whatever the person blogging wants to talk about, as long as it's vegan. One of my favourite vegetarian blogs, Johanna at Green Gourmet Giraffe has been participating in MoFo this year, and she has produced some amazing things, as have so many other blogs I regularly read. The massive commitment here comes because the bloggers commit to posting either every week day, or every single day of the month. There really are so many inspiring blogs out there!


But anyway, back to the task in hand, vegan cupcakes. I bought Vegan Cupcakes Take Over the World (VCTOTW) quite a while ago mostly because I was annoyed that so many people were raving about recipes that I couldn't access (mostly on the Post Punk Kitchen forums) and I wanted a bite of the cherry (cake!) too...

These are the first cupcakes I've made from the book, and as luck would have it, one of the only three cupcake recipes on the PPK blog. It's a really interesting little book, with loads of different ideas that I definitely need to explore further. You can find the recipe here, with the original US cup measurements, but because I prefer to weigh I will give my measurements here. I will leave you to link for the method.I also used the melty chocolate ganache on pg 143 of the book rather than the choc mousse topping given in the link (though that does look particularly delicious!). I made a couple of minor amendments to suit what was available in my storecupboard.

Vegan Chocolate Cupcakes
Ingredients
225ml soya milk
7ml white wine vinegar
150g white caster sugar
70ml(g) light olive oil
1tsp vanilla extract
1/2tsp chocolate extract
125g plain flour
30g cocoa powder
3/4tsp bicarbonate of soda
1/2tsp baking powder
1/4tsp salt

Oh yum! These are fabulous. They are so soft, light and moist and with such a deep, rich red chocolatey colour and aroma that you couldn't fail to be pleased by them. The topping was amazing too - it was just sweet enough, and stayed soft and slightly gooey sticky, and really complemented the cupcakes very well indeed. A tiny, minor point is that personally I found the cake a touch sweet, but other colleagues commented that it wasn't too sweet - opinions obviously vary!


Once again, as with my avocado chocolate cupcakes, I was really impressed by the dark red colour of these cupcakes and work colleagues seemed to like them too. I had a recipe request from someone who prefers to avoid eggs and my lovely vegan colleague was really pleased that I had made cupcakes that she could have, and I was thrilled that she enjoyed them.

I think these could definitely become one of my go-to recipes - the method is easy because you don't have to soften butter or do any creaming step, and there is no worry that the eggs will curdle the mixture. All of the ingredients are storecupboard, even the milk, as it is easy to buy long-life cartons of soya milk, so there is never any excuse to not be able to whip up a batch.

As I said earlier, I'm not vegan, but these are seriously amazing cupcakes, and more fool you if you skip making them because you aren't willing to accept alternative ingredients!!!  

LinkWithin

Related Posts Plugin for WordPress, Blogger...