Friday 30 September 2011

Random Recipes - Apple Snow with Yogurt and Oatmeal


I was determined to participate in random recipes this month hosted as ever by Dom from Belleau Kitchen. As an avid magazine subscriber I have piles and piles of them, and couldn't even begin to think about picking a recipe. But then I remembered my blue folder.... In days gone by when I was more organised (and had fewer magazines) I'd eventually get round to cutting out the recipes I fancied (and some that I didn't) and sticking them onto A4 paper, held in the aforementioned blue file.

However, I had a habit of cutting out not only the recipe I really fancied, but the ones I thought I might fancy at some point in the future (when I had lots of money/access to super-fresh seafood/a hugely carnivorous OH/a family of eight to feed) so there are many recipes in there which  I actually don't fancy at all! In addition, if there was a feature in a magazine on, for example, the food of Sicily, I'd clip the whole lot out, to avoid having to either decide what to take out or because I was feeling lazy with the scissors and glue!


So it was with some trepidation that I opened this file (nothing has been added to it for about five years...) and was very pleasantly surprised to find that I would be making apple snow with yogurt and oatmeal, which is a Nigel Slater recipe from the Sainsbury's Magazine in the early 2000's. Not only did it appeal to me, it was simple to make and in season too! Nigel suggests serving this as a dessert, and mentions how pleased he is to find a dessert without added sugar. I agree, but would also suggest this as a lovely refreshing breakfast.

With only three ingredients I thought it only fair to stick to the recipe as closely as possible.


Apple Snow with Yogurt and Oatmeal
You will need 2 medium apples per person, 60g thick sheep's milk yogurt and 1 tbsp of medium oatmeal.

Score lightly around the centre of the apples and roast in an oven set to gas 6/200C for around 35-40 minutes depending on size of apples and their variety. The scoring stops the apple exploding! When they have a fluffy midriff and are soft, remove from the oven, and when cool enough to handle, scrape out all of the flesh, mash with a fork and leave to cool. Chill thoroughly in the fridge.

Meanwhile, toast the oatmeal until it starts to colour and smell nutty and toasty. Using little glasses, Nigel suggests Moroccan tea glasses, spoon in the apple fluff and then top with the yogurt. Sprinkle over the oatmeal and eat straightaway - the suggestions are either to take a little of each layer, or to mix into an apple-yogurt fool.


I used coxes apples for this and the beautiful pink blush on the skins transfered to the flesh during the baking, giving my apple snow a rosy glow. I haven't had sheep's milk yogurt for years, but it was fresh and tasty and the combination of sweet apple, refreshing yogurt and toasty oatmeal was a definite winner for me. Sorry you've had to wait until the very last minute for my submission to your event Dom, but I'm glad I made it!

Tuesday 27 September 2011

Sticky Blueberry Jam Bread - Breakfast Club #15


Well, I've called this a bread, mostly because it's a yeasted dough, but it actually tastes far more like cake to me! Which is great, I get to eat cake for my breakfast if I make this bread mmmmm, cake!


I blame the whole thing (quite happily though!) on Celia at Fig Jam and Lime Cordial, who, months and months ago, posted a recipe and method for an absolutely amazing looking blackberry crown. She was fortunate enough to be given some delicious homemade blackberry jam by a kind friend and wanted a fitting way to use this gift. So her blackberry crown bread, inspired by the presentation of a recipe in Dan Lepard's The Handmade Loaf and using a recipe for a sweet dough by Richard Bertinet, was born. And I was in love! (Hop over to the recipe, look at the last picture of the cut bread and tell me you don't want to eat it - I won't believe you!)


Time passed, as it does and then when Helen at Fuss Free Flavours announced that this month's Breakfast Club theme was conserves, I realised that the time to make this bread had arrived. For the genius of this loaf is that you don't need to put the conserves on the loaf for they are already contained within the loaf, clever no?! Although additional butter and jam wouldn't go amiss when eating this for breakfast.This month the event is being hosted by Sonia's Kitchen.


I halved the recipe as given and am giving the amounts I used below:

Basic Sweet Dough
Ingredients
125g full-fat milk
1tsp instant yeast (although the original recipe specifies fresh)
250g strong white flour
30g unsalted butter, at room temperature
20g caster sugar
5g salt
1 large egg

Method
- Pour the milk into a pan and warm to body temperature.
- Mix the yeast into the flour, distributing evenly and then rub in the butter.
- Mix in the sugar and salt, then add the eggs and milk.
- Continue with your usual method of kneading (I favour Dan Lepard's method of using oil on the work surface and not kneading all that much) leaving the dough until it has doubled in size.

To make the loaf
Jam of choice and matching fruit - I chose blueberry, but I think raspberry would work well, along with Celia's choice of blackberry, or even perhaps cherry.

Pinch off pieces of dough - from memory I think I used pieces 50g in size and used nine altogether. Form into balls and then flatten out, forming a little pocket. Add a small amount of jam and pinch the ball back into shape. As you finish shaping the balls, pop them into a greased small loaf tin (I used one that is smaller than a 1lb tin, but had some dough left, with which I made some little rolls) and layer them up with light muscovado sugar and fresh blueberries. Sorry, I didn't really measure the amounts of these, but a light sprinkle of sugar and as many fresh berries as you fancy. Check out Celia's post for how much she used.


Confession time that I forgot to note how long I cooked this loaf, but as Celia points out, it is high in sugars, both added and natural from the milk in the loaf, so a lower temperature than normal is needed. Celia suggests starting at 200C/Gas 6 for 10-15 minutes and then dropping the temperature to 175C/Gas 3-4 for a further 20-30 minutes, and I am sure I followed her advice. Keep a beady eye on this loaf because it would be a shame to allow it to burn.

Remember that the jam/blueberries will be scorching hot when the loaf comes out, burning in only the way hot sugar can - ouch! It was very sticky underneath too - mmmm, sticky! I had to take quite a few shots to get one where there was more bluberry in evidence....


Oh boy am I ever glad I made this loaf. It lived up to and exceeded my wildest bread-y dreams. So soft, so light, and ever so delicious. I really must make this again soon. I haven't eaten much brioche in my life (another thing to recify!) but to my mind this was soft and cakey like a brioche, but without nearly so many eggs or as much butter or sugar. It was, however, perfectly sweet and buttery for me, and I love the idea that I'm eating cake for my breakfast. I would urge you to give this a go - it's fabulous!

I am also submitting this to Jac's Bookmarked Recipes event, hosted at Tinned Tomatoes. This was bookmarked from Celia's blog, Fig Jam and Lime Cordial, and also from its original source, Dough by Richard Bertinet.

Saturday 24 September 2011

We Should Cocoa - Chocolate Peanut Butter Mega Flapjack


We should cocoa is one! Happy Birthday! To celebrate the first birthday of the best chocolate blogging event out there, Chele at Chocolate Teapot has invited us all to create a tasty chocolate treat that we would like to see at the virtual first birthday party. I can't believe it's been a year since the first we should cocoa was announced - how time flies. I do remember being very excited about the challenge though, and very pleased that the first ingredient was raspberries - I love raspberries and made them into this delicious cake.


It took me a while, but I eventually decided on these flapjacks. I think they'd be great to take to a party - lots of other people have made cake for the party so I fancied something a little different. This recipe is based on Dan Lepard's Halva flapjack, a recipe I have seen lots and lots of bloggers making. You can find the original recipe here. I'm still not sure about using tahini so I decided to adapt the recipe to suit what I had available (hello ginormous jar of peanut butter) and what I fancied eating (mmm, cranberries and chocolate). Dan says that the use of tahini in this recipe allows less butter to be used and that when heated tahini goes fudgy. Now, clearly tahini is made from sesame seeds and peanut butter from peanuts, but both seeds and nuts are high in fats and have the same sort of paste consistency so I was hoping that using PB wouldn't lead me far wrong with the recipe.


Foodycat noted that the recipe needed to be cooked for longer than Dan stated and that hers was still very gooey in the middle after the stated time. She also recommended using the full amount of oats. So with these recommendations in mind, here is my adapted version of Dan's original recipe.

Chocolate Peanut Butter and Cranberry Flapjack
Ingredients
100g butter
75g light muscovado sugar
200g condensed milk
75g peanut butter (mine was a crunchy 100% peanut version)
50g honey
100g dried cranberries
100g chocolate, chopped
225g oats

Method
- Grease and line an 8"/20cm square tin with baking parchment. Preheat the oven to gas 4/180C.
- Melt the butter, sugar and condensed milk in a saucepan until hot and the sugar has dissolved.
- Remove from the heat and add the PB and honey and then the dried cranberries. Mix well.
- Add in the oats and mix fairly well, then add the chopped chocolate and mix until everything is evenly distributed.
- Spoon into the prepared tin, smoothing the surface and bake until pale golden. Dan states 15-20 minutes, I found mine needed at least 30.
- Remove from tin and allow to cool, but cut whilst still slightly warm if possible.

Notes
- I added the chocolate along with the oats rather than earlier to stop it all melting into one chocolate blob. This way I reckon the oats have taken the heat out of the mixture. But don't hang around while you're mixing it.
- I cut mine when cold and it was still soft enough to do this.
- My house smelled deliciously of hot peanut butter and chocolate while these were cooking. A particularly delicious combination...


Wow, these were fab! They were lovely and fudgy in the middle and the combination of chocolate, peanut butter and dried cranberries was like eating a particularly decadent version of one of my favoured sandwiches, peanut butter and jam. Mmmm! The cranberries were great at providing just a little tartness and the chocolate was, well, chocolate - i.e. delicious! I will make these again and wish I had made them earlier! I think that they would be particularly good at a party (especially if you want to pretend that the oats are good for the little children attending!) so although they're not flashy or over the top, they are my submission.

If you want to see my other submissions to We should Cocoa here they are:
September - Chocolate raspberry cake (raspberries)
December - Chocolate date crumble bar (dates)
January - Chocolate box cake (leftovers)
February - (tea)
April - (marzipan)
July - (apricot)

Hmm, must try harder this year to complete all the challenges! Can't wait to see what's in store for us all!

Monday 19 September 2011

Chocolate yogurt cake


When Suelle recently posted her Chocolate and Marzipan Yogurt Cake I was instantly taken with it - the flavours sounded delicious and the texture of her cake looked fabulous. I really wanted to try it out. Well, I can't think what I did wrong - I must have missed something vital out of the recipe or changed something without realising what kind of impact it would have, but my first attempt was an utter disaster. Totally. I am entirely to blame for this, as I trust Suelle's recipes and know that I did make some changes.

I couldn't quite believe that it was such a disaster though, so in the interests of fairness to the recipe I made it again, verbatim to Suelle's recipe. Yay, complete success! So I don't know what went wrong the first time, but I do know that this is a very workable recipe and I'm very glad I gave it another go - I would have hated to have wrongly written it off.


This cake is made with low fat yogurt and oil rather than butter, inkeeping with Suelle's current baking of low saturated fat recipes. I'm sure I've said before how surprised I am with the variety of different oil based recipes out there - and this is one of them.

For the original post please visit Suelle's blog here.

Chocolate yogurt oil cake
Ingredients
170g plain flour
30g cocoa
1/2 teaspoon salt
2 teaspoons baking powder
100g caster sugar
100g light muscovado sugar
250g low fat yogurt
110g light olive oil
3 large eggs
1/2tsp chocolate essence (optional)
150g plain chocolate (72%), chopped coarsely

Method
- Preheat the oven to gas 4/180C. Grease and line an 8" (20cm) springform tin.
- Weigh the flour, cocoa and sugars into a large bowl, add the salt and baking powder and mix well to combine.
- Measure the yogurt into a jug/bowl and beat in the eggs. Add the oil and chocolate essence if using and whisk to roughly amalgamate.
- Mix the wet ingredients into the dry and when well combined mix in the chopped chocolate.
- Spoon into the prepared tin and bake. Suelle says 50 minutes, but I found mine took a bit longer than this to be done. And then I probably left it in a bit longer again because I kept forgetting that finding a piece of molten chocolate always makes a cake look less done!

I must remember next time to use a different chocolate - I used Green and Black's 72% cooking chocolate. It doesn't tend to reharden very well after cooking, remaining quite soft, so I want to try something different next time. Tastes good though!

Verdict - I'm very glad that I managed to make this successfully! It was a very moist cake indeed. It wasn't the most chocolately cake I've ever made - I suppose this is a function of the oil rather than butter which would provide a flavour I'm more familiar with. I think that the olive oil here gives a completely different texture to the soft, tender crumb of a cake made with butter. It seemed somehow sturdier and although it smelled absolutely fabulous when I took off the lid of its storage tin (the chocolate essence!) the depth of chocolate flavour wasn't quite there.

However, having said this, some of my colleagues really, really loved this cake, and all of them enjoyed it, so a definite success and good to have a wide repertoire of cakes to be able to make for all situations. Thank you Suelle, for bringing this one to my attention!

Saturday 17 September 2011

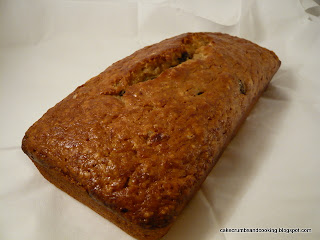
Banana bread - simplest ever?


I spotted this recipe in the current issue of the Waitrose Kitchen magazine and was pleased to have a home for the two bananas that were threatening to overwhelm me with banana-smell every time I entered the kitchen. I don't really know why I bought them in the first place - I went through a phase (a very long one, a couple of years probably) of having a banana every single day for breakfast (yes, I'm very much a creature of habit). But I've recently moved on from bananas to apples. Don't know how long this phase will last... anyway, it meant that my bananas had moved from ripe to the almost-beyond-edible stage that is perfect for baking.

The original recipe is here, but I adapted it because I obviously didn't want to put walnuts in there (hello raisins) and I didn't have soured cream. In all honesty I cannot remember what I substituted in the place of the soured cream. I have a feeling that it was most likely to be yogurt, but perhaps milk. Rubbish memory!


Successful though, and I'd make this again. Waitrose called it 'Simplest ever... banana bread'. I'm not sure I quite agree with that - in the absence of a food processor I rubbed the butter into the flour but it certainly wasn't difficult in any way. I opted out of the specified cream cheese topping on the basis of keeping qualities, and also I happen to love the way that banana bread becomes moist and sticky on the top after a couple of days. Mmmm, sticky!


Banana bread
Ingredients
75g soft butter, cubed
175g plain flour
1 tsp baking powder
125g caster sugar
2 tbsp yogurt/milk
1 large egg, lightly beaten
1 tsp vanilla extract
2 small, very ripe bananas, peeled
50g raisins

Method
- Preheat the oven to gas 4/180C. Grease a non-stick 2lb/900g loaf tin with butter and line with baking parchment.
- Place the flour and baking powder in a bowl and rub in the butter until the mixture resembles breadcrumbs. Add the sugar.
- Combine the yogurt/soured cream, egg and vanilla extract in a small bowl/jug and add the bananas, mashing them until all well mixed.
- Add the wet ingredients to the dry and mix well until combined. Add the raisins and mix in.
- Pour/dollop into the prepared tin, level the surface and bake for 40-45 minutes until risen, golden and a skewer inserted into the middle comes out clean.
- Allow to cool on a wire rack.

It's a fairly shallow loaf, which is just a reflection of it being a fairly small amount of ingredients, I wasn't expecting a massive rise. I guess you could make it in a smaller tin if the shallow-ness bothers you. It was nice and moist and the raisins had plumped up well during cooking. I had forgotten how nice banana bread is, and especially with raisins in it, providing a textural contrast and a hit of fruity sweetness.

Tasty - yes. Make again - yep, probably. Well received with colleagues - happily yes! A success all round really then.

Sunday 11 September 2011

Summer into Autumn Fruit Cake - Nectarine and Blackberry


No, not a dried fruit cake at all, not even with exotic fruits (though that's an idea... dried cranberries, pineapple, papaya, apple, pears hmmm, don't use those much). Anyway, sorry, back to the fruit cake here, a cake with summer fruit in it.

Yes, it's now autumn, but the last of the summer fruit is still available and affordable at the supermarkets (plus this is an adaptable cake!) and I made this one ages ago and am determined to get it posted before all the fruit has gone! The recipe was published in BBC Good Food in the August 2011 issue, and I made it shortly after it came out, so the end of June!!! Just how behind am I on some of these cakes?!


There were a number of options given; plums (would still be fab!), blackberries (equally, see it needn't be a summer fruit cake!), peaches, or blueberries.

I decided to mix and match and had half blackberries and half nectarines. You can find the original recipe here on the BBC Good Food website, which I stuck to pretty closely aside from not making the drizzle for the cake after it came out of the oven.

The cake was successful in that I chose to put the fruit in two distinct layers, blackberries lower down and nectarine further up and the fruit stayed put, which was good. The cake was nice enough, but not anything particularly spectacular. I did discover that I don't really like blackberries in cake that much though - the seeds are too hard and crunchy and prominent. The nectarine layer was much nicer! I would either double up on the nectarine or use a mixture of nectarines and blueberries next time perhaps. My cake didn't have as pleasing an appearance as the ones pictured in the magazine, which have a very close crumb and smooth, pale tops. Ah well. Tasted fine, which is what really matters.

Tuesday 6 September 2011

Roast Butternut Squash and Rosemary soup - No Croutons Required


I always intend to enter No Croutons Required, the vegetarian soup/salad challenge run by Jac at Tinned Tomatoes and Lisa at Lisa's Kitchen. This month the theme is using an ingredient grown in your garden. I have to confess that really, the only thing that grows in my garden is weeds, so I'm really hoping that this soup can still be included. Aside from the weeds, the only surviving culinary plants (fruit bushes aside) are some hardy herbs. I have successfully managed to not-kill a rosemary, mint and I think even some oregano. I know that killing mint is pretty much impossible, but I'm still proud of myself.


For this challenge I decided to use the rosemary, here it is in all its glory..... As autumn is approaching and chilly days and evenings are going to be upon us all too soon I have decided to embrace this change of seasons and am using butternut squash. Even though this wasn't grown in my garden, it came from my local vegetarian co-op where they source all of the produce as locally as possible, so along with the tiny red onion, my squash may have travelled further than from my back garden, but it hasn't crossed an ocean to get to me!


I decided to adapt an idea I saw in a relatively new purchase, Hungry? by the people who sell the Innocent smoothies, veggie pots and juices. I still haven't looked at this book properly, but one of their suggestions for soup is a butternut squash with cinnamon and a touch of dried chilli. I liked the idea of the cinnamon complementing the soup and a  little chilli to lift it. Instead of boiling up the butternut, I chose to roast it (at the same time as baking a cake!) to bring out the natural sweetness and allow the rosemary to impart its flavour to the squash.


Roast Butternut Squash and Rosemary Soup with Chilli and Cinnamon
Ingredients
1/2 small butternut squash
tiny red onion
1 sprig rosemary
olive oil
about 250ml vegetable stock
pinch cinnamon (or to taste)
pinch dried chilli (or to taste)

- Roast the butternut squash with onion and rosemary tossed with olive oil until tender.
- Move to a small pan, add the stock, cinnamon, chilli and blitz to a smooth soup.
- Season with salt and black pepper to taste and reheat until piping hot.
- Serve with bread.


A perfect lunch for the chilly weather that lies ahead. I think some people would laugh if you knew how much (little!) chilli I had added, but I could tell it was there! The cinnamon was more of a scent than a flavour, but overall this was a lovely soup!


Saturday 3 September 2011

Squidgy chocolate squares - unconventional brownies


I really fancied a rich chocolate square, brownie like but not a brownie, if that makes sense. After some hunting I came across this recipe for vegan brownies on allrecipes.co.uk and it seemed to fit the bill.

As usual, I adapted the recipe slightly, un-veganising it (sorry!) to include some butter (I'm sure it would work really well as stated though!) and halving the recipe. I made it in an 8" square tin, but next time I think it would be better in a smaller tin, to make a thicker square.


Squidgy chocolate squares
Ingredients
125g plain flour
175g demerara sugar
32g cocoa powder
1/2tsp baking powder
1/2tsp salt
125ml water
62ml light olive oil
62g butter, melted
1/2tsp vanilla extract (or 1tsp if not using chocolate essence)
1/2tsp chocolate essence (optional)

Method
- Preheat the oven to 180C/Gas 4. Grease and line an 8" square tin, or a slightly smaller one for thicker squares, but be prepared to adjust baking time.
- Mix flour, sugar, cocoa powder, baking powder and salt in a large bowl.
- Add the water, olive oil, butter, vanilla extract and chocolate essence if using.
- Mix well, pour into prepared tin and level.
- Bake for 25-35 minutes, depending on how squidgy you want the middle! (I think mine took about 35 minutes)
- Allow to cool, and very, very carefully remove from the tin. I wasn't careful enough and mine broke, but they were still delicious!


I really enjoyed these - they were deliciously fudgy and gooey in the middle - fabulous! I think next time I'll try them with either light or dark muscovado sugar or perhaps half and half of each, to add a little more depth of flavour to the sweetness. I might also add some chocolate chunks or some dried cranberries too, but wanted to make the recipe as stated first time round to make sure it wasn't a complete disaster!

LinkWithin

Related Posts Plugin for WordPress, Blogger...