Showing posts with label review. Show all posts

Thursday, 4 July 2013

Chocolate Cashew Cookies

Chocolate Cashew Cookies

I was recently contacted and asked if I would like to take part in the Aero Perfect Pairing challenge. With the offer of Niki Segnet's book 'The Flavour Thesaurus - Pairings, recipes and ideas for the creative cook' I was definitely in. The book arrived along with a big bag of Aero's Chocolate Orange bubbles (which I didn't manage to get a picture of) and a bar of Aero mint chocolate. 

I made some chocolate orange cupcakes using Nigella's Storecupboard Chocolate Orange cake recipe (one of my standby recipes) and topped them with some chocolate frosting and the chocolate  orange balls. Unfortunately, making cakes in the morning before work isn't really conducive to having enough time to allow them to cool, so they were still warm when I put the chocolate frosting (which was itself still warm and runny) on them and the chocolate orange bubbles kind of melted. Sorry, no pictures!


I have to confess that I wasn't quite sure which flavour combination to go for - I wanted something I thought would work, but which isn't too widespread and well known. The brief stated that the recipe didn't have to include either Aero or chocolate but being a bit of a chocoholic, I decided that I would include dark chocolate in my recipe. 

A cookie recipe that I'd bookmarked ages and ages ago from the Hungry Hinny sprang to mind as being an interesting one in which to incorporate different flavours. The recipe is for cream cheese cookies and doesn't use egg at all. I increased the amount of flour slightly and hope that the Hungry Hinny doesn't mind me reproducing my attempt at these cookies. Very unusually for me, I made these by hand - only a bowl and spoon required - no need to make washing up and use the stand mixer!

Creamed butter and cream cheese

Chocolate Cashew Cookies
Ingredients
85g cream cheese (I used full fat Philadelphia)
85g butter, melted and cooled slightly
1 tsp vanilla extract
105g light muscovado sugar
150g plain flour
1/2tsp bicarbonate of soda
1/2tsp salt
30g cashews, roughly broken/chopped
50g dark chocolate, in small chunks

Method
- Preheat the oven to 160C. Line two baking trays with parchment paper.
- Beat the cream cheese until softened, then add the melted butter and vanilla. Keep beating - it will turn from curdled looking lumpy mess into a beautifully smooth batter (I had serious doubts when I saw the initial mixture but it all turned out fine). 
- Beat in the sugar and then the flour, bicarbonate and salt until a dough forms.
- Fold in the cashews and dark chocolate. 
- At this point I ignored the instructions to leave for 30 minutes to chill and just dolloped small blobs onto the lined baking tray, spread well apart. (For my mixture putting it in the fridge didn't really seem to make much difference - I put the rest of it in the fridge while the first batch of cookies were baking, but actually preferred that first batch slightly - the second batch appeared 'grainy' - no idea why)
- Bake for 15 minutes until very light brown. Allow to sit for around 10 minutes once removed from the oven to make it possible to transfer them to a wire rack (they'll be very soft once they come out of the oven).
I made 22 cookies from the mixture.

Soft cookie dough

Verdict? Actually, personally I wasn't all that keen on this cashew chocolate combo - I couldn't really taste the cashews and think I should have toasted them before adding them which would have enhanced their flavour and made them crunchier - cashews are quite a soft nut really. Otherwise successful and colleagues liked them more than me. The actual cookie dough part was very soft and far more cakey than I was expecting. I'd like to try the recipe again though. I'm wondering about using some golden syrup sugar from Tate and Lyle I bought recently and using dried fruit like cranberries along with the chocolate. An interesting recipe to play with.

And my colleagues finished up all of the Aero chocolate orange balls quite happily!

Cakey cookies

Disclaimer: I received a copy of 'The Flavour Thesaurus' and some Aero products. All views expressed are my own. Thank you Sophie.

Monday, 17 September 2012

Blueberry Yogurt Cheesecake


And now for something a little different from the usual baking you see on my blog. I was contacted a while ago and asked if I would like to look at the recipes that have recently been added to the Total Greek Yogurt website so I agreed to take a look, Total yogurt is definitely one of my favourites. I am a big fan of plain yogurt over flavoured, finding most flavoured yogurt too sweet or with an odd thickened texture (Longley Farm is my exception - utterly delicious, properly tangy yogurt, but sadly not too widely available).

My first port of call in the 1000 recently published recipes was naturally the baking ones. I had a good long browse through before deciding that sadly there wasn't anything that took my fancy at all. I had hoped for a delicious cake using yogurt as an ingredient (like this Stone Fruit Yogurt Cake by Dan Lepard that I have made numerous times) but instead there were quite a lot of recipes with a yogurt frosting (all very well, but should really be kept in the fridge I think, so no good for sharing with colleagues).


So I ended up choosing this blueberry yogurt cheesecake. After having agreed to receive ingredients to make the cheesecake I learned that this is part of Total's campaign to spread the word about their delicious natural yogurt. Other points the lovely people at Total would like you to know include:

- They are running a competition to celebrate the launch of their 1000 ways to use Total Yogurt. This recipe is one of 30 you can find across various blogs. The more you find, the more chance you have of winning the grand prize.
- These are also available in a brand new Facebook app, so you don’t even have to leave Facebook to get inspiration for dinner. (I'm a facebook newbie - find Cake, Crumbs and Cooking here - so I don't really know if this is a good thing, but I guess it is)
- Total yoghurt is the only authentic Greek yoghurt on sale in the UK. Because it is made in Greece in the traditional way it is much thicker and more robust than Greek‐styled yoghurt. As such it is much better to use in cooking and is still just as good for you. Total Greek Yoghurt is 100% natural.
- Speaking of the prize, top chef Paul Merrett has put together his list of essential kitchen equipment. The lucky winner will get this amazing wish list including the very best cookware worth more than  £800.


Here is the competition:
There are 30 TOTAL recipes on 30 different food blogs across the web. Can you find them? If so, you are in with the chance of winning Paul Merrett's Ultimate Chef's Kit, worth over £800. On the tab you'll find clues leading to 10 of the hidden recipe and over the next few weeks, additional clues will be posted on the timeline to help you find the final 20. The more recipes you find, the more times you name goes into the draw and the more chances you have to win. The recipes are part of the brand new recipe collection 1000 Ways to Love your TOTAL.

The link to the facebook tab is: http://www.facebook.com/TotalGreekYoghurt/app_270613416296446


Ingredients for yummy cheesecake - including 'maple' syrup

This recipe is quick and easy to pull together, which is just what is needed when you're short of time. I halved the recipe, not needing extra cheesecake hanging around.

When I received my ingredients I realised I'd need to amend the recipe slightly - the recipe specifies two 'cookie type biscuits' and I had been given digestives and butter. What to do, except make a digestive base?! There was also no clue given as to the size of mould/pastry ring/pastry cutter needed so I had to guess. I used a 7cm diameter ring. I guessed slightly wrongly and ended up with too much cheesecake mixture for my ring. I also guessed the amount of biscuit mix I'd need wrongly too. I decided two digestives (weighing 30g) bashed up and mixed with 15g melted butter would be plenty, and it was; plenty and too much. I used about half of it, which corresponds to one biscuit and about 8g butter.


I was saddened that the 'maple syrup' provided was only 35% maple syrup, so I decided that in order to make the best of the other ingredients I had been given I would use some of my own 100% maple syrup - it seemed silly not to. Well, I do not profess to be a cheesecake afficionado, but I really, really liked this and will definitely, definitely be making it again. The beautiful creamy richness of the yogurt-cheese mixture, the popping of the blueberries as you ate them (can you tell I was generous with my blueberries - pile them high) and the buttery sweet base and smoky sweet maple syrup. Wow, it was lovely. I was worried that the yogurt-cheese mix would be too tart but it wasn't at all.

I would recommend making and eating them the same day though because my method of making the base meant that the yogurt-cheese mixture made it go slightly soggy by the next day which was a bit of a shame. The other thing I would recommend is drizzling with maple syrup just before you eat them because again, this made the base a little soft too. However, the taste was just fabulous. My final point is that I needed a chef's blowtorch to get the cheesecake out of the ring. I was honestly dubious as to whether this would work, but just trying to pull the ring off the cheesecase wasn't working so I used the blowtorch (first time use!) and it worked really, really well (just as well as when fancy-pants chefs use it in television programmes). I really don't know how I would have managed to release it otherwise. I was really pleased with how this looked - very smart and definitely suitable for a dinner party. 


So what do I think of the recipes overall? Well, there are a lot of them. I didn't have a thorough look through all of them (not surprising given there are 1000) but I was disappointed to see that the majority of the baking recipes were 'serve with greek yogurt' rather than actually using it as an ingredient. This is why I picked this recipe - the yogurt is actually used as an ingredient rather than just a garnish or serving suggestion. From the savoury recipes I looked at this appears to be the case too - garnishes rather than ingredients for many recipes.

This particular recipe lacked certain necessary details (such as the size of the ring to be used) and that it would be difficult to subsequently remove the ring without a blowtorch (though if you can think of an alternative method please leave a comment!). I made a different base simply due to the ingredients I was given, but the specified cookie would probably work well. But as mentioned before it was delicious and I'll make it again. I was thinking that a 'deconstructed' version would be easier too - just mix the cream cheese and yogurt in a bowl and add the fruit, buttery biscuit crumbs and then pour over a generous slosh of maple syrup - not as pretty but just as tasty!

Overall, the recipes lack a little detail in how to actually make some of them, which has made me appreciate the work recipe writers put in to their jobs. I think there are some excellent ideas there for inspiration but perhaps not for complex recipes. My love for Total yogurt remains undimmed - it's still utterly delicious.

Disclaimer: I received the groceries pictured above to make this recipe and have included relevant links to Total's website for their campaign. I have not otherwise received any payment and all opinions expressed are my own.

Sunday, 9 September 2012

The Great British Bake Off, Flapjacks, a Plaited Loaf and a Review


I was recently contacted and asked whether I would like to receive a copy of the Great British Bake Off book to review. Not being one to say no to the offer of a lovely free new book, and being a book which is perfectly in-keeping with the theme of my blog I jumped at the chance. Shortly after, a thump was heard on the doormat and the book was in my possession. Actually, that's a bit of artistic license... what really happened was that I heard the postman trying his very best to shove the book unceremoniously through the letterbox and went and quickly opened the door to relieve him of it before my letterbox was broken. Anyhow, I have my copy which is the important part.

 Ginger flapjacks

I've been enjoying watching the bake off as it has progressed on the television, but don't worry, there are no spoilers here - I haven't really been keeping up to date, what with one thing and another - which is also why it has taken me so long to get round to writing this review of the book. 

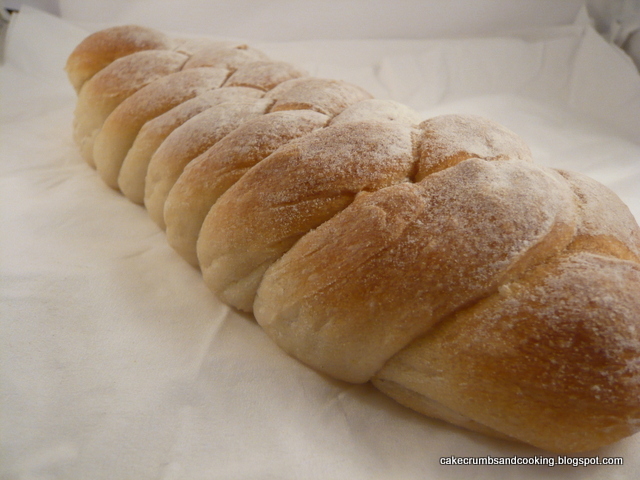
6-braided plait

As you may have surmised from the altercation the book had with my letterbox, it's pretty hefty. 320 pages with many, many delicious looking recipes. As in previous years, the majority of the recipes are by Linda Collister, an author whose recipes I enjoy making and has my trust. At the beginning of each chapter is the 'Showstopping Challenge' recipe - a basic recipe is given and then variations on that theme getting more difficult. For example - in the biscuit chapter the basic gingerbread is used to make Gingerbread People (easy), Iced Stars (takes a little time) and then Winter Woodland Cottage (needs a little skill). There are also technical challenge recipes from Paul and Mary throughout the book along with the best of the contestants recipes from the bake off. There are also really helpful pages devoted to 'Showstopping Techniques' such as icing and stacking a cake and chocolate ribbons and bows in the cake chapter, crimping and decorating in the pie chapter and piping meringue swirls in the desserts chapter, among many, many more.

5 braided plait

The chapters of the book are *Cakes *Biscuits *Breads & Sweet Dough *Tarts *Pies *Desserts *Puddings and then finally *The Basics. The majority of the recipes have illustrations (just), and generally the book is beautifully photographed, so it's a little irritating to find that some of the recipes are not illustrated. I counted 108 recipes, of which 37 do not have an illustration (just over a third of them). I wonder if this is down to budget but I wouldn't think so - there are plenty of full page 'lifestyle' shots and shots of the contestants working. It does seem a pity to have so many recipes without any idea of what they should look like when a small photo on the corner of the page would have been more than adequate for some. I do think it's important for the styling of the book that there are 'lifestyle' and contestant photos, but it seems to be at the expense of the recipe shots here.

Ginger flapjacks

For my recipes I decided to choose something really easy, and something that required a little more time. I decided to make the 'Ruby Jacks', a variation on flapjack. The recipe was easy to follow, but used a rather smaller proportion of oats to the recipes for flapjack I usually use, resulting in a rather spectacular rising of the mixture in the oven (I didn't know flapjacks could puff up like these did) and subsequent sinking and the resulting flapjack was very buttery and soft indeed rather than being substantial and chewy. They were very nice, but I'm not quite sure where the name 'Ruby' comes from - the introduction to the recipe suggests that this is due to the ruby hint given by the inclusion of the stem ginger (mmm, ginger, I am such a ginger fiend), but given that stem ginger is yellow(ish) I can't really see why they'd be red(dish) and they weren't! Still tasty though.

Braiding and baking bread

My other recipe was Paul's technical challenge from the Bread episode - a braided bread. The recipe and full instructions can be found on the BBC Food website, so I won't reproduce them in full. The dough itself was straightforward to make - just a simple white dough so I was more interested in the actual braiding process, having never done this before (but having meant to for a very long time - Celia has a lot to answer for I think!). I know that my loaf wouldn't have passed muster with the master of bread - firstly I couldn't get his instructions for an eight stranded plait to work for me (and I haven't had chance to try with a bit of appropriately sized rope - I just don't have that sort of thing hanging around in my house!) and secondly when I baked and cut my bread I had clearly used too much flour to keep the strands separate - they were still visible in the cross section of the loaf. The bread tasted fine - plain white bread but I'm annoyed I couldn't follow the instructions (I'm sure this is my fault, although if the bake-off contestants were given the same instructions I'm not surprised they found it tricky!). In the end I resorted to a different baking book, Bread, by Jeffrey Hamelman as I knew it had some alternative braiding instructions in there and I successfully followed his instructions for a five stranded braid and then cut my remaining three strands in half to give six short ones and made a six-strand braid too. Celia's right though - it is fairly addictive and I'm going to give it a go again (perhaps when I have more time and give myself a chance to read through the instructions for braiding first!)

Jeffrey Hamelman's 'Bread' with braiding instructions

I know I am biased because I am a keen buyer of cookbooks, and baking books too but I would recommend this one. I was unsure as to whether it would just be full of 'Showstoppers' that are unachievable, but actually, there are loads of recipes in there that I'd like to make, ranging from very basic to rather special. There are far too many to list here, but I'd really like to try the 'Chess Cake', the 'Caramel Layer Cake', the 'Camembert and Quince Flatbreads', the 'Double Crust Pear Pie' and Mary's 'Creme Caramel' among many others. 


Because these loaves are plaited (or braided) I'm entering them into this month's alphabakes, where the letter is P. Alphabakes is a monthly challenge hosted by Caroline of Caroline Makes and Ros of The More than Occasional Baker. The letter for this month is P and the host is Caroline.

Disclosure: I received a copy of this book to review. All views expressed are my own and aside from the book I did not receive payment.

Friday, 9 December 2011

Sticky ginger cake and a product review


Disclaimer: I was approached and asked if I would like to review a product, which was sent to me free of charge. I did not receive any payment. The review is my view of the product, positive or negative, as I found it.


The product in question was a set of spatulas by the company Joseph Joseph. I haven't used any Joseph Joseph products before but have seen them in department stores, where they always seem to be well made, so I was keen to try them out. The selling point of this set is that they have elevated heads, making them very helpful for messy cooks like me, with a very small amount of space to work in. I find myself quickly getting untidy with no-where to put things down. The idea is that these won't make messy splats on your work surface.


The set comprises two flexible spatulas and a slightly stiffer spoon type spatula. They are well made and solid in design. I like the fact that the spatula head joins the handle half way down (where the colour changes) because it means that you don't get bits of cake mixture stuck in the head part, which can be a problem with some designs.


I've used them a couple of times now, and am very pleased. They're very non-stick too, and are heat resistant up to 340C, which was good, given that one of the uses I put them to was making caramel! More on that to come in another post...


Thank you to Jo and Find Me a Gift. I didn't find it particularly easy to find the kitchen based gifts on the website, so it might take a bit of hunting.


Onto the cake... I really wanted a slightly alternative take on the festive baking going on at the moment, and whilst browsing the Guardian website, came across this article by Nigel Slater. There are a number of non traditional Christmas treats in it. He says this cake is the alternative Christmas cake that he has around to offer to guests who aren't traditional fruit cake fans. That appealed to me, and having all the ingredients available I set to make it.

Had I thought a little harder I would have realised it was just a gingerbread recipe! I think I was taken in by the 'additions' to the recipe, thinking that it would be something different (after all, who adds things to gingerbread - it's such a runny batter that they will undoubtedgly sink). But as I made the batter I realised that this was a standard gingerbread, and that my raisins and chopped ginger were indeed going to sink! I decided that I didn't mind, after all, gingerbread is one of my favourite cakes, and so I was interested to see how this one turned out!


I followed the recipe as given here (it's number 4, you need to scroll down the page), and my 4tbsp raisins (rather than sultanas) weighed about 85g. I didn't bother with the icing, I sometimes prefer my gingerbread naked....

What was it like? Well, pretty good. I had some good positive feedback from colleagues who really enjoyed how moist it was, but in all honesty it wasn't gingery enough for me. I think my ground ginger must be duff or there isn't enough of it in the recipe, but I found this cake just a touch on the sweet side because it wasn't gingery enough. That said, it was still delicious and moist, with a lovely sticky top, and once I resigned myself to the sinking ginger and raisins, they provided quite a nice layer of gooey luscious fruit on the base of the cake. A good recipe, but not a perfect one!

Thursday, 25 August 2011

And the winners are...

Congratulations to Choclette and I'll be Sally for now, you are the winners of a copy of the Great British Bake Off second series cook book. Apologies to all those who didn't win!

Choclette, I've emailed you details, I'll be Sally for now, please get in touch with me at cakecrumbsandcooking@googlemail.com - I tried your email but it failed to deliver.

Sunday, 14 August 2011

Review: The Great British Bake Off - How to Bake.....


When the Great British Bake-Off was on the BBC last year, I really enjoyed watching the contestants progress through the rounds, seeing what they would come up with for the various different challenges, and seeing how they all interpreted the 'technical challenge' recipes set by Mary Berry and Paul Hollywood. I can't say I've baked many of either Mary or Paul's recipes, not owning any books by them. Quite a few of the recipes from the first series are available here, on the BBC Food website. The new series starts on Tuesday 16th August, 8-9pm, BBC2. There will be 11 episodes and I'm looking forward to it!

I'm sure you can probably guess where this is leading... I was recently contacted by someone from Random House, the publishers who are behind the book that accompanies the new series of the Great British Bake Off to see if I would like to review the book. Now I didn't immediately jump at this offer, because I wasn't sure if the book would contain anything new or indeed, anything I wanted to bake, but after a delay and some umming and ahhing I decided to accept their offer. A book speedily arrived.

Disclaimer: Clearly, this is a publicity exercise for the book, and I received my copy free of charge. However, I have not been paid to write this review, and the opinions contained are my own - good or bad.

The book is laid out in chapters, presumably according to the order of the challenges that the participants will undertake in the TV series; Cakes, Biscuits and Teatime Treats, Bread, Pies and Savoury pastry, Tarts and Sweet Pastry, Patisserie, Puddings and Desserts and finally, Celebration Cakes. The recipes are predominantly by Linda Collister, with some of the technical challenge recipes (7 in total) by Mary Berry or Paul Hollywood, with some 'Best of the Bake Off' recipes in each chapter which are the contestant's own. I really like Linda Collister's baking, from another book that I already own by her, which swayed me to accepting this offer. And although initially dubious I'm glad I did.


The book is well laid out, and beautifully photographed and although some of the recipes don't have corresponding photos there are some very indepth step by step recipe photographs, for the 'How to Make the Perfect....' (one of these in most chapters) and the technical challenge recipes, which is a good idea. I appreciate photos of what I'm aiming for, being more of the inspired by photos than intimidated by them school of thought.


As I went through the book I was glad I'd accepted the offer because there are quite a few recipes that I wanted to bake straightaway, and more that I would like to bake when I have more time or want to challenge myself with something new (pastry and patisserie chapters, I'm thinking of you!). Some of the particularly delicious sounding recipes (well, to my mind anyway) are Rhubarb and Custard Cupcakes, Brandy Snaps, Sticky Maple-Apple Traybake, Monkey Bread, Stilton, Potato and Caramelised Onion Pie, Chocolate, Fennel and Ginger tarts and Chocolate Fudge Hot-Pot Pudding but there are many more calling out my name. I have lots of baking books but I really could spend a long time just baking from this one!

So what did I decide to make to start? I chose Stem Ginger Shortbread, Sticky Orange Marmalade Cake, and Chocolate Velvet Cup Cakes with Chocolate Fudge Frosting.


The stem ginger shortbread was lovely and easy to make, and eat. Perhaps not as crumbly as some I have made before, not my best, but a lovely basic recipe all the same. The sticky orange marmalade cake was lovely - again easy to make (are you seeing a theme emerging here!) but it looked really lovely and showed off my lovely homemade orange marmalade off to good effect. The only slight problem I had with it was that it sunk slightly when it cooled and had overbrowned slightly in the oven. I removed the very top layer of over-browning because the marmalade glaze on the cake and the icing would hide the top of the cake, but I found myself berating myself for not managing to make it perfectly and imagining what Mary Berry and Paul Hollywood would have said had my cake been up for judging. I'm sure that the dip in the middle wouldn't have gone down well, but I think they would have been pleased with the final taste and texture!

My favourite was the chocolate velvet cup cakes with chocolate fudge frosting. These can be found right at the back of the book, in the celebration cakes chapter, and it would be a shame to miss them, because they're delicious!


Chocolate Velvet Cup Cakes with Chocolate Fudge Frosting (reproduced with permission)
Ingredients
175ml semi-skimmed or full-fat milk (I used semi-skimmed aka 2%)
100g dark chocolate (70% cocoa solids)
125g caster sugar
60g unsalted butter, softened
1/2 tsp vanilla extract
1 large free-range egg, at room temperature, beaten
150g self raising flour, sifted

Method
- Preheat the oven to 180C/gas 4. Pour the milk into a small, heavy-based pan (preferably non-stick). Chop the chocolate and add to the milk with one-third of the sugar. Set over the lowest possible heat and leave until melted and smooth, stirring frequently. Remove from the heat. If necessary, give the liquid a quick whisk to amalgamate, then set aside until needed.
- Put the butter into a mixing bowl and beat until creamy with a wooden spoon or an electric mixer. Add the rest of the sugar and the vanilla and beat thoroughly for about 4 minutes or until the mixture is very light and fluffy.
- Gradually add the egg, beating well after each addition and scraping down the sides of the bowl from time to time. Using a large metal spoon fold in the flour in 3 batches alternatley with the chocolate liquid. When completely amalgamated spoon the mixture into the paper casess so they are evenly filled.
- Bake for 15-18 minutes or until the cakes are well risen and spring back when gently pressed with a finger. Remove the tray from the oven and leave to cool for about 2 minutes, then transfer the cup cakes to a wire rack and leave to cool completely before icing.

Chocolate fudge frosting
Enough for 12 cupcakes
100g dark chocolate (70% cocoa solids), chopped or broken up
1 rounded tablespoon golden syrup
50g unsalted butter

- Put the chocolate, golden syrup and butter into a heatproof bowl. Set over a pan of steaming hot but not boiling water (don't let the base of the bowl touch the water) and melt gently, stirring frequently. As soon as the mixture is smooth remove the bowl from the pan and cool, stirring frequently.
- When very thick and on the point of setting, swirl the frosting on top of the cup cakes using a round-bladed knife. Quickly add any decorations and leave to set.

My notes:
- My chocolate mixture did look a bit grainy, but it seemed to work ok.
- I inadvertently added half of the sugar to the milk mixture (why can't I divide 125g by three and get 40g not 60g???) but just put the rest in with the butter and it was fine!
- They actually took 15 minutes to bake!!! Yay, I usually find my cakes need longer than stated!
- Don't worry that the batter is very runny. I sort of spoon/poured it into the cases feeling very dubious indeed with visions of flat pancakes coming out of the oven only to be greeted by the beauties in the pic below!


I love this chocolate fudge frosting! It was beautifully bitter (I used Green and Black's 72% cooking chocolate) to offset the smooth sweetness of the cakes.
- Don't be greedy like me, and increase the quantities by 50%, you'll have far too much to fit on the cakes!
- The frosting took about 2 hours at ambient temperature (about 20C here) to reach almost-setting point, and until then was pretty much liquid. Have faith, and patience and you'll be rewarded!
These were utterly delicious. The cake was soft and smooth, moist and sweet and was offset really well by the slightly bitter chocolate frosting. I think this will be my go-to recipe for chocolate cupcakes from now, with the added advantage of needing less butter and eggs than a standard recipe and tasting fabulous! I'll also try and remember to make the frosting too, I much, much prefer it to chocolate buttercream which I tend to find too sickly sweet.


And if you've managed to get all the way to the end of that.... I have been offered two copies of the book to give away to my readers, but because it's a heavy book I'm sorry that this is only open to UK readers. Apologies to all my international visitors. To have a chance to win a copy of this book;
1. Become a follower of Cake, Crumbs and Cooking, if you aren't already.
2. Leave me a comment and let me know what your baking nemesis is - does pastry make you pale? do your scones leave people speechless? and what is your absolute favourite thing to bake?

This will close at midnight on the 20th August and I'll pick the winners by random number generator. I'll then contact you by email so if your email isn't obvious on your blog/website, please leave it in your comment :-)

Saturday, 28 May 2011

The Fairy Hobmother and a weighty issue


The Fairy Hobmother (aka Ian from Appliances Online) has been very busy recently, appearing on many blogs granting wishes. I left a comment on a post by Jacqueline over at Tinned Tomatoes, very cheekily asking for a new cooker!!! Well, although Appliances Online, who sell cookers (link removed at request of Appliances Online 22/09/13) and other white goods, couldn't quite run to a cooker (which I wasn't expecting in the slightest) I was very pleased to have my other wish granted, and am now the owner of a shiny new set of kitchen scales.

I haven't had a lot of luck with kitchen scales. I have a set where one of the legs has come loose, which bizarrely enough still weighs things accurately. I also have a set which seem to eat batteries, and then continues to refuse to work, and finally a set where there appears to be no external problem at all, but a 250g packet of butter weighs about 500g..... hmmmm, successful cakes this will not make. The set I recently recieved from the Fairy Hobmother are to replace yet another set where you have to press firmly (actually you have to squeeze and jab at the right time in just the right place) for the scales to come on at all, which is a bit rubbish really. Here's hoping this shiny new set are the answers to my weighty issues...


If you would like the Fairy Hobmother to visit you, leave a comment below, preferably with contact details if they aren't obvious on your blog! I know that the Fairy Hobmother has given out Amazon certificates too, so presumably being abroad doesn't exclude you.

Sunday, 17 April 2011

Lemon and elderflower cupcakes plus Dr Oetker

I was recently contacted and asked if I would like to receive some of Dr Oetker's baking products to experiment with and use in my baking. I replied in the affirmative and received the basket of goodies in the photo at the end of the post. There are some interesting products in their range for bakers like me who are essentially a bit rubbish when it comes to creating homemade decorations for baked goods and it was interesting to receive some of them. I have to admit to being surprised that Scotbloc is still produced, and more surprised to be sent it as a food blogger - not a product I would use, although I recognise it has its place (T can vouch for this - he put it in that place in my house....)
I decided to use the delicate wafer daisies to decorate some little spring inspired cupcakes, baked in some of their pretty cupcake cases. When I think of spring, lemon always springs to mind, and shortly after that, elderflowers. This is partly because there is a large elderflower in my garden and I am watching it with a beady eye to see when it starts to flower... until then elderflower cordial from Bottlegreen is excellent!
The recipe for these is adapted from a couple of sources - I sort of made it up as I went along. I was pleased that the wafer daisies had survived transit related traumas - there were 11 whole and 2 broken ones. Lemon and elderflower cupcakes Ingredients 60g softened butter 110g golden caster sugar 80g self raising flour 60g plain flour 2 eggs
3tbsp elderflower cordial
zest 1/2 small lemon

For the icing
120g icing sugar
elderflower cordial, plus a little water

Method

- Preheat the oven to gas 4/180C. Place your cupcake liners in a bun tray (smaller than a muffin tin).

- Cream the butter and sugar until well mixed.

- Beat in the flour, eggs, elderflower cordial and lemon zest until well mixed.

- Divide between the cake cases.

- Bake for 20-25 minutes until pale golden.

- Remove and allow to cool on a wire rack.


- When cool decorate using the glace icing (mix icing sugar with enough elderflower cordial to make a thick icing) and place a daisy on the top.


They were pretty successful, although the elderflower flavour didn't come through very strongly in the cupcakes. It was strengthened by the elderflower in the icing though, and overall they worked well, reminding me that spring is well and truly on its way. Yippee!!!

With thanks to Sarah at Brando for Dr Oetker.

LinkWithin

Related Posts Plugin for WordPress, Blogger...