Friday 28 September 2012

Maple Syrup Butter Cookies


When Dom from Belleau Kitchen and Karen of Lavender and Lovage announced that this month, their two challenges; Random Recipes and Tea Time Treats were getting together I had mixed feelings. Not that this isn't a good pairing, but rather that my heart sort of sinks when I have no control over the recipe I have to make - I am a complete control freak and hate having decisions taken out of my hands. And this month this would apply to another of the challenges I like to enter, not just random recipes itself.


So I took a deep breath, opened one of my (many - what, are you surprised I have many) baking books. I chose 'Mix' which is one of my books containing recipes from the Australian Women's Weekly. I really like these recipe - there are often combinations that I haven't thought of, or different presentations that inspire me to bake. And my recipe was these rather cute little maple syrup butter cookies.

The chosen book - note all the stickers for recipes I want to make

Perfect - nothing says 'Teatime' to me more than biscuits. These were really quick and easy to put together. They're a melting-moment type biscuit. I tried to find the recipe online, but find the AWW website very hard to navigate so I had to give up. They consist of butter beaten with maple syrup and a tiny dash of vanilla. This was my only real problem making them - the butter and maple syrup is supposed to become light and fluffy but mine split and wouldn't do light and fluffy. Plain flour and cornflour is then added and they are piped onto prepared trays to be baked. They were fun to pipe (I like piping generally), if a little sticky.

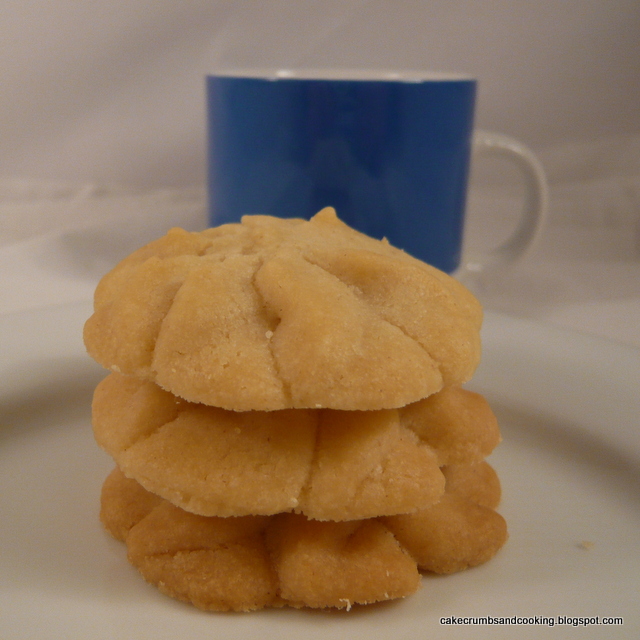
First batch - nicely cooked

After the first batch came out of the oven I decided to refrigerate the rest and see if they would keep their shape better - they didn't so I wouldn't bother wasting time refrigerating them again. The first batch were baked while I had something else in the oven underneath them, the second batch were alone in the oven and have consequently coloured more on the base. I am still trying to learn the foibles of my new oven.

Second batch - overbaked

The house smelled particularly delicious while these were baking - what's not to like about warm maple syrup and butter - utterly divine! I would try these again - I wanted to see if I can get them to keep their shape a little better and I might try using the fan oven instead of the conventional setting.They were very buttery and quite crisp at first with a melt in the mouth texture that comes from the use of cornflour as part of the flour. The maple syrup flavour was unfortunately not to my taste at all. I don't know why, but they really didn't appeal to me at all. The texture was great - melting and delicate, but the flavour was just so wrong. I haven't baked a lot with maple syrup before, but these were not pleasant. And I also found that as the only sweetening agent was the syrup they weren't quite sweet enough for my taste in biscuits either. A bit of a disappointment and a definite don't make again.

I can't decide what to do with them now, whether to give up on them as a bad job (made about a week ago now) or whether to whip up a batch of buttercream and sandwich them together - this would counteract the problem of them not being sweet enough but might make them soggy. Hmm, what would you do? Or can you recommend good baking recipes using maple syrup please?

Edited to add: I am also submitting these into Jac's Bookmarked Recipes feature, since they are also something in this recipe book that I have been meaning to make for ages.


Wednesday 26 September 2012

Mojito Cocktail Cupcakes


The best chocolate blogging challenge around is now two! Happy Birthday We Should Cocoa. Set up by Choclette of Choc Log Blog and Chele of Chocolate Teapot WSC has now been going for two years, and I'm proud to say that I've been there since the start (although I haven't participated in all of the challenges!).

When Choclette announced that the theme for this month was Cocktails I have to admit that my heart sank. I don't think I've ever knowingly drunk a cocktail, or at least not a proper one. I may have had one or two mocktails in my time, but even those are infrequent. I was thus utterly stumped for inspiration on this one. I let the thought slide because my time has not been my own recently, but as of now (well, for a little while anyway) my exams are over and I can bake as I wish.


And so I didn't really think about this challenge at all. Since my exam date and the deadline collided exactly and since I have been at home on study leave and not really able to make cakes (and certainly not make them for colleagues) I thought I would bow out of the challenge. And then I remembered that Choclette had named me as one of the first month's challenge participants. And so the pressure to participate grew.

Fortunately inspiration struck just in time. I was thinking about the chocolate I like to eat most, and after unflavoured chocolate my favourite flavour is mint. I think this is because the sweet fruity centred chocolates are not my scene and nuts are off limits. So I always hope that if someone is buying chocolates for me they go for the mint box because then I can be a greedy piglet and hog them all to myself!


And to go with mint I thought of lime. Mint and lime, yum and then rounded off with white chocolate so the flavours don't clash with the strong dark chocolate. But how to combine them. I decided on a lime drizzle cupcake base and then a white chocolate and mint buttercream in luscious swirls on the top. Most decadent and most appropriate for WSC's second birthday. Mint and lime are the flavours of a Mojito, so these are my mojito cupcakes.

All kinds of green

Mojito Cocktail Cupcakes
Ingredients
125g unsalted butter
125g white caster sugar
2 eggs
125g self raising flour
about 3tbsp milk
grated zest 1 lime

For the drizzle/syrup
Juice of the lime plus 40g icing sugar

For the buttercream
75g unsalted butter, softened
150g icing sugar
40g white chocolate, melted
2 tsp peppermint extract
white chocolate chips to scatter

Method
- Preheat the oven to 180C/Gas 4. Line a 12 hole muffin tin with ten liners.
- Cream the butter until light and fluffy. Add the lime zest and continue to mix.
- Add the flour and eggs and beat well, then add the milk as necessary to make a softer mixture.
- Divide between the cases and bake for 25-30 minutes.

While they are baking make a simple syrup from the icing sugar and the juice of the lime - bring to the boil and simmer a couple of minutes. Allow to cool slightly.

- When the cupcakes are baked, prod all over with a wooden cocktail stick and carefully spoon over the syrup. Allow to sink in and allow the cupcakes to cool.
- In the meantime, make the buttercream icing by beating the butter and icing sugar together, adding the slightly cooled white chocolate and 2 tsp peppermint essence to the mixture.
- Pipe onto your cupcakes, scatter over white chocolate chips and admire.


What I have learnt from making these: that 6 hours in exams and a 90 minute journey home through driving rain does not necessarily mean you cannot bake when you get home. You will struggle to write the post up too though... thanks to Choclette for allowing me to be a little late.
Don't melt white chocolate in the microwave, well, at least not 40g for a minute on full power unattended. Cue smoke streaming out of the microwave and frantic (and ineffectual) wafting of teatowel to avoid setting smoke alarm off.


I'm pleased to say that they were delicious. The sponge was beautifully soft and moist and slightly lime-y and then the sweet buttercream was the perfect complement - rich and smooth and then minty too, but not overwhelmingly so. Just right for celebrating the end of my horrible day of exams! A celebration of two years of We Should Cocoa - here's to the continuing success of the challenge.

Thursday 20 September 2012

Fig and Vanilla Demerara Crunch Cake

Soft vanilla cake punctuated with jammy figs

Fairly short post for this one - life and blogging are pretty incompatible at the moment. Thank goodness I have delicious cake to make it all a bit easier. I haven't ever had fresh figs before (well, not to my knowledge), so when the One Ingredient challenge was announced this month (hosted this month by Laura of How to Cook Good Food and cohosted by Nazima of Working London Mummy) I decided that now was the time to try baking them into a cake - they just look so plump and inviting.


Because figs are also right in season now, I am also entering this into 'Simple and in Season' hosted this month by Katie of Feeding Boys and a Firefighter and founded by Ren of Fabulicious Food


I think this worked really well - the figs looked really attractive on the top of the cake, happily not sinking too much and the cake below was wonderfully soft and moist - full of vanilla and muscovado flavour. The figs were crunchy and chewy, as is also the way of the dried version of the fruit, which I am really rather partial to. I think this would make a great family dessert served warm with custard.

Jammy figs

 I think I ought to try fresh figs in another way too though, perhaps raw to get a better appreciation of their subtle flavour. Have you got a favourite way of enjoying fresh figs? Do let me know!

Before baking

Fig and Vanilla Demerara Crunch Cake
Ingredients
150g butter, softened
75g light muscovado sugar
75g caster sugar
50g plain flour
150g self raising flour
3 medium eggs (55g each)
2tsp vanilla extract
3 fat figs, cut into 6 pieces each
demerara sugar for sprinkling

Method
- Preheat the oven to gas 4/180C. Grease and line an 8"/20cm square tin with parchment paper.
- Cream the butter and sugars together until light and fluffy.
- Add the eggs, vanilla extract and flour and beat until well combined.
- Spoon into the prepared tin and level out, then place the figs onto the mixture. You can do rows like I did, or scatter randomly.
- Scatter demerara sugar over the surface.
- Bake for 50 minutes to an hour until a cake tester inserted comes out clean.
- Turn out onto a wire rack and allow to cool, or alternatively, enjoy warm with a puddle of custard for a lovely autumnal dessert. 


Monday 17 September 2012

Blueberry Yogurt Cheesecake


And now for something a little different from the usual baking you see on my blog. I was contacted a while ago and asked if I would like to look at the recipes that have recently been added to the Total Greek Yogurt website so I agreed to take a look, Total yogurt is definitely one of my favourites. I am a big fan of plain yogurt over flavoured, finding most flavoured yogurt too sweet or with an odd thickened texture (Longley Farm is my exception - utterly delicious, properly tangy yogurt, but sadly not too widely available).

My first port of call in the 1000 recently published recipes was naturally the baking ones. I had a good long browse through before deciding that sadly there wasn't anything that took my fancy at all. I had hoped for a delicious cake using yogurt as an ingredient (like this Stone Fruit Yogurt Cake by Dan Lepard that I have made numerous times) but instead there were quite a lot of recipes with a yogurt frosting (all very well, but should really be kept in the fridge I think, so no good for sharing with colleagues).


So I ended up choosing this blueberry yogurt cheesecake. After having agreed to receive ingredients to make the cheesecake I learned that this is part of Total's campaign to spread the word about their delicious natural yogurt. Other points the lovely people at Total would like you to know include:

- They are running a competition to celebrate the launch of their 1000 ways to use Total Yogurt. This recipe is one of 30 you can find across various blogs. The more you find, the more chance you have of winning the grand prize.
- These are also available in a brand new Facebook app, so you don’t even have to leave Facebook to get inspiration for dinner. (I'm a facebook newbie - find Cake, Crumbs and Cooking here - so I don't really know if this is a good thing, but I guess it is)
- Total yoghurt is the only authentic Greek yoghurt on sale in the UK. Because it is made in Greece in the traditional way it is much thicker and more robust than Greek‐styled yoghurt. As such it is much better to use in cooking and is still just as good for you. Total Greek Yoghurt is 100% natural.
- Speaking of the prize, top chef Paul Merrett has put together his list of essential kitchen equipment. The lucky winner will get this amazing wish list including the very best cookware worth more than  £800.


Here is the competition:
There are 30 TOTAL recipes on 30 different food blogs across the web. Can you find them? If so, you are in with the chance of winning Paul Merrett's Ultimate Chef's Kit, worth over £800. On the tab you'll find clues leading to 10 of the hidden recipe and over the next few weeks, additional clues will be posted on the timeline to help you find the final 20. The more recipes you find, the more times you name goes into the draw and the more chances you have to win. The recipes are part of the brand new recipe collection 1000 Ways to Love your TOTAL.

The link to the facebook tab is: http://www.facebook.com/TotalGreekYoghurt/app_270613416296446


Ingredients for yummy cheesecake - including 'maple' syrup

This recipe is quick and easy to pull together, which is just what is needed when you're short of time. I halved the recipe, not needing extra cheesecake hanging around.

When I received my ingredients I realised I'd need to amend the recipe slightly - the recipe specifies two 'cookie type biscuits' and I had been given digestives and butter. What to do, except make a digestive base?! There was also no clue given as to the size of mould/pastry ring/pastry cutter needed so I had to guess. I used a 7cm diameter ring. I guessed slightly wrongly and ended up with too much cheesecake mixture for my ring. I also guessed the amount of biscuit mix I'd need wrongly too. I decided two digestives (weighing 30g) bashed up and mixed with 15g melted butter would be plenty, and it was; plenty and too much. I used about half of it, which corresponds to one biscuit and about 8g butter.


I was saddened that the 'maple syrup' provided was only 35% maple syrup, so I decided that in order to make the best of the other ingredients I had been given I would use some of my own 100% maple syrup - it seemed silly not to. Well, I do not profess to be a cheesecake afficionado, but I really, really liked this and will definitely, definitely be making it again. The beautiful creamy richness of the yogurt-cheese mixture, the popping of the blueberries as you ate them (can you tell I was generous with my blueberries - pile them high) and the buttery sweet base and smoky sweet maple syrup. Wow, it was lovely. I was worried that the yogurt-cheese mix would be too tart but it wasn't at all.

I would recommend making and eating them the same day though because my method of making the base meant that the yogurt-cheese mixture made it go slightly soggy by the next day which was a bit of a shame. The other thing I would recommend is drizzling with maple syrup just before you eat them because again, this made the base a little soft too. However, the taste was just fabulous. My final point is that I needed a chef's blowtorch to get the cheesecake out of the ring. I was honestly dubious as to whether this would work, but just trying to pull the ring off the cheesecase wasn't working so I used the blowtorch (first time use!) and it worked really, really well (just as well as when fancy-pants chefs use it in television programmes). I really don't know how I would have managed to release it otherwise. I was really pleased with how this looked - very smart and definitely suitable for a dinner party. 


So what do I think of the recipes overall? Well, there are a lot of them. I didn't have a thorough look through all of them (not surprising given there are 1000) but I was disappointed to see that the majority of the baking recipes were 'serve with greek yogurt' rather than actually using it as an ingredient. This is why I picked this recipe - the yogurt is actually used as an ingredient rather than just a garnish or serving suggestion. From the savoury recipes I looked at this appears to be the case too - garnishes rather than ingredients for many recipes.

This particular recipe lacked certain necessary details (such as the size of the ring to be used) and that it would be difficult to subsequently remove the ring without a blowtorch (though if you can think of an alternative method please leave a comment!). I made a different base simply due to the ingredients I was given, but the specified cookie would probably work well. But as mentioned before it was delicious and I'll make it again. I was thinking that a 'deconstructed' version would be easier too - just mix the cream cheese and yogurt in a bowl and add the fruit, buttery biscuit crumbs and then pour over a generous slosh of maple syrup - not as pretty but just as tasty!

Overall, the recipes lack a little detail in how to actually make some of them, which has made me appreciate the work recipe writers put in to their jobs. I think there are some excellent ideas there for inspiration but perhaps not for complex recipes. My love for Total yogurt remains undimmed - it's still utterly delicious.

Disclaimer: I received the groceries pictured above to make this recipe and have included relevant links to Total's website for their campaign. I have not otherwise received any payment and all opinions expressed are my own.

Friday 14 September 2012

Butterscotch Chocolate Cupcakes


These were something I had to be able to produce rather quickly, one evening after work recently. One of my colleagues was moving jobs, to a more senior post and I wanted to make some cupcakes for her - after all, what kind of baking colleague would I be if I didn't provide some form of leaving cake!

As such, it wasn't the time to try out new exciting recipes, but to stick to a tried, tested and trusted recipe, but with a little twist - added chopped chocolate. I do enjoy the contrast in texture of biting into a piece of chocolate in the midst of the soft cupcake, and chopping the chocolate fairly small means that it doesn't all sink.


For myself, it's dark chocolate all the way, but I had a bar of Green and Black's Butterscotch chocolate which is a dark milk chocolate (34% cocoa) with little butterscotchy pieces in it (rather more-ish as I nibble a little as I type).

Butterscotch Chocolate Cupcakes
Ingredients
175g softened butter
175g caster sugar (or a mixture of caster sugar and light muscovado)
150g self raising flour
3 large eggs
20g cocoa powder
50g Butterscotch Milk Chocolate, chopped

For the frosting
100g milk chocolate (I used Green and Black's 34% milk chocolate here)
40g butter

Method
- Preheat the oven to gas 4/180C. Place 12 liners in a muffin tin.
- Cream together the butter and sugar until very light and fluffy.
- Add the eggs, flour and cocoa powder and continue to beat until well mixed.
- Fold in the chopped chocolate and divide between the prepared cases.
- Bake for around 25 minutes until they are risen and springy and a cake tester comes out clean.
- Allow to cool on a wire rack.
- When cool, make the frosting - melt the chocolate and then add the cubed butter, stirring until it has all amalgamated. You may need to allow it to cool a little before using, but when the texture seems thick enough to hold, spread onto the cupcakes and sprinkle with decorations of your choice.


I guess I probably don't need to say that these went well - I gift boxed some for my colleague who was leaving to take home for her family and then the rest were enjoyed by my other colleagues. Good Luck in your new job S.


It's nearly National Cupcake Week - you can check out their website (and naturally follow them on facebook and twitter if that's your thing!) for more info, but this means that this month's Calendar Cakes challenge (hosted alternately by Rachel of Dolly Bakes and Laura of Laura Loves Cakes) is Cupcakes. So I am entering these into the challenge. Super easy and very tasty!


Sunday 9 September 2012

The Great British Bake Off, Flapjacks, a Plaited Loaf and a Review


I was recently contacted and asked whether I would like to receive a copy of the Great British Bake Off book to review. Not being one to say no to the offer of a lovely free new book, and being a book which is perfectly in-keeping with the theme of my blog I jumped at the chance. Shortly after, a thump was heard on the doormat and the book was in my possession. Actually, that's a bit of artistic license... what really happened was that I heard the postman trying his very best to shove the book unceremoniously through the letterbox and went and quickly opened the door to relieve him of it before my letterbox was broken. Anyhow, I have my copy which is the important part.

 Ginger flapjacks

I've been enjoying watching the bake off as it has progressed on the television, but don't worry, there are no spoilers here - I haven't really been keeping up to date, what with one thing and another - which is also why it has taken me so long to get round to writing this review of the book. 

6-braided plait

As you may have surmised from the altercation the book had with my letterbox, it's pretty hefty. 320 pages with many, many delicious looking recipes. As in previous years, the majority of the recipes are by Linda Collister, an author whose recipes I enjoy making and has my trust. At the beginning of each chapter is the 'Showstopping Challenge' recipe - a basic recipe is given and then variations on that theme getting more difficult. For example - in the biscuit chapter the basic gingerbread is used to make Gingerbread People (easy), Iced Stars (takes a little time) and then Winter Woodland Cottage (needs a little skill). There are also technical challenge recipes from Paul and Mary throughout the book along with the best of the contestants recipes from the bake off. There are also really helpful pages devoted to 'Showstopping Techniques' such as icing and stacking a cake and chocolate ribbons and bows in the cake chapter, crimping and decorating in the pie chapter and piping meringue swirls in the desserts chapter, among many, many more.

5 braided plait

The chapters of the book are *Cakes *Biscuits *Breads & Sweet Dough *Tarts *Pies *Desserts *Puddings and then finally *The Basics. The majority of the recipes have illustrations (just), and generally the book is beautifully photographed, so it's a little irritating to find that some of the recipes are not illustrated. I counted 108 recipes, of which 37 do not have an illustration (just over a third of them). I wonder if this is down to budget but I wouldn't think so - there are plenty of full page 'lifestyle' shots and shots of the contestants working. It does seem a pity to have so many recipes without any idea of what they should look like when a small photo on the corner of the page would have been more than adequate for some. I do think it's important for the styling of the book that there are 'lifestyle' and contestant photos, but it seems to be at the expense of the recipe shots here.

Ginger flapjacks

For my recipes I decided to choose something really easy, and something that required a little more time. I decided to make the 'Ruby Jacks', a variation on flapjack. The recipe was easy to follow, but used a rather smaller proportion of oats to the recipes for flapjack I usually use, resulting in a rather spectacular rising of the mixture in the oven (I didn't know flapjacks could puff up like these did) and subsequent sinking and the resulting flapjack was very buttery and soft indeed rather than being substantial and chewy. They were very nice, but I'm not quite sure where the name 'Ruby' comes from - the introduction to the recipe suggests that this is due to the ruby hint given by the inclusion of the stem ginger (mmm, ginger, I am such a ginger fiend), but given that stem ginger is yellow(ish) I can't really see why they'd be red(dish) and they weren't! Still tasty though.

Braiding and baking bread

My other recipe was Paul's technical challenge from the Bread episode - a braided bread. The recipe and full instructions can be found on the BBC Food website, so I won't reproduce them in full. The dough itself was straightforward to make - just a simple white dough so I was more interested in the actual braiding process, having never done this before (but having meant to for a very long time - Celia has a lot to answer for I think!). I know that my loaf wouldn't have passed muster with the master of bread - firstly I couldn't get his instructions for an eight stranded plait to work for me (and I haven't had chance to try with a bit of appropriately sized rope - I just don't have that sort of thing hanging around in my house!) and secondly when I baked and cut my bread I had clearly used too much flour to keep the strands separate - they were still visible in the cross section of the loaf. The bread tasted fine - plain white bread but I'm annoyed I couldn't follow the instructions (I'm sure this is my fault, although if the bake-off contestants were given the same instructions I'm not surprised they found it tricky!). In the end I resorted to a different baking book, Bread, by Jeffrey Hamelman as I knew it had some alternative braiding instructions in there and I successfully followed his instructions for a five stranded braid and then cut my remaining three strands in half to give six short ones and made a six-strand braid too. Celia's right though - it is fairly addictive and I'm going to give it a go again (perhaps when I have more time and give myself a chance to read through the instructions for braiding first!)

Jeffrey Hamelman's 'Bread' with braiding instructions

I know I am biased because I am a keen buyer of cookbooks, and baking books too but I would recommend this one. I was unsure as to whether it would just be full of 'Showstoppers' that are unachievable, but actually, there are loads of recipes in there that I'd like to make, ranging from very basic to rather special. There are far too many to list here, but I'd really like to try the 'Chess Cake', the 'Caramel Layer Cake', the 'Camembert and Quince Flatbreads', the 'Double Crust Pear Pie' and Mary's 'Creme Caramel' among many others. 


Because these loaves are plaited (or braided) I'm entering them into this month's alphabakes, where the letter is P. Alphabakes is a monthly challenge hosted by Caroline of Caroline Makes and Ros of The More than Occasional Baker. The letter for this month is P and the host is Caroline.

Disclosure: I received a copy of this book to review. All views expressed are my own and aside from the book I did not receive payment.

Monday 3 September 2012

Meandering, Cakeless

Please excuse the lack of blogging action recently. Normal service may be resumed shortly, but in the meantime, I'll leave you with a picture of somewhere I wish I were going...


And somewhere I've been recently....


She sells seashells on the seashore, 
The shells that she sells are seashells for sure.

LinkWithin

Related Posts Plugin for WordPress, Blogger...