Showing posts with label modify. Show all posts

Thursday, 4 July 2013

Chocolate Cashew Cookies

Chocolate Cashew Cookies

I was recently contacted and asked if I would like to take part in the Aero Perfect Pairing challenge. With the offer of Niki Segnet's book 'The Flavour Thesaurus - Pairings, recipes and ideas for the creative cook' I was definitely in. The book arrived along with a big bag of Aero's Chocolate Orange bubbles (which I didn't manage to get a picture of) and a bar of Aero mint chocolate. 

I made some chocolate orange cupcakes using Nigella's Storecupboard Chocolate Orange cake recipe (one of my standby recipes) and topped them with some chocolate frosting and the chocolate  orange balls. Unfortunately, making cakes in the morning before work isn't really conducive to having enough time to allow them to cool, so they were still warm when I put the chocolate frosting (which was itself still warm and runny) on them and the chocolate orange bubbles kind of melted. Sorry, no pictures!


I have to confess that I wasn't quite sure which flavour combination to go for - I wanted something I thought would work, but which isn't too widespread and well known. The brief stated that the recipe didn't have to include either Aero or chocolate but being a bit of a chocoholic, I decided that I would include dark chocolate in my recipe. 

A cookie recipe that I'd bookmarked ages and ages ago from the Hungry Hinny sprang to mind as being an interesting one in which to incorporate different flavours. The recipe is for cream cheese cookies and doesn't use egg at all. I increased the amount of flour slightly and hope that the Hungry Hinny doesn't mind me reproducing my attempt at these cookies. Very unusually for me, I made these by hand - only a bowl and spoon required - no need to make washing up and use the stand mixer!

Creamed butter and cream cheese

Chocolate Cashew Cookies
Ingredients
85g cream cheese (I used full fat Philadelphia)
85g butter, melted and cooled slightly
1 tsp vanilla extract
105g light muscovado sugar
150g plain flour
1/2tsp bicarbonate of soda
1/2tsp salt
30g cashews, roughly broken/chopped
50g dark chocolate, in small chunks

Method
- Preheat the oven to 160C. Line two baking trays with parchment paper.
- Beat the cream cheese until softened, then add the melted butter and vanilla. Keep beating - it will turn from curdled looking lumpy mess into a beautifully smooth batter (I had serious doubts when I saw the initial mixture but it all turned out fine). 
- Beat in the sugar and then the flour, bicarbonate and salt until a dough forms.
- Fold in the cashews and dark chocolate. 
- At this point I ignored the instructions to leave for 30 minutes to chill and just dolloped small blobs onto the lined baking tray, spread well apart. (For my mixture putting it in the fridge didn't really seem to make much difference - I put the rest of it in the fridge while the first batch of cookies were baking, but actually preferred that first batch slightly - the second batch appeared 'grainy' - no idea why)
- Bake for 15 minutes until very light brown. Allow to sit for around 10 minutes once removed from the oven to make it possible to transfer them to a wire rack (they'll be very soft once they come out of the oven).
I made 22 cookies from the mixture.

Soft cookie dough

Verdict? Actually, personally I wasn't all that keen on this cashew chocolate combo - I couldn't really taste the cashews and think I should have toasted them before adding them which would have enhanced their flavour and made them crunchier - cashews are quite a soft nut really. Otherwise successful and colleagues liked them more than me. The actual cookie dough part was very soft and far more cakey than I was expecting. I'd like to try the recipe again though. I'm wondering about using some golden syrup sugar from Tate and Lyle I bought recently and using dried fruit like cranberries along with the chocolate. An interesting recipe to play with.

And my colleagues finished up all of the Aero chocolate orange balls quite happily!

Cakey cookies

Disclaimer: I received a copy of 'The Flavour Thesaurus' and some Aero products. All views expressed are my own. Thank you Sophie.

Tuesday, 12 March 2013

Soured cream, raspberry and blackcurrant mini cakes with white chocolate buttercream frosting

Candles omitted - I'll leave you to guess the age...

Well, that's a bit of a lengthy title for some very diminutive cakes. It was J's birthday recently and for various reasons I wanted to make small cakes rather than a giant centrepiece. I decided to use my straight-sided 12-hole mini cake tin from Lakeland (sadly this is not sponsored by them, I paid for it myself, hence the desire to get plenty of use out of it!) and use a soured cream enriched cake mixture to provide a richer cake, suitable for a birthday.

I was also experimenting with some freeze dried raspberries I bought recently. My theory was that if I squashed them into powder they might provide enough colour to tint some of the sponge pink. It was quite a reasonable theory, but I probably didn't use enough of the raspberries, and didn't pulverise them enough and the sponge remained resolutely un-pink. Next time I want a coloured sponge I guess I'll just have to resort to food colouring.

The filling was a white chocolate buttercream (another slight experiment for me) and blackcurrant jam. Raspberry would have been more complimentary, but blackcurrant was available.


Soured cream, raspberry and blackcurrant mini cakes with white chocolate buttercream frosting
Ingredients
65g butter
65g caster sugar
65g self raising flour
1 egg
1/8 tsp baking powder
1/2 tsp vanilla extract
25g soured cream
freeze dried raspberries (optional - I didn't measure these and probably used about 1/2-1tsp)
Ingredients for white chocolate buttercream - see below
Blackcurrant (or raspberry) jam

Method
- Preheat the oven to gas 4/180C. Grease five of the mini tin holes. These would work in regular muffin tins too, just make sure they're well greased, and realise you'll get sloping sides.
- Beat together the butter and sugar until light and fluffy.
- Add the egg, flour, baking powder, vanilla and soured cream. Beat until well combined.
- Spoon half the mix into two of the holes.
- Add the raspberries (pulverised or not) if using to the remaining mixture and divide between the other two holes. The fifth prepared hole is for if you've got a little more batter than you think will fit into the other holes. I did have and ended up making a half-height mini-mini cake too.
- Bake for around 30-35 minutes until risen and golden and a cake tester comes out clean.
- Remove from the tin and allow to cool on a wire rack.

White chocolate buttercream
This amount is too much for these cakes, but since I was just playing to see how it turned out I wasn't worried about how much I was making.
50g unsalted butter, softened
70g icing sugar
30g white chocolate, melted and cooled
- Beat the butter until light and fluffy. Add the sugar and continue to beat. Add the chocolate and beat to combine. 

To assemble
- Cut each cake into three. Spread a little buttercream onto each of the two lower layers then dollop on a little jam and spread out. 
- Reassemble layers.
- Dust with icing sugar. Although if you wanted to, you could use more of the buttercream to add to the top of the cakes.

Admire and then eat.

These were very much appreciated and I had the mini one for myself. The cake was rich and smooth and not very strongly raspberry flavoured. The white chocolate buttercream is definitely something I'll be doing again. It wasn't as sweet as the usual buttercream I make and was very smooth and rich without particularly tasting of white chocolate. I used Green and Black's white chocolate, so it's interesting that even a relatively strong tasting variety didn't seem to come through.

Very successful - Happy Birthday J xxx

Thursday, 22 March 2012

Madeleines de Commercy


I tried making Madeleines ages and ages ago, to a recipe I can't remember, and not very successfully. I put it down to using a silicon baking mould for the madeleines, but it might just have been a bit of a rubbish recipe. I can't even remember what was wrong with them - I think they didn't really rise very well and refused to take any colour at all. It was a most frustrating experience and I gave up.

A good while later my interest in Madeleines was again prodded with this beautifully photographed and written post by Joanna @Zeb_Bakes about her Limeblossom Tea and Madeleines. And then as a final reminder, I saw Dan Lepard's recipe for them in Short and Sweet. I was obviously intending to make these because I bought a Madeleine mould ages ago - a metal one this time. I bought mine from Lakeland, but a brief warning - the mould is actually quite wide and just barely fits into my oven - it's more a case of balancing it on the runners at the edge of the oven than placing it on the shelf. I think this means it's likely to get very scratched at the edges, which is a shame. There is a version of Dan's recipe here, but the quantities in the book are really quite different, for all of the ingredients! So not really the same recipe at all, although I think the method is similar. A case of having to buy the book.


He has a very helpful tip about getting the characteristic 'nipple' that is seen on Madeleines. Adding a tiny little piece of cold butter before they go into the oven will allow the nipple to form. I cut up my butter and then put it into the freezer as I prepared the rest of the batter, removing it just before adding it to the mixture in the moulds. I did find that I had a little too much batter for my moulds, perhaps had I added less I would have got the characteristic thin, crispy edge to the cakes. I don't mind though!

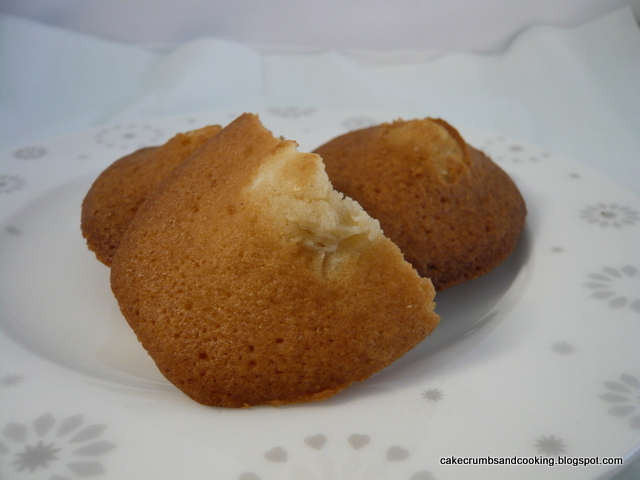
Not all that easy to see in the photos - the front one is the second batch - the back ones are the overdone ones - much more obvious in real life.

I had to make these twice. The first time, they rose beautifully, peaking and so forth, but I think my oven has a tendency to run hot at the top end of its range, and even though I removed them at 9 1/2 minutes with my oven set at just over 200C/just over Gas 6 they were really quite overdone (the recipe specifies 10 minutes at Gas 7/220C). The second time I set the timer for 7 1/2 minutes, which was much, much more successful - no more overdone Madeleines for me! In fact, they might even have come out a little earlier.


I was really pleased with the way these looked - beautiful little peaks and nice soft, tender cakes. I think I perhaps needed to add a little salt to the recipe, and be rather more generous with my flavourings (I think I only added 1tsp of vanilla rather than the specified 2tsp the second time I made them). These are a great starting recipe to give the correct result aesthetically, so it should be fairly easy to ramp up the flavours in them. Lots of spring flavours come to mind - elderflower, lemons, honey (ok, honey isn't really spring) or perhaps even chocolate substituting some of the flour for cocoa powder. Endless opportunities for variations. After all, now I have the shaped tin I need to use it!
On a slightly odd, personal, side note... my paternal grandmother was called Madeleine. I never met her, but I wonder if she ever ate these delicate cakes and what she would have made of them. All the pictures I have seen of her show her as being very elegant, and I can imagine her sitting down to afternoon tea, playing Bridge (popular in my family!) and eating these in a bygone era.


As these begin with an M I'm submitting them to AlphaBakes, run by Ros at The More than Occasional Baker and Caroline of Caroline Makes. Caroline is hosting this month and the letter this month is (unsurprisingly) M.

Saturday, 7 January 2012

Spelt honey cake


This is another of the type of cakes I regard as everyday 'snacking' type cakes. The ones that you keep in the cake tin to grab a piece of as you pass by. Not a posh dessert, but something simpler, just to keep you going. But this cake was no less delicious for that.

I would almost call it frugal - it felt that way to me because I was using up lots of bits of ingredients that I had lying around the place, as you will be able to tell from the ingredients list! However, I don't think it was a particularly cheap cake to make - it still contains butter and eggs and the spelt flour isn't exactly a routine ingredient for many people. Frugal in spirit I think (and the pictures are certainly frugal - please excuse them!).


The spelt flour was a new product that I had seen in the supermarket and wanted to try. I have enjoyed cakes and breads made with spelt flour in the past and wondered what the Dove's Farm flour would be like. Although I have only used it for this cake, I'm pleased with it. One of the brands I have bought in the past is full of bits of husk, which pretty much necessitates sieving it, and then picking through the bran to get the husks out and then adding the bran back in so as not to lose the weight of flour, or the nutritional benefits of that part of the flour. It's a pain! But the Dove's Farm flour doesn't seem to have husks in as far as I can tell.


Spelt honey cake
Ingredients
175g butter, softenend
80g caster sugar
90g honey, melted *
100g plain flour
100g wholemeal spelt flour
scant 2 tsp baking powder
3 eggs
60g buttermilk (the end of a pot used for a different cake)

* I used a runny honey, but it had crystallised and wouldn't squeeze out of the squeezy nozzle (I'm going to stop buying squeezy honey - I never get it all out before it crystallises), so I chopped the top off the bottle, spooned it into a pan and melted it very gently over a low heat, just to get rid of the crystals.

Method
- Preheat the oven to Gas 4/180C. Grease and line an 8"/20cm square tin. Mine was a shallow rather than deep tin.
- Cream the butter and sugar until slightly lighter in colour.
- Add the flours, baking powder, honey (which was warmish), eggs and buttermilk and continue to beat until well combined.
- Spoon into the prepared tin and level. Bake for 40-50 minutes (ish, I can't quite remember!) until well risen and golden and springy to the touch.
- Allow to cool on a wire rack.


As I said above, I hadn't intended this to be a decorated cake, and was more interested in the flavour that the honey and spelt flour gave the cake. To this end I should really have used a more interestingly flavoured honey! It was  a lovely, moist tasty cake. There was a slightly wholemeal flavour, which was good, and the honey was discernable but subtle. I  think I'd definitely make this again, but would use a better honey to get a more obvious flavour. I think mine was just a fairly generic runny honey.

Nice cake, went down well at work!

Friday, 9 December 2011

Sticky ginger cake and a product review


Disclaimer: I was approached and asked if I would like to review a product, which was sent to me free of charge. I did not receive any payment. The review is my view of the product, positive or negative, as I found it.


The product in question was a set of spatulas by the company Joseph Joseph. I haven't used any Joseph Joseph products before but have seen them in department stores, where they always seem to be well made, so I was keen to try them out. The selling point of this set is that they have elevated heads, making them very helpful for messy cooks like me, with a very small amount of space to work in. I find myself quickly getting untidy with no-where to put things down. The idea is that these won't make messy splats on your work surface.


The set comprises two flexible spatulas and a slightly stiffer spoon type spatula. They are well made and solid in design. I like the fact that the spatula head joins the handle half way down (where the colour changes) because it means that you don't get bits of cake mixture stuck in the head part, which can be a problem with some designs.


I've used them a couple of times now, and am very pleased. They're very non-stick too, and are heat resistant up to 340C, which was good, given that one of the uses I put them to was making caramel! More on that to come in another post...


Thank you to Jo and Find Me a Gift. I didn't find it particularly easy to find the kitchen based gifts on the website, so it might take a bit of hunting.


Onto the cake... I really wanted a slightly alternative take on the festive baking going on at the moment, and whilst browsing the Guardian website, came across this article by Nigel Slater. There are a number of non traditional Christmas treats in it. He says this cake is the alternative Christmas cake that he has around to offer to guests who aren't traditional fruit cake fans. That appealed to me, and having all the ingredients available I set to make it.

Had I thought a little harder I would have realised it was just a gingerbread recipe! I think I was taken in by the 'additions' to the recipe, thinking that it would be something different (after all, who adds things to gingerbread - it's such a runny batter that they will undoubtedgly sink). But as I made the batter I realised that this was a standard gingerbread, and that my raisins and chopped ginger were indeed going to sink! I decided that I didn't mind, after all, gingerbread is one of my favourite cakes, and so I was interested to see how this one turned out!


I followed the recipe as given here (it's number 4, you need to scroll down the page), and my 4tbsp raisins (rather than sultanas) weighed about 85g. I didn't bother with the icing, I sometimes prefer my gingerbread naked....

What was it like? Well, pretty good. I had some good positive feedback from colleagues who really enjoyed how moist it was, but in all honesty it wasn't gingery enough for me. I think my ground ginger must be duff or there isn't enough of it in the recipe, but I found this cake just a touch on the sweet side because it wasn't gingery enough. That said, it was still delicious and moist, with a lovely sticky top, and once I resigned myself to the sinking ginger and raisins, they provided quite a nice layer of gooey luscious fruit on the base of the cake. A good recipe, but not a perfect one!

Saturday, 3 September 2011

Squidgy chocolate squares - unconventional brownies


I really fancied a rich chocolate square, brownie like but not a brownie, if that makes sense. After some hunting I came across this recipe for vegan brownies on allrecipes.co.uk and it seemed to fit the bill.

As usual, I adapted the recipe slightly, un-veganising it (sorry!) to include some butter (I'm sure it would work really well as stated though!) and halving the recipe. I made it in an 8" square tin, but next time I think it would be better in a smaller tin, to make a thicker square.


Squidgy chocolate squares
Ingredients
125g plain flour
175g demerara sugar
32g cocoa powder
1/2tsp baking powder
1/2tsp salt
125ml water
62ml light olive oil
62g butter, melted
1/2tsp vanilla extract (or 1tsp if not using chocolate essence)
1/2tsp chocolate essence (optional)

Method
- Preheat the oven to 180C/Gas 4. Grease and line an 8" square tin, or a slightly smaller one for thicker squares, but be prepared to adjust baking time.
- Mix flour, sugar, cocoa powder, baking powder and salt in a large bowl.
- Add the water, olive oil, butter, vanilla extract and chocolate essence if using.
- Mix well, pour into prepared tin and level.
- Bake for 25-35 minutes, depending on how squidgy you want the middle! (I think mine took about 35 minutes)
- Allow to cool, and very, very carefully remove from the tin. I wasn't careful enough and mine broke, but they were still delicious!


I really enjoyed these - they were deliciously fudgy and gooey in the middle - fabulous! I think next time I'll try them with either light or dark muscovado sugar or perhaps half and half of each, to add a little more depth of flavour to the sweetness. I might also add some chocolate chunks or some dried cranberries too, but wanted to make the recipe as stated first time round to make sure it wasn't a complete disaster!

Tuesday, 30 August 2011

Bread rolls and playing with your food


Inspired (and aided!) by Celia, Brydie and Joanna, these are my bread rolls made with my new bread presses a spiral, a kaiser/vienna and a rosette/rosetta (I bought two of them from Bakery Bits, here you need to scroll down) but I need to play around some more with the recipe that I'm using. When I press the rolls they flatten a lot, and my dough doesn't seem to have much oven spring, resulting in rather flat rolls. It's just a straight yeasted dough, a little lower in hydration than my usual, and with a little olive oil added.


I suspect that this is partly to do with the fact that as they proove they seem to develop a bit of a skin, I ought to try prooving them in a moister environment to prevent this and try and get them to spring a bit more. I also think that the white rolls weren't aided by a further experiment in using some quite elderly '00' pasta flour I had hanging around. I don't think it was designed for bread really - not only did they not spring very well, they staled quite quickly too. I ought to try either Joanna's recipe or Celia's sourdough rather than just freestyling.


I also found that if I pressed them immediately before baking I got the patterns you see above


whereas if I pressed them and allowed them to proove a little further, the pattern all but disappeared on baking seen here at the front - I pressed the back one just before baking. All good fun but I do need some more practice before I can emulate the three bakers I linked to at the beginning of this post. If you want stunning pictures, hop through to their blogs!


This one is my best one!


Typically though, the bread rolls I made the morning I was expecting the presses to arrive in the post (and they didn't arrive until after the bread needed baking.... one of those days) sprang much better and were reasonably tasty if nothing special. Just goes to show though, that even if you don't have fancy presses, you can still make pretty bread rolls. I just used my small dough scraper, but any reasonably firm piece of plastic would probably do.

Thursday, 26 May 2011

Double chocolate blueberry cookies


Sorry about the lack of activity round here. I've got lots and lots to post but have been unexpectedly without internet access for the past few days - I was staying in a hotel that I'd expected to have wi-fi and had been planning to catch up on some posting, but there was no wi-fi, so obviously no posting! Never mind, I'll try and make up for it now. Starting with 101 uses of a tin of condensed milk. Well, perhaps not quite. When I made these caramel muffins I not only found Carnation Caramel, but tins of condensed milk too, my cupboards truly are a voyage of discovery sometimes!

A recipe in the current issue of the Sainsbury's magazine (June 2011) had caught my eye, and required 2 tbsp of condensed milk. Obviously it's not ideal to open a can for just 2tbsp (unless you want to risk eating the rest just as it is....) so this post is the first of a mini series using condensed milk. Onto the recipe...


Double chocolate cookies
Ingredients
125g butter, softened
125g caster sugar
2 tbsp condensed milk
125g self raising flour, sifted
50g cocoa powder, sifted *
100g plain/white chocolate, cut into chunks or 50g each dark chocolate and dried blueberries
* I think I used slightly less cocoa, because 50g is an awful lot, and then just added a little more flour to substitute. I think I used about 30g cocoa powder.

Method
- Preheat the oven to 150C/gas 2. Line a couple of baking trays with parchment paper.
- Cream the butter and sugar together until pale and fluffy.
- Beat in the condensed milk and then add the flour and cocoa and mix. Stir in the chocolate and blueberries.
- Roll into 12 walnut sized pieces (I got about 25) spacing well apart on the baking tray. Flatten slightly then bake for about 25 minutes** (I did 20 and they were overdone) until firm at the edges but soft in the middle.
- Leave to cool for a few minutes before transfering to a wire rack to cool completely.

**Gas 2 seemed very cool, so I used gas 3 and baked for 20 minutes. I forgot that because the recipe was only supposed to make 12, so mine were effectively half the size, that they'd need less time anyway. They weren't burnt, but they were definitely overdone - lovely cookies, but too crispy. 
Originally from Sainsbury's magazine, June 2011.


These were nice cookies, but as I say, I definitely overcooked them, and they deserve another chance. I do like the combo of dried blueberries and chocolate. I used quite big chunks of chocolate rather than choc chips, and it was nice to hit a big lump of chocolate; I bet they'd be great warm, or dipped in coffee! They aren't as good as the world peace cookies though! Other flavour variations suggested in the recipe are: White chocolate and cranberry, Zingy ginger and lemon, Maple syrup pecan, Oats and honey, Cherry and flaked almond and Toffee fudge chunk. I quite fancy trying them with maple syrup and cranberry, in a combination of the flavours they suggest!

Friday, 6 May 2011

Buttermilk Oaten Bread


Is it a house brick, or maybe solid porridge? Was it all just a big mistake, or is it actually a loaf of bread? Well, it's defnitely bread, but it also comes under the heading of a big mistake too. Let me elaborate.... the recipe/inspiration for this bread comes from The National Trust Teatime Baking Book, yes, that one again (apparently my new favourite book). However, I had a bit of a mix-up with this one and have 'adapted' (i.e. made a hash of) it so much that I feel I can post the recipe as my own!


This bread is a non-yeasted soda-type bread, with the slightly unusual step of soaking the oatmeal of the title overnight in the buttermilk of the title. I didn't have the required fine oatmeal, but made do with medium oatmeal, and also didn't have buttermilk, instead substituting a mixture of fat-free Greek style yogurt and milk to make the mixture slacker.

Unfortunately the time between mixing the oatmeal and dairy to soak overnight and finishing the bread the following day was sufficient for me to forget that I'd halved the recipe. So I just stuck in the whole amount of flour as specified in the recipe for two loaves, rather than the one I planned on making. Well, I did wonder why the mixture was so dry - no way could I knead a bowl of crumbs! So I added more milk and eventually it came together. So try it if you want, but heed my warning about recipes with two stages separated by a period of sleep. This is why I don't try any of the more adventurous challenges out there in the blog world, I can't manage simple bread recipes, let alone anything actually complicated!!!


Buttermilk Oaten Bread aka Solid Porridge
Ingredients (as I made it)
100g medium oatmeal
130g fat free greek yogurt
80ml semi-skimmed (2% fat) milk
125g plain white flour (soft, not bread)
125g plain wholemeal flour (soft, not bread)
1 tsp baking powder
1/4 tsp salt

Method
- Mix the yogurt, milk and oatmeal together. Refrigerate overnight. In the morning, the mixture will be pretty stiff.
- Preheat the oven to Gas 4/180C. Grease and line a baking tray.
- Add the flours, baking powder and salt to the soaked oatmeal, plus extra milk to combine (I didn't measure this, but at a very rough guess 50ml?)
- Knead until smooth.
- Pat out until about 1 1/2 - 2" thick. Place on the baking tray and dust with flour, or sprinkle with oats. To be honest, I mean to sprinkle with oats, but forgot that too. I'd also suggest cutting some slashes in the bread but forgot that. Can you see a theme developing here?
- Bake for 40-50 minutes (I think, the recipe says 35-40 but I definitely left mine longer than that!) until it is golden and sounds hollow when tapped.
- Remove from the oven and allow to cool, or serve warm with butter melting onto it... mmmm, butter!


You can see from the picture that this is a really dense bread. I'm sure that a lot of people really wouldn't like it! I, on the other hand, am quite enjoying it! It has a distinctive (pleasant!!!) oaty taste and because it's so dense it really does remind me of solid porridge. I quite like porridge, so this is no bad thing in my books. And because it's bread you can spread it with butter, it's difficult to spread porridge with butter (and no, I haven't tried that!) I think it would make really good toast, or croutons for a salad. It hasn't really turned out the way I expected, but I quite like the finished result as it is, although I may try repeating the recipe more as it was intended at some point!

EDIT: 15th May


This is the bread made as it was supposed to be - with 125g flour in total rather than 250g. I still felt it needed a little extra milk to bring it together. The texture was pretty much identical to the first time I made it, so I didn't go too far wrong there. Nice bread though - to have made it twice so quickly!

Wednesday, 19 January 2011

Chocolate and Dried Fig Cake

Another one of my 'everyday' type cake recipes. It may not be much to look at, but this is a tasty cake, and perfectly complements a cup of coffee at morning break time. This cake follows the frugal theme and is not my recipe for We Should Cocoa this month (although it was for a while... for my submission see here), making the most of Christmas left overs. Chele set the challenge for this month and specified that our chocolate submission should also include leftovers. For me this was a packet of dried figs, bought with no specific purpose in mind. I quite like dried figs, but never seem to get around to eating them, so thought that incorporating them into a chocolate cake seemed like a good way to go.

Again in the frugal vein I was using up some low fat creme fraiche that was hanging around the fridge (leftovers from the banana cake recipe) and also wanted to see how the combination of creme fraiche, a relatively lower egg content and wholemeal flour would work in combination.


This was quite a light chocolate cake - it was moist from the creme fraiche, and sank very slightly on coming out of the oven, which I guess is due to the wholemeal flour. However, it did stay level, without a dip, which is encouraging - I hate it when cakes sink after coming out of the oven, it's really depressing! So this is my recipe, created as I went along...


Fig and chocolate cake
Ingredients
120g butter, softened
120g caster sugar
2 tbsp cocoa powder
120g self raising wholemeal flour
100g low fat creme fraiche (I used Yeo Valley, which doesn't have any added stabilisers or other ingredients)
50g dried figs, chopped small (about 4 dried figs)
40g 70% dark chocolate, chopped small


Method
- Preheat the oven to 180C/Gas 4. Grease and base line a shallow 8"/20cm round cake tin.
- Cream the butter and sugar until light and fluffy.
- Add the eggs, flour, cocoa powder and creme fraiche and beat again until well mixed.
- Fold through the figs and chocolate and dollop into the cake tin, spreading the mixture out.
- Bake for 35-40 minutes until springy and a cake tester comes out clean.
- Cool on a wire rack, then cut and eat.


You could also add a chocolate frosting or glaze of some sort, but I was too lazy, sorry, frugal to do this!


Some of my colleagues really enjoyed this cake, but personally it's probably not one I'll make again. I think there are probably better ways of using dried figs up, and better chocolate cake recipes but you don't know until you try do you? I'm glad that I chopped the chocolate and figs very small - they stayed suspended in the cake rather than sinking to the bottom. I was pleased with the use of wholemeal flour, I should definitely do it more! The fig flavour wasn't obvious at all until you bit into a piece of fig, unsurprising I suppose. I wonder if you could stew the figs, make a puree of them and fold this in, modifying the flour content to account for the moisture - I'm sure this would make the cake more figgy. An evolving recipe I feel....

Friday, 8 October 2010

Blackberry and pear cake - disaster

This was theoretically a really good idea, and I might get round to repeating the combination of flavours, but just to show that sometimes the smallest ingredient can be the most important here we have my latest complete disaster. Next time I'll follow the recipe including the... baking powder. D'oh!!!
Needless to say I didn't taste it!

Thursday, 2 September 2010

MM2 - Chocolate Shortbread

Who doesn't like shortbread? Crumbly, buttery and utterly delicious it's a fine treat in its original state. Add chocolate, both cocoa powder and chunks and you'll get something even better!


This recipe is one from a fairly recently acquired book; Easy Baking by Linda Collister. There are so many amazing looking recipes in this book that it's already bristling with post it notes marking the pages of the recipes I want to make. But you have to start somewhere and here seemed as good a place as any. The recipe has also been published online in the Independent (in 1998!!!! years before I started baking with any degree of seriousness!) and is about halfway down the page, here. Ignore the ounce measurements, they've forgotten some vital spaces and / signs!!! I decided to add more chocolate to my version and some semolina for a little added crunch, and I resized it for a smaller tin. My version is given below.

Chocolate shortbread
Ingredients
150g softened butter
75g golden caster sugar
15g cocoa powder
15g fine semolina
195g plain flour
45g dark chocolate (72% cocoa solids is my preference), chopped

Method
- Preheat the oven to gas 4/180C. Grease and base line an 8"/20cm round tin.
- Beat butter in a bowl until very soft and creamy. Add the sugar and beat again until well combined.
- Add cocoa powder, semolina and flour and mix well until no flour remains visible.
- Mix in the chocolate then tip into the tin and press until smooth.
- Bake for 20-25 minutes. Do not allow to brown or it will be bitter.
- Remove from the oven, sprinkle with more caster sugar, mark into 12 and allow to cool completely in the tin.


This was lovely, but I wasn't sure that the middle was cooked properly even though I probably left it in for nearer to 30 minutes. Lovely and buttery and crumbly though, and the added chocolate chunks had a delicious bitter contrast to the main sweet body of the biscuit. One to be repeated but just cooked a little longer I think.

Tuesday, 31 August 2010

MM1 - Divine chocolate ginger cake

I had a bit of a disaster with this one, but I'm sharing it anyway because I think that it could easily be rectified. The recipe comes from the book Divine - Heavenly Chocolate Recipes with a heart by Linda Collister, which I've had for ages and not managed to bake anything from until now. I have a lot of cookbooks that I've never made anything from (and I'm sure I'm not alone in this!) so I think this cake should be the beginning of a new series on the blog, the MM posts. Marked and Made. I think I should credit Chele at Chocolate Teapot for inspiring this idea, with her Cookbook Challenge posts; I've always thought that this was a really good idea, so thanks Chele! I don't know how frequent these posts will be though....

Anyway, back to the cake. I was really pleased to be able to find this cake already on the internet here, so I can share the recipe with you. I'm sure that if you've been following for a while you'll have realised that I love all things chocolate and ginger is one of my all time favorite flavours so a combination of the two in cake seemed perfect to me. I'm not sure why it's taken me so long to make this recipe, as it was really good! I made one change only; to use dark rather than milk chocolate because I'm that way inclined! and I love the contrast of sweet cake and bitter chocolate (and I have loads of dark chocolate in my cupboard and no milk!). I used Divine brand chocolate and whilst searching the internet for the recipe I looked at their website and spotted lots more delicious looking recipes, as well as lots of info about Divine chocolate which I'm definitely going to be looking at in detail!


As I mentioned at the beginning though, I had a slight disaster. The recipe in my book specifies a 450g loaf tin, which I duly used. The mixture overflowed. Luckily I had thought to put a baking tray on the shelf below in the oven before I put this in (the amount of mixture in the tin made me suspicious that it wasn't all going to stay put during baking!) so I didn't get the nasty burning smell as cake mixture hits the oven floor that I hate! The cake also took longer than the specified 45-50 minutes to cook, so it's rather brown on the top. A little too brown really. However I think that next time if I use a 900g loaf tin it'll be much better - the cake will cook more quickly and not overflow. And I really hope there will be a next time, because this was one delicious cake. Large hunks of chewy crystallised ginger and big chunks of bitter chocolate made this a very more-ish cake.


You can see the waterfall effect on this side of the cake where the mixture rolled off in the oven. I bet people would pay good money to get that effect deliberately and I've managed it anyway..... or perhaps not! Anyway, make the cake, it's moist and gingery and chocolatey and good. And one of my colleagues asked for the recipe because she liked it so much. Yay!

LinkWithin

Related Posts Plugin for WordPress, Blogger...