Showing posts with label Dan Lepard. Show all posts

Sunday, 7 April 2013

A bready update

50% wholemeal spelt soured cream rolls

There haven't been very many bready posts recently at all (aside from the not-cross buns!). This is not because I'm not eating much bread, far from it. However I am often a creature of habit and when I find a recipe that works for me I tend to stick with it. Recently this has been Dan Lepard's Sour Cream Loaf. Not as a loaf though - as bread rolls. I've blogged about the recipe before and the original can be found on the Guardian website here.

Of recent times I have made 12 rolls from the recipe amounts, which suits me well as a lunchtime sized roll. I've also played with the flour a little too. At the top of the post you can see a batch I made using half wholemeal spelt flour, half standard strong white flour. These were good, and it's sometimes good to have a change from all white too.

Unbleached white soured cream rolls

Above you can see a batch made with organic, unbleached strong white flour. I bought this from a supermarket, but the producer is Gilchester Organics. Their website has areas for learning about their products and also recipes. (This is not a sponsored post - I'm just talking about the flour I bought). The flour is a creamy colour and produces bread that it neither white nor wholemeal. I think in terms of comparison the nutrient profile is probably similar to white flour but the flavour is different. The photo above is not the best - I thought I had a better one from one of the more recent batches I have baked, but it seems not - my recent batches look more like the top picture.  The crumb is close and even textured and very soft - delicious. And of course, using the soured cream bread recipe means that the whole house smells of warm cream while you are baking, which just cannot be a bad thing!

Small unbleached white soured cream loaf

So, what have you been baking recently? Anything I should try to lift me out of this (rather pleasant ) bread baking rut?

Sunday, 24 March 2013

Dan Lepard's Chocolate Lamingtons

Lamingtons with successful glaze - mark 2

Well, sort of. Last year, Dan's recipe for double chocolate lamingtons was published in the Guardian, ahead of ANZAC day. I made them at the time, and used the glaze that he recommended for coating them. However, since I avoid coconut (as one of those things to which I might be allergic but don't fancy finding out about) I didn't want to actually coat the lamingtons and dip them in desiccated coconut, I just wanted to glaze the cakes. 

Lamingtons the first time round - with a rather runny glaze used in the middle and on the top

I rather fancied Suelle's take on the cake, which you can find here Chocolate and Coconut Layer Cake. She had the rather brilliant idea of halving the coating quantities and splitting the cake in half, sandwiching it together with the glaze and spreading it across the top. I decided to go for this too but unfortunately I was in a bit of a hurry to get the cake iced and my glaze was steadfastly refusing to thicken, which as a coating I think you'd probably expect. My lamingtons were good, but rather messy to eat and the glaze wasn't really what I wanted. I think I possibly used a different chocolate to Suelle and that's why my glaze took so long to set. I refrigerated a little of it and it did eventually thicken up. 


As with many cakes I make that end up turning out not quite right, I intended to remake the cake (very successful) and ice it with a different icing. But as usual, time slides and I didn't get round to remaking the cake. Then as part of the step-by-step baking series that Dan is now doing for the Guardian, he published a more conventional lamington recipe recently, for Australia Day (26th January) and also a twist on this recipe,  Macadamia Ginger cake with lamington icing. These two recipes reminded me of how successful the chocolate lamington cake had been and how I had intended to give it another go. And so I did.


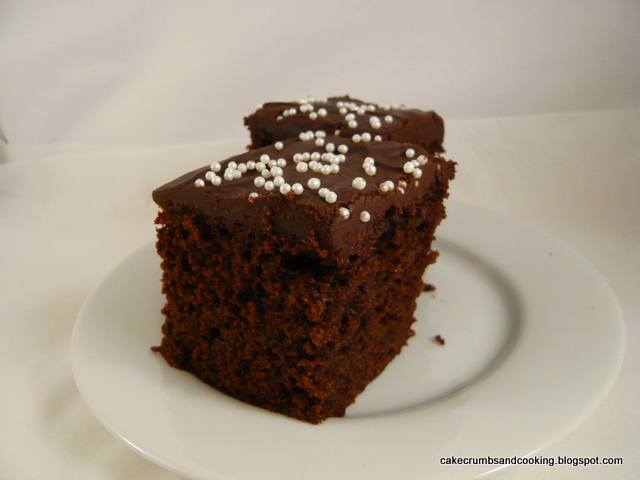
I used the double chocolate lamington cake recipe, as stated here and then taking inspiration from the macadamia ginger cake with lamington icing, used an approximation of the lamington icing from that cake to ice mine with. As with my first attempt, the cake was successful. I did note that it took longer to bake than stated (about 10-15 minutes longer) and the top surface seemed a little darker than I would have liked. However, once the icing was on not only was this not noticeable, there was no hint in the taste of the cake that it had caught at all, so the dark surface was obviously just in my mind.

Dan states for the lamington icing that you need a half batch of the lamington icing, plus 75g dark chocolate. I used the quantities stated below (which are approximately 1/3 of the amount stated, plus 30g dark chocolate) , which gave a generous covering for an 8" (20cm) square cake, as you can see in the pictures. 


Lamington icing
130g dark chocolate (I used G&B 72% cooking chocolate)
10g cocoa powder
100g caster sugar
65ml milk

Method
- Bring the milk, caster sugar and cocoa powder to the boil in a small pan, whisking.
- Add the chocolate, stir until melted, allow to thicken if necessary and then use to spread over your cake.

* I found that it was difficult to beat all of the small lumps of cocoa out of the icing, therefore I would recommend sifting it first. I also ended up transferring the sugar/cocoa/milk mixture to a small bowl to try and beat some of the lumps out of it before adding the chocolate. The mixture thickened quickly when I added the chocolate and was easily spreadable - I could happily spread the mixture right to the edge of the cake without fear that it was going to run off.


The actual cake was lighter than I expected and as you might expect from the ingredients, really quite sweet. I'm not sure why, but the top 1/3 of the cake seemed to be more aerated than the lower portion - you can see this in the picture above. The icing was very successful - it was less sweet than I was expecting and I would definitely use it again (I'm not that keen on super sweet icings as a rule). The icing doesn't dry to a gloss, but to a matt finish. I also decorated my cake with hundreds and thousands, and these needed to be added quickly while the icing was still wet enough to hold them, otherwise they just rolled off....


I'm entering this into We Should Cocoa, the monthly chocolate blogging challenge set up by Choclette of Choc Log Blog and Chele of Chocolate Teapot. The host this month is Lucy of The Kitchen Maid and she has chosen 'Fame' as the theme. Lamingtons are a famous Antipodean treat and Dan Lepard is a famous baker so I think these qualify!

Friday, 16 November 2012

Chocolate Sliders


I made sliders, based on Dan Lepard's recipe quite a long time ago now (in fact, just over a year... how time flies). They have been on my mind again recently. The lovely soft, moist texture was what appealed to me both then and now so I thought I'd make them again. This time however, I wanted to add my own twist - chocolate!

Soft and moist texture

Not for any particular reason, just because adding chocolate to things generally makes them better. I have been meaning to make a chocolate loaf (yeasted bread rather than cake) for many years now and thought that this recipe would lend itself well to the addition of chocolate. See below for my thoughts and musings after tasting them....

Before prooving

Chocolate Sliders
Ingredients
25g cornflour (cornstarch in the US)
275ml milk (I used semi-skimmed)
1tsp sugar (5g)
12g butter
50g cocoa powder
325g strong white bread flour
1 tsp salt
1 tsp dried (instant) yeast

Makes 14

I followed Dan's instructions for these again with minor modifications:
- Slake the cornflour with a little of the milk to form a smooth paste (slaking is just the term used to refer to the process of mixing a small amount of the liquid with the cornflour - it prevents lumps forming when the mixture is heated) and then add the rest of the milk, mixing until smooth. You will find that the mixture does not have any lumps in it because the lumps are removed before the majority of the milk is added. Heat until boiling, stirring all the time - the mixture will remain quite runny for ages and then suddenly thicken up. Remove from the heat at this point, stir in the sugar and butter and allow to cool a little.
- Add the flour, cocoa powder, salt and yeast and mix well to form a dough. I had to add a little water here as my dough was too dry to come together. Leave for 10 minutes or so, and then knead briefly until smooth. I then kneaded my dough again after about 20 minutes and then left it to increase in size.
- Leave until significantly increased in size. I didn't time this as I was busy with various other things, but I think it was left for longer than Dan's specified 90 minutes.
- I wanted mini slider size rolls so weighed out 50g pieces of dough (yes, using a scale to make sure they were all the same) and shaped them into balls. I placed these relatively close together on a lined baking tray and left them to rise again. I place them close together to get a slight 'batching' effect, where the edges of the buns met rather than staying separate.
- Preheat the oven to Gas 6/200C in sufficient time before you think you'll need it (yes, that's vague - your oven might take 30 minutes to heat up, it might take 5. Mine probably takes about 10 but it was on anyway). 
- Dust lightly with flour and then bake for 20-25 minutes. I have no idea how I decided when they were done - they went into the oven dark brown and came out dark brown.... The time is based on Dan's recommendations but with a little added to allow for using a lower temperature.

After prooving

Texture wise, these were perfect - just how I remember the sliders from last year. So soft and moist - almost cake like (in a bread-y sort of way). Taste-wise I have to confess to being slightly underwhelmed. I had remembered enjoying the sliders so much last year and thought that these would be just as good. Although I said at the beginning that adding chocolate to most things makes them better, the substitution of such a large proportion of the flour for cocoa powder actually ended up making a slightly bitter roll. Not inedibly bitter, but it took me by surprise. I think that adding chopped chocolate to the basic dough would have been a better way to add chocolate flavour to the sliders. Either that, or to add more sugar to the dough to counteract the bitterness.


However, nothing ventured, nothing gained and although the bitterness of the bread took me by surprise the first time I ate them, they have very much grown on me and I'm glad I tried the experiment. I have been eating them for breakfast (what?! bread is definitely a breakfast item, even if it is chocolate bread...) and although they aren't the best spread simply with butter I think they'd be divine with Nutella (for those who can). I can definitely recommend them with choccy Philly or spread with butter and a square of 70% chocolate (I used Lindt because a 10g square is just the right size for these rolls). I think the chocolate is quite a French thing - I am given to understand that a few squares of chocolate in a pain-de-mie (sweetish soft white bread) roll is a common snack for children in France (though I could be mistaken - they probably eat Mars Bars like the rest of the world!)

Choccy Philly - really not silly...


I am submitting these to We Should Cocoa this month, where the theme is 'Bread'. Founded by Choclette of Choc Log Blog and Chele of Chocolate Teapot, the host this month is Nazima of Franglais Kitchen.


I am also submitting them to Breakfast Club, founded by Helen of Fuss Free Flavours and hosted this month by Choclette of Choc Log Blog.

Wednesday, 24 October 2012

Ginger Pumpkin Chocolate Cupcakes


When this month's We Should Cocoa was announced by the Hungry Hinny (who is guest hosting for Choclette of Choc Log Blog and Chele of Chocolate Teapot) as pumpkin, my mind immediately jumped to the recipe I wanted to use - Dan Lepard's Pumpkin Chocolate Mud Cake. And then I remembered I had already made and blogged this one - find it here. (And very good it was too).


Luckily the random collection of cells that passes for my brain recalled another pumpkin cake by Dan Lepard which I thought would be appropriate to adapt for this challenge. Originally published three years ago as a Hallowe'en treat, you can find the original recipe here on the Guardian website, but I made a number of changes to make it suitable for this challenge and to suit my ingredients and allergies...

Ginger Pumpkin Chocolate Cupcakes with Vanilla Buttercream icing
Ingredients
4 lumps of ginger in syrup, drained of the syrup
175g light muscovado sugar
200g butter
2 large eggs
150g pumpkin, grated
200g plain flour
2 tsp baking powder
1 heaped tsp ground ginger
100g plain chocolate (60-70% cocoa solids), chopped
1/2 tsp ginger extract (optional, but I used it!)

For the buttercream
100g softened butter
250g icing sugar
1 tsp vanilla extract
splash of recently boiled water

Method
- Preheat the oven to 180C/Gas 4. Line 18 muffin holes with cases - I used a Hallowe'en variety pack - black, orange and spider, plus a couple of yellow ones I found in the baking cupboard. 
- Cream the butter and sugar until light and fluffy.
- Add the eggs one at a time, beating well between each addition.
- Fold in the pumpkin, ginger extract and chopped stem ginger, then the flour and spices.

I promise there was squash in there...

- Fold in the chocolate and divide between the prepared cases. Bake for 25-30 minutes until risen and springy to touch.
- Allow to cool.
- Make the buttercream by creaming the butter until very soft. Add half of the icing sugar and start beating slowly to incorporate. Add the rest of the icing sugar and the vanilla and continue to beat until very light in colour and fluffy. I add a little water from a recently boiled kettle to let the mixture down a bit and make it softer to pipe. Some people use milk - I have found that cold milk sometimes makes the mixture split. 


I was a little ambivalent about these, although my colleagues really liked them. I loved the stem ginger in the cake and the chunks of chocolate (chocolate and ginger being my two favourite flavours of the moment) and the cake itself was lovely and moist and tender. You couldn't taste the pumpkin, but there was a slight pumpkin-y aroma when the cake tin was opened. It contributed much more to moistness than flavour. I'm not sure the vanilla buttercream was the right complement to the cake, but it was delicious in its own right! I think I was looking for a more intense hit of ginger throughout the cake, but actually, these were great anyway.


As these contain a rather seasonal ingredient, I am sending them to Simple and in Season, also hosted by Nazima of Franglais Kitchen and founded by Ren of Fabulicious Food.


I am also sending them to One Ingredient, hosted this month by Nazima of Franglais Kitchen and co-hosted by Laura of How to Cook Good Food.


And last but not least, of course these are heading to We Should Cocoa!


Wednesday, 3 October 2012

Treacle and Greengage Muscovado Muffins


When I saw that Dan Lepard's column in the Guardian a few weeks ago was all about baking with treacle I quickly investigated further - I love treacle and baking with it. So far from being a slightly 'weird' ingredient as Dan proposes, I was keen to see what he was suggesting we could use this gorgeously sticky substance for now. Both recipes appealed, but the Treacle and Caraway Apple muffins sounded amazing. Unfortunately I discovered fairly recently that I'm not really a fan of the flavour of caraway in baked goods. Perhaps it's something I'll come to appreciate more (as I get older, or should that be wiser?) but at the moment, caraway is no-go. Easy enough to leave out though. I also had a glut of greengages and decided to use those instead of the specified apples - there will be time enough for apples later in the autumn and I wanted to make the most of the last of the seasonal fruit available now. I changed the proportion of flours too, and have noted my changes here.


Treacle and Greengage Muscovado Muffins
Ingredients (for method, follow the link highlighted in the text above to Dan's recipe in the Guardian)
100g butter, melted
40g sunflower oil
50g black treacle
175g light muscovado sugar
3 eggs
2tsp vanilla extract
200g plain flour
100g wholemeal spelt flour
2tsp baking powder
around 6 small(ish) greengages, chopped into about 8 each
Oats to scatter

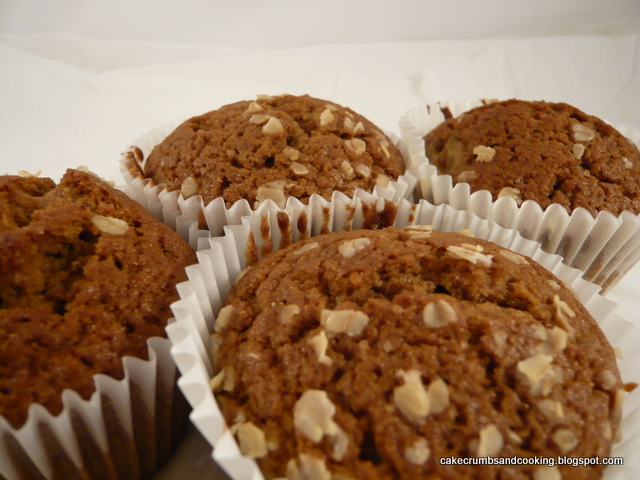
Since the recipe specifies scattering the muffins with flaked almonds before baking I racked my brains for a suitable alternative and came up with oats - not quite as crunchy (in fact not nearly as crunchy) but provided a little visual appeal to the finished article and a bit of a contrast of textures. I think next time I'd be a little more generous with the oats. I also made 18 muffins out of this mixture, which was perfect for me - 12 would have made very large muffins for my requirements.


These were immensely popular at work, and rightly so. The combination of flavours - the treacle, vanilla and then the soft delicate plum were great together. They were beautifully moist and the greengages worked superbly in place of apples, becoming deliciously soft and squashy. I'm sure that any soft plum would work well (although I'm not sure about those ones that are bullet hard and available year round). The treacle flavour was definitely there, adding depth and background, but if you're not a treacle fan, it wasn't overwhelming. I gave my version of the recipe to an interested colleague. I hope she enjoys them as much as the rest of us did. I'll definitely make these again and would recommend you make them too! 

Sunday, 1 April 2012

Black Bread - Short and Tweet


This week's selection included suggestions for a number of different breads from @EvidenceMatters - you can find the Short and Tweet schedule for April here. You can find out more about the challenge and how to participate here. So this week's selection included Spelt and Ale loaf (I've just finished my spelt flour!), Walnut loaf (out for obvious reasons round this way), Soya and Linseed Loaf (I have recently baked, but not blogged about a soya containing loaf so didn't want to duplicate the bread in my freezer), Multigrain and Honey loaf and Black Bread. Both of these remaining breads included ingredients I'm really not sure that I'm keen on. I don't really do seeds very much and the Black Bread is full of slightly weird and wonderful ingredients.

Having recently aquired some caraway seeds I decided that it would be the Black Bread for me. Helpfully it didn't require the sponge stage that the multigrain and honey loaf needs. Helpful because I am not organised and have only just finished baking this loaf!


The loaf derives the intense black colour from a mixture of rye flour (although you can choose rye, spelt or wholemeal), black treacle, cocoa powder and instant coffee powder, plus there are additional flavours from the seeds - caraway, fennel and cumin are the suggestions so I decided on caraway. There is also an option on the starchy root vegetable too - carrot is suggested and is what I used, but I'm sure that parsnip, swede, turnip or even potato would work equally well. I guess that with all of these variations each loaf of black bread will be fairly unique to the baker making this particular recipe.

I halved the recipe - partly due to storage issues (again) and partly because I'm not sure that I'll like the end result! Having said that, when I halved the ingredients I was mean with the seeds, using just a scant tsp, mean with the coffee, using just over a half a tsp instant espresso powder (I really don't like coffee at all, even as a flavouring in cakes, but having successfully made Dan's Black Pepper Rye Bread that has coffee as the liquid component, I suspect that the coffee will add to the complexity of flavours rather than overwhelm the loaf), and used about 20g butter.

Cooked rye, muscovado sugar and yeast.

Leaving the yeast to sponge briefly with a portion of the rye that is cooked.

The same mixture after being left for almost an hour.

Lots of random ingredients, ready to be heated.

All in, now to mix...

Mixed up dough, rough and ready before kneading.

Just before shaping. I chose a baton shape rather than the specified round.

After prooving.

Dusted and slashed. I didn't coat mine with the specified sesame seeds, because as I mentioned above, I don't really do seeds.

Just out of the oven.

The crumb is so, so soft. I'm really pleased with the way this has turned out - I chose the right time to bake and was rewarded with oven spring and my slash opening out well, and the crumb is moist and even.

I baked for 10 minutes at Gas 7/220C, then 30 minutes at Gas 6/200C, followed by a further 10 minutes at Gas 6/200C upside down to crisp the base of the loaf.


Amazing looking bread - I haven't had any of it yet, but will update with tasting notes as soon as I can.

Edited 02/04 It's a stunning bread to eat - soft and moist but not pappy soft. The flavour is certainly unusual. The combination of rye, coffee, cocoa and treacle all sort of magically meld into one seamless complex whole - of those flavours I could probably have identified treacle as one but the others were mingled. I'm sure this is just how it is meant to be - after all, the coffee in the Black Pepper Rye bread isn't noticeable as coffee either. I'm glad about this as a non-coffee lover. The next thing I say may sound obvious to many of you, but bear with me, because I've only ever used caraway seeds once before in my life! The choice of seeds in the recipe is caraway, fennel or cumin and I chose caraway, simply because I had them available. The caraway flavour is still very prominent after baking. I thought that this may be the case, because it is a strong flavour, but wondered if it would be tempered by all of the other flavours in the loaf - not so much is the answer! This is fine and great if you love caraway, but I'm still not so sure. I guess this means I'm perching on the fence with this loaf. So it's a stunning loaf - visually, texturally and flavourwise, but use seeds that you know you like the flavour of. Next time I'll make it without seeds I think! I had mine with hard cheese, but think it would actually be much better with a cream cheese.

I'm also entering this into Alphabakes, hosted by Caroline at Caroline Makes and the host this month, Ros at The More than Occasional Baker. The Letter this month is B. So I think my Black Bread qualifies there! 


Thursday, 22 March 2012

Madeleines de Commercy


I tried making Madeleines ages and ages ago, to a recipe I can't remember, and not very successfully. I put it down to using a silicon baking mould for the madeleines, but it might just have been a bit of a rubbish recipe. I can't even remember what was wrong with them - I think they didn't really rise very well and refused to take any colour at all. It was a most frustrating experience and I gave up.

A good while later my interest in Madeleines was again prodded with this beautifully photographed and written post by Joanna @Zeb_Bakes about her Limeblossom Tea and Madeleines. And then as a final reminder, I saw Dan Lepard's recipe for them in Short and Sweet. I was obviously intending to make these because I bought a Madeleine mould ages ago - a metal one this time. I bought mine from Lakeland, but a brief warning - the mould is actually quite wide and just barely fits into my oven - it's more a case of balancing it on the runners at the edge of the oven than placing it on the shelf. I think this means it's likely to get very scratched at the edges, which is a shame. There is a version of Dan's recipe here, but the quantities in the book are really quite different, for all of the ingredients! So not really the same recipe at all, although I think the method is similar. A case of having to buy the book.


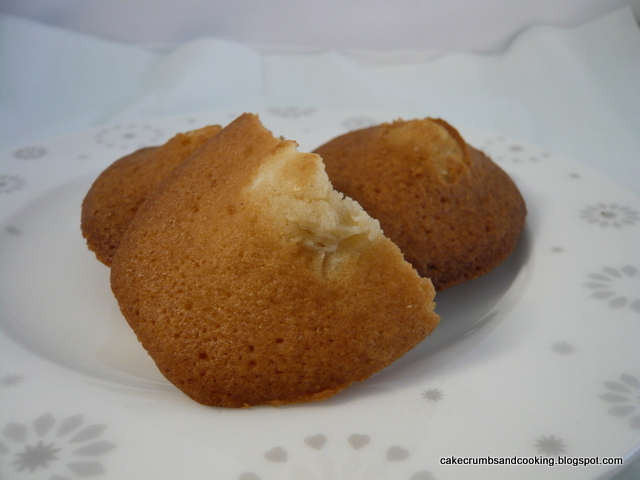
He has a very helpful tip about getting the characteristic 'nipple' that is seen on Madeleines. Adding a tiny little piece of cold butter before they go into the oven will allow the nipple to form. I cut up my butter and then put it into the freezer as I prepared the rest of the batter, removing it just before adding it to the mixture in the moulds. I did find that I had a little too much batter for my moulds, perhaps had I added less I would have got the characteristic thin, crispy edge to the cakes. I don't mind though!

Not all that easy to see in the photos - the front one is the second batch - the back ones are the overdone ones - much more obvious in real life.

I had to make these twice. The first time, they rose beautifully, peaking and so forth, but I think my oven has a tendency to run hot at the top end of its range, and even though I removed them at 9 1/2 minutes with my oven set at just over 200C/just over Gas 6 they were really quite overdone (the recipe specifies 10 minutes at Gas 7/220C). The second time I set the timer for 7 1/2 minutes, which was much, much more successful - no more overdone Madeleines for me! In fact, they might even have come out a little earlier.


I was really pleased with the way these looked - beautiful little peaks and nice soft, tender cakes. I think I perhaps needed to add a little salt to the recipe, and be rather more generous with my flavourings (I think I only added 1tsp of vanilla rather than the specified 2tsp the second time I made them). These are a great starting recipe to give the correct result aesthetically, so it should be fairly easy to ramp up the flavours in them. Lots of spring flavours come to mind - elderflower, lemons, honey (ok, honey isn't really spring) or perhaps even chocolate substituting some of the flour for cocoa powder. Endless opportunities for variations. After all, now I have the shaped tin I need to use it!
On a slightly odd, personal, side note... my paternal grandmother was called Madeleine. I never met her, but I wonder if she ever ate these delicate cakes and what she would have made of them. All the pictures I have seen of her show her as being very elegant, and I can imagine her sitting down to afternoon tea, playing Bridge (popular in my family!) and eating these in a bygone era.


As these begin with an M I'm submitting them to AlphaBakes, run by Ros at The More than Occasional Baker and Caroline of Caroline Makes. Caroline is hosting this month and the letter this month is (unsurprisingly) M.

Sunday, 18 March 2012

Butterscotch Banana Cakes - Short and Tweet


This is the latest installment in the twitter challenge Short and Tweet - baking from Dan Lepard's book Short and Sweet. You can find the blog here, and the whole thing is organised by @EvidenceMatters who spends ages doing the wonderful round ups you can see on the blog each week.

This weeks choices were tailored towards providing a treat for Mothering Sunday (this Sunday 18th March in the UK, although I know that in Australia and the US, Mother's Day isn't until May). They included Saffron Peach Cake, Orange Cassata Cake or Butterscotch Banana Cake. You can find the schedule for March's challenges here.


I love my mum dearly, but we've never done much in the way of celebrating Mothering Sunday, and indeed, this year she is jetting off on holiday on the day, so no need for me to provide a cake to celebrate. With other constraints taken into account I chose the Butterscotch Banana Cake. I have made this before (blog post here) and wasn't really very sure of it then (I found it a little oily), but since it seems to take a couple of attempts for me to really like some recipes I thought I'd give it another whirl. 

You can find the recipe online here on the Guardian website. The published recipe is very similar. When I weighed my banana flesh I found I had 2/3 of the required amount and it was easy to scale everything else back to 2/3 of the original too. For the wholegrain part of the recipe I used wholemeal spelt flour. I didn't have the specified yogurt, but used a splash of milk instead. Not really the correct substitution at all, but never mind. I also decided to make cupcakes rather than a full size cake as Dan mentions that the recipe works well as cupcakes and gives a time for them to bake. This saved me having to work out what size tin I'd need for 2/3 of the recipe and wondering how long to bake for.


The first step is to caramelise the bananas in a sugar syrup. I was a little wary of the wet sugar syrup splitting and crystallising horribly as has happened in the past, but I was in luck and it didn't. It did seem to take ages of boiling for it to get to the required dark reddish caramel, but patience eventually allowed it to happen. There is always something really satisfying when you start to see the sugar start to change colour into caramel and then the whole pan quickly follows. I cooked the banana for quite a while - not that I was distracted whilst doing it.... Actually, it just meant that the banana broke down really easily.


I cannot begin to describe how delicious bananas cooking in hot caramel is. I remember how I almost stopped at this stage last time too - so tempting to just pour this into a bowl and eat with a big scoop of icecream. Instead I scooped it into the cake batter and mixed well:


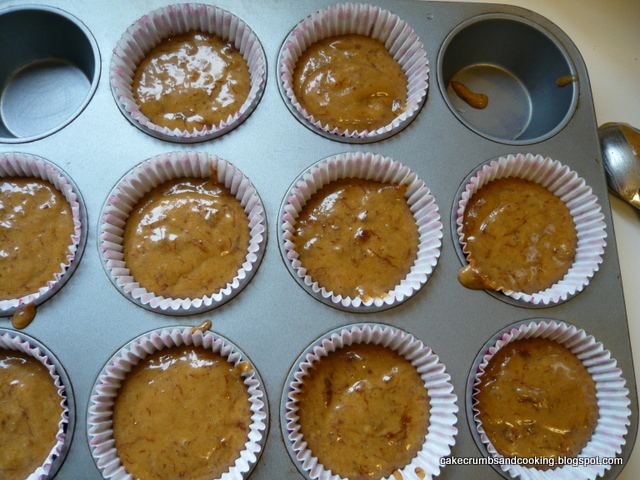
This was then spooned into the waiting muffin cases. I filled them about 2/3 full and really wasn't expecting much of a rise - I think because last time, when I made this as a full cake the middle was a little sunken.


As you can see my 2/3 batter mixture made 10 muffins. And I think I could possibly have squeezed 11 out of the mixture had I been a little meaner when dividing them up. But who wants a mean cake? And I was pleasantly surprised to see a lovely soft little peak on the cakes:


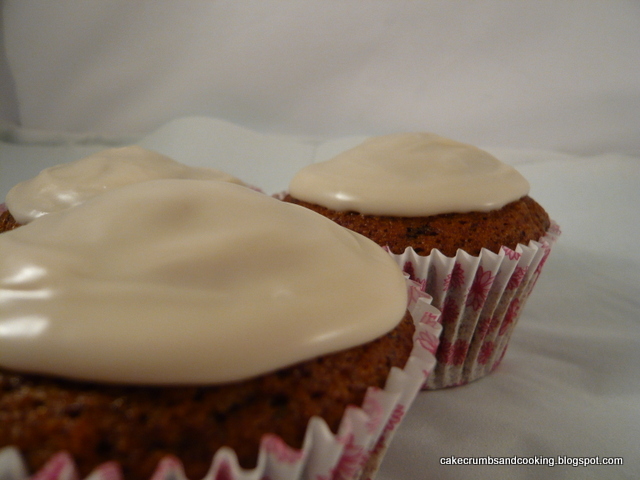
I struggled to know how to decorate these little cakes. When I made the large cake I just left it plain, but small cakes are somehow more demanding of a decoration of sorts. I briefly considered buttercream, but dismissed the idea as too sweet and sickly on top of an already sweet cake. I then decided to make a simple glace icing, but with unrefined icing sugar to give a complementary toffee flavour to that found in the cakes. Sadly, my unrefined icing sugar was clumped and hardened beyond hope of redemption. (And I'm not prepared to whizz it bit by bit in my mini food processor to get it to a useable state again - I don't much enjoy breathing icing sugar!). Back to the drawing board. Then it occured to me that I could use normal icing sugar with a little golden syrup to bring that toffee-ish flavour to the icing. Yum!


So my icing for these buns consisted of about 150g icing sugar, a tbsp of golden syrup and enough water to make a thick icing. It was a tasty icing, and one I'll have to bear in mind for future recipes too.

Verdict? Great recipe - quite time consuming in terms of making the caramel, cooking the banana in it and then leaving to cool but once that bit is done, it's plain sailing. You can see from the picture below just how rich and moist the interior of the cake is - the reddish brown of the caramel definitely comes through. They are light, very banana-ry and very moist and I didn't find them oily at all this time. Sadly I just didn't like them all that much. The cooked strands of banana in the cake were a little offputting and gave a texture I just wasn't keen on. However, this is entirely a personal thing because one of my colleagues said that she thought these were possibly the best cakes I have ever taken to work! I'm glad I gave them another go because I've changed my mind on a couple of things after giving them a second chance, but I'll stick to a more standard banana cake recipe from now on.


LinkWithin

Related Posts Plugin for WordPress, Blogger...