Saturday 31 March 2012

The Easiest and Lightest Chocolate Vanilla Marble Cake


I needed something super speedy to prepare, requiring no attention to bake and that didn't need copious icing or frosting afterwards to make it look attractive. These are the stipulations of someone baking late in the evening whilst simultaneously making and eating dinner, but with a surplus of eggs to use.

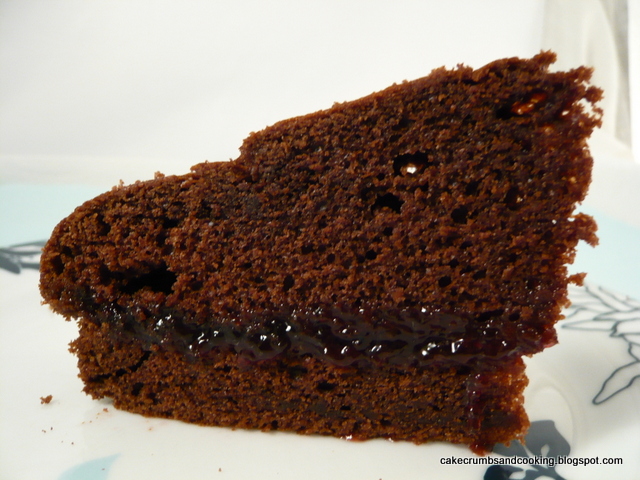
Chocolate vanilla marble cake it was. Quick and easy to mix and bake, and the marbling effect means that the lack of icing is not noticed in the way it would be in a plain cake. Stork margarine is your friend here - straight from fridge to mixing bowl in the way that butter just won't do. I'm fairly sure it's the secret to the superbly light texture of this cake too.


Chocolate and Vanilla Marble Cake
Ingredients
200g stork
200g caster sugar
3 very large eggs (mine weighed 214g total, so probably 4 smaller eggs)
200g plain flour
2tsp baking powder
1tsp vanilla extract
2tbsp cocoa powder

Method
- Preheat the oven to gas 4/180C. Grease and line an 8"/20cm square cake tin and put liners in a 6 hole muffin tin too.
- Place all ingredients (except cocoa powder) into the bowl of a stand mixer (or a normal bowl and use a handheld electric mixer). Mix until all the ingredients are well combined and the mixture is light in colour and texture.
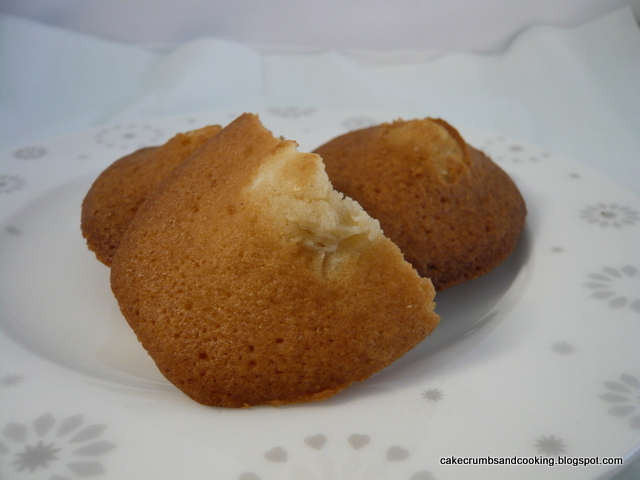
- Dollop half of the mixture randomly into the tin. I also made four little cakes too - it looked as though there would be too much mixture for the tin.
- Add the cocoa powder to the mixture remaining in the bowl and mix again until all combined.
- Dollop the now-chocolate mixture into the gaps left from the first time round.
- Swirl. I used the handle of my silicon spoon - you don't want something too narrow, but neither does it want to be too chunky.
- Bake the smaller cakes for 20-25 minutes and the large cake for 40 minutes.
- Allow to cool slightly, then remove to a wire rack to cool completely.
- Slice and serve.


That's it. Simple as.

Super light, super moist and extremely easy. Not too much washing up either, which is always a bonus :-)   

Wednesday 28 March 2012

Pam's Chocolate Cake


I'm looking for a fudgy chocolate cake recipe that I can fall back on for special occasions. There are already lots and lots of chocolate cake recipes on this blog (see the index at the side - not yet completed for chocolate but getting there), but thankfully, this doesn't stop me wanting to try new ones! There are just so many delicious looking recipes out there for me to try and this is just one of them.

The recipe is published in Pam Corbin's book 'Cakes'. This is one of the River Cottage series of cookery handbooks, and is full of seriously enticing recipes. It has also got some lovely tips in the getting started chapter on ingredients and then a chapter on filling, topping and decorating too, and is generally a good book to read. Well, if you like reading about cake as much as I do that is.


This cake is entitled simply 'Chocolate Cake' but the delicious looking photo makes the cake rather more enticing that the title would have you believe. I made a couple of small changes and a couple of minor errors in the method too, so this is an adapted version of the cake in the book. I decided to make a half recipe as suggested in the variations at the end of the recipe and bake in the suggested 7"/18cm deep tin (this is another lovely feature of the book - there are often ways you can change the recipe slightly to give a recipe another flavour combo, or serve it in a different way - can you tell I'm a fan?!)


Chocolate Cake (my ingredients)
Ingredients
25g cocoa powder
150g plain flour
1/2tsp baking powder
1/2tsp bicarbonate of soda
90g butter (mine was salted)
50g light brown sugar
50g caster sugar
2 eggs
75g half fat creme fraiche
few tbsp milk (probably about 3)

The original recipe calls for a proportion of ground almonds in the cake, along with either buttermilk or a mixture of milk and yogurt instead of the half fat creme fraiche - guess what I had in the fridge! I made a slight mistake with the method too. I started by creaming the butter and sugar, all well and good, and then added the other ingredients as instructed. When I was pretty much finished I looked at the batter, which was a lovely golden colour and remembered I was supposed to be making chocolate cake. Hmmm! The cocoa powder is mixed with boiling water to a paste and then set aside to cool. Guess who forgot to add it until the last minute? It was supposed to go in after the butter and sugar. Ooops, but no harm done. My cake, in an 18cm tin (I used my new pushpan) was baked in around 40-45 minutes.

I sort of wish I hadn't added the milk, as it curdled the mixture slightly, with being so cold from the fridge and being added at the last minute. Thankfully this didn't seem to matter when it came to eating the cake.


There is a suggested chocolate fudge icing for the cake, but as I ran out of time to make this, I decided to go the simple route and simply split and fill my cake with black cherry jam. As a slight aside, I'm glad it's not just me that has problems with fruity jams with bits in them. Many recipes tell you to allow the jam to cool for a period of time before jarring, to allow the fruit to remain evenly distributed through the whole jar. The makers of Waitrose's Black Cherry conserve hadn't heard this trick and pretty much all of the cherry pieces were in the top third, used for these jammy muffins. So it was effectively cherry jelly that I spread in the middle of my cake. No less delicious for that though!


It was a lovely, soft moist cake. Nice and chocolate-y but not overwhelmingly so. I wonder if adding melted chocolate to the recipe would improve the depth of chocolate flavour. I think I would describe this as an excellent afternoon tea chocolate cake - not too rich and not particularly fudgy or gooey but a good light, moist cake. It was lovely with jam, but would be equally delicious with a more decadent gooey icing.

Sunday 25 March 2012

Courgette, Raisin and White Chocolate Cakes


This will be a fairly brief post - a record of a good recipe that I think I'd probably like to make again some day. Unfortunately it wasn't very photogenic and I ran out of time to add a photogenic topping, meaning that the few photos I have aren't very attractive.

This is the opposite of the experience of eating the aforementioned cake, which is really rather enjoyable. I wanted something naturally green to enter We Should Cocoa this month, where the theme set by Chele is Green! And specifically not eco-green. Green green!


Courgettes are green, and so I decided on a cake with courgettes in it. Cake with courgettes in it is not really green - more brown. I used this recipe from Delicious. magazine. I did adapt it slightly though, so have given my list of ingredients below:

160g courgettes, grated
100g raisins
60g (4tbsp) lemon juice
2tbsp honey
3 large eggs
140g sunflower oil (using a .8 conversion from the weight given)
200g light muscovado sugar
225g self raising flour
1/2 tsp baking powder
1/2 tsp bicarbonate of soda
100g chopped white chocolate

The instructions tell you to line a 12 hole large muffin tin. I'm not actually sure what size they mean because there would have been way too much mixture for my standard 12 hole muffin tin. There is an option to use a 23cm round tin to bake the mixture in, so I had already decided to use my 20cm square tin (rule of thumb that the same mixture will fill a square tin 1" smaller than the corresponding round tin). As I poured the mixture in I had the feeling that it wasn't all going to fit - my tin isn't very deep, and the batter was rather runny. I quickly put muffin cases into a 6 cup muffin tin that would fit alongside the cake tin in the oven, and filled 5 of the 6 holes with mixture. Hence the previous comment that there is no way I could have fitted all the mixture into a 12 hole standard tin. I think perhaps this should be made clearer in the recipe, most people only have one size of muffin tin, and would not take note of the 'large' part of the instructions.


Best part of the recipe - simmering the raisins with the lemon juice and honey - it just smelled so delicious! My muffins baked for 30 minutes and the large cake for about 45-50 minutes. Neither of them rose particularly to a peak - it isn't often you see a cake emerging that is entirely flat, but this one was! The cake was darker than I was expecting, but I guess this is due to the caramelisation of the sugars in the honey and the white chocolate. Most of the white chocolate sank to the bottom. I promise it was in there, it's just that the muffin I chose to cut open was sadly lacking on the white chocolate front!


I loved this cake - sweet, but not too sweet and very light and moist without being at all oily. The raisins and white chocolate were a lovely combination and I would make this again. It was popular at work - I wrote a little note to remind people that veggies in cakes are nice - just remember carrot cake! I think my colleagues are getting used to slightly random experiments appearing, so even those who usually use courgettes in soup are happy to try them in cake, which pleases me greatly! If you look hard, you can see that the cake has some little green flecks in it - that's courgette! And I was in 'think green' mode - I used my green knife, you can just see it at the back of the picture, to cut open the cakes!

As I have run out of time to make something more obviously chocolate-y (I promise the white choc was there!) and more obviously green, this will be my submission for this months We Should Cocoa. The challenge is hosted by Choclette of Choc Log Blog and Chele of Chocolate Teapot. The host this month is Chele and the theme (as I think I might have mentioned!) is green.


Saturday 24 March 2012

Crystallised Stem Ginger and Treacle Scones


As regular readers will know, I do love a good scone - light or substantial, fruited or plain, served with butter, jam, clotted cream, or all of these, or even on their own!

So when Karen of Lavender and Lovage (who co-hosts with Kate of What Kate Baked) announced that this month's Tea Time Treats theme was scones, I was very pleased. Why then, has it taken me until almost the deadline to find a treat that I want to share with you? I kept imagining more and more delicious flavour combinations that I could add to tempt you to make my scones, something different, something unusual, mango and cardamom perhaps? or maybe chilli and chocolate? but then I realised that when I want scones I want something old fashioned, but with a little twist. A teatime treat, but not one you'd be able to buy in a tea shop or the supermarket.


One of my favourite flavours is ginger. And black treacle and ginger are a combination made in heaven so it is with great pleasure that I give you my Crystallised Stem Ginger and Treacle Scones.

Crystallised Stem Ginger and Treacle Scones
Ingredients
225g self raising flour
1/2tsp baking powder
2 tsp ground ginger
50g butter
90ml milk
1 rounded tbsp black treacle (about 35g)
40g crystallised stem ginger, chopped small
A little flour to sift over

Method
- Preheat the oven to Gas 6 1/2/210C. Line a baking tray with parchment paper.
- Place the flour, baking powder and ginger into a bowl, mixing to distribute the ingredients. Add the butter and rub in until it looks like breadcrumbs.
- Measure the milk into a jug, add the treacle and warm gently in the microwave. I did this to help the treacle distribute evenly through the mixture. Mix well until the treacle has dissolved in the milk.
- Add the crystallised stem ginger to the dry ingredients and mix in.
- Add the milk/treacle mixture and stir, bringing together the dough. Add a touch more milk if the dough seems too dry and crumbly.
- Tip onto a smooth surface. If necessary, bring together all the crumbs, but I don't knead my scone dough. Pat out the dough to not less than about 1 1/2" or 4cm thick.
- Cut out rounds (I used a 2"/5cm cutter) and place on baking tray. Dust lightly with flour - or you could brush with milk.
- Bake for 16-18 minutes until risen and golden (slightly tricky to tell as they start out darker than normal!)
- Allow to cool on a wire rack.

Best eaten the day of making, but I often freeze leftovers to warm in the microwave - yum!


Perhaps not my favourite scone recipe, a touch crumbly but nice and light, with the treacle adding more perhaps in the way of colour than flavour, but still adding its own sweetness to an otherwise unsweetened scone. The ground ginger adds the background ginger flavour and the crystallised stem ginger gives the real punch of ginger flavour for the ginger lover. Great with butter but even better with some ginger conserve.

Thursday 22 March 2012

Madeleines de Commercy


I tried making Madeleines ages and ages ago, to a recipe I can't remember, and not very successfully. I put it down to using a silicon baking mould for the madeleines, but it might just have been a bit of a rubbish recipe. I can't even remember what was wrong with them - I think they didn't really rise very well and refused to take any colour at all. It was a most frustrating experience and I gave up.

A good while later my interest in Madeleines was again prodded with this beautifully photographed and written post by Joanna @Zeb_Bakes about her Limeblossom Tea and Madeleines. And then as a final reminder, I saw Dan Lepard's recipe for them in Short and Sweet. I was obviously intending to make these because I bought a Madeleine mould ages ago - a metal one this time. I bought mine from Lakeland, but a brief warning - the mould is actually quite wide and just barely fits into my oven - it's more a case of balancing it on the runners at the edge of the oven than placing it on the shelf. I think this means it's likely to get very scratched at the edges, which is a shame. There is a version of Dan's recipe here, but the quantities in the book are really quite different, for all of the ingredients! So not really the same recipe at all, although I think the method is similar. A case of having to buy the book.


He has a very helpful tip about getting the characteristic 'nipple' that is seen on Madeleines. Adding a tiny little piece of cold butter before they go into the oven will allow the nipple to form. I cut up my butter and then put it into the freezer as I prepared the rest of the batter, removing it just before adding it to the mixture in the moulds. I did find that I had a little too much batter for my moulds, perhaps had I added less I would have got the characteristic thin, crispy edge to the cakes. I don't mind though!

Not all that easy to see in the photos - the front one is the second batch - the back ones are the overdone ones - much more obvious in real life.

I had to make these twice. The first time, they rose beautifully, peaking and so forth, but I think my oven has a tendency to run hot at the top end of its range, and even though I removed them at 9 1/2 minutes with my oven set at just over 200C/just over Gas 6 they were really quite overdone (the recipe specifies 10 minutes at Gas 7/220C). The second time I set the timer for 7 1/2 minutes, which was much, much more successful - no more overdone Madeleines for me! In fact, they might even have come out a little earlier.


I was really pleased with the way these looked - beautiful little peaks and nice soft, tender cakes. I think I perhaps needed to add a little salt to the recipe, and be rather more generous with my flavourings (I think I only added 1tsp of vanilla rather than the specified 2tsp the second time I made them). These are a great starting recipe to give the correct result aesthetically, so it should be fairly easy to ramp up the flavours in them. Lots of spring flavours come to mind - elderflower, lemons, honey (ok, honey isn't really spring) or perhaps even chocolate substituting some of the flour for cocoa powder. Endless opportunities for variations. After all, now I have the shaped tin I need to use it!
On a slightly odd, personal, side note... my paternal grandmother was called Madeleine. I never met her, but I wonder if she ever ate these delicate cakes and what she would have made of them. All the pictures I have seen of her show her as being very elegant, and I can imagine her sitting down to afternoon tea, playing Bridge (popular in my family!) and eating these in a bygone era.


As these begin with an M I'm submitting them to AlphaBakes, run by Ros at The More than Occasional Baker and Caroline of Caroline Makes. Caroline is hosting this month and the letter this month is (unsurprisingly) M.

Sunday 18 March 2012

Butterscotch Banana Cakes - Short and Tweet


This is the latest installment in the twitter challenge Short and Tweet - baking from Dan Lepard's book Short and Sweet. You can find the blog here, and the whole thing is organised by @EvidenceMatters who spends ages doing the wonderful round ups you can see on the blog each week.

This weeks choices were tailored towards providing a treat for Mothering Sunday (this Sunday 18th March in the UK, although I know that in Australia and the US, Mother's Day isn't until May). They included Saffron Peach Cake, Orange Cassata Cake or Butterscotch Banana Cake. You can find the schedule for March's challenges here.


I love my mum dearly, but we've never done much in the way of celebrating Mothering Sunday, and indeed, this year she is jetting off on holiday on the day, so no need for me to provide a cake to celebrate. With other constraints taken into account I chose the Butterscotch Banana Cake. I have made this before (blog post here) and wasn't really very sure of it then (I found it a little oily), but since it seems to take a couple of attempts for me to really like some recipes I thought I'd give it another whirl. 

You can find the recipe online here on the Guardian website. The published recipe is very similar. When I weighed my banana flesh I found I had 2/3 of the required amount and it was easy to scale everything else back to 2/3 of the original too. For the wholegrain part of the recipe I used wholemeal spelt flour. I didn't have the specified yogurt, but used a splash of milk instead. Not really the correct substitution at all, but never mind. I also decided to make cupcakes rather than a full size cake as Dan mentions that the recipe works well as cupcakes and gives a time for them to bake. This saved me having to work out what size tin I'd need for 2/3 of the recipe and wondering how long to bake for.


The first step is to caramelise the bananas in a sugar syrup. I was a little wary of the wet sugar syrup splitting and crystallising horribly as has happened in the past, but I was in luck and it didn't. It did seem to take ages of boiling for it to get to the required dark reddish caramel, but patience eventually allowed it to happen. There is always something really satisfying when you start to see the sugar start to change colour into caramel and then the whole pan quickly follows. I cooked the banana for quite a while - not that I was distracted whilst doing it.... Actually, it just meant that the banana broke down really easily.


I cannot begin to describe how delicious bananas cooking in hot caramel is. I remember how I almost stopped at this stage last time too - so tempting to just pour this into a bowl and eat with a big scoop of icecream. Instead I scooped it into the cake batter and mixed well:


This was then spooned into the waiting muffin cases. I filled them about 2/3 full and really wasn't expecting much of a rise - I think because last time, when I made this as a full cake the middle was a little sunken.


As you can see my 2/3 batter mixture made 10 muffins. And I think I could possibly have squeezed 11 out of the mixture had I been a little meaner when dividing them up. But who wants a mean cake? And I was pleasantly surprised to see a lovely soft little peak on the cakes:


I struggled to know how to decorate these little cakes. When I made the large cake I just left it plain, but small cakes are somehow more demanding of a decoration of sorts. I briefly considered buttercream, but dismissed the idea as too sweet and sickly on top of an already sweet cake. I then decided to make a simple glace icing, but with unrefined icing sugar to give a complementary toffee flavour to that found in the cakes. Sadly, my unrefined icing sugar was clumped and hardened beyond hope of redemption. (And I'm not prepared to whizz it bit by bit in my mini food processor to get it to a useable state again - I don't much enjoy breathing icing sugar!). Back to the drawing board. Then it occured to me that I could use normal icing sugar with a little golden syrup to bring that toffee-ish flavour to the icing. Yum!


So my icing for these buns consisted of about 150g icing sugar, a tbsp of golden syrup and enough water to make a thick icing. It was a tasty icing, and one I'll have to bear in mind for future recipes too.

Verdict? Great recipe - quite time consuming in terms of making the caramel, cooking the banana in it and then leaving to cool but once that bit is done, it's plain sailing. You can see from the picture below just how rich and moist the interior of the cake is - the reddish brown of the caramel definitely comes through. They are light, very banana-ry and very moist and I didn't find them oily at all this time. Sadly I just didn't like them all that much. The cooked strands of banana in the cake were a little offputting and gave a texture I just wasn't keen on. However, this is entirely a personal thing because one of my colleagues said that she thought these were possibly the best cakes I have ever taken to work! I'm glad I gave them another go because I've changed my mind on a couple of things after giving them a second chance, but I'll stick to a more standard banana cake recipe from now on.


Saturday 17 March 2012

Caramel Mud Cakes - a Random Fail


Each month I intend to enter Dom's random recipe challenge. Each month he announces the theme and I scurry away to see what recipe I'll get. Ocassionally I actually make and post the proscribed recipe. More often than not I look at it and try to think how I'll persuade myself to eat X, Y or Z ingredient, or ponder how to cut down a savoury recipe intended for 4, 6 or more to just the required one portion. And then I give up and the intended random recipe remains in my cookery books and never makes it to the plate or to this blog.


Where is this leading I hear you asking... Well, this month Dom has set his random recipe challenge as being cookery book number 17 on the shelf. Not a problem, cookery book duly plucked off the shelf. Quite excited, as the chosen book is simply 'Chocolate'. A small book purchased from Marks and Spencer, and containing many delicious looking recipes for chocolate containing goodies - yum, what would I get?


The random page opened showed caramel choc-chip mud cakes. Oh yum indeed. So I set to making them.

Caramel Choc-Chip Mud Cakes
Ingredients
90g white eating chocolate, chopped
90g unsalted butter, chopped
110g light muscovado sugar
2 tbsp golden syrup
125ml milk
110g plain flour
35g self raising flour
1 egg
40g milk chocolate, chopped
milk chocolate, to decorate (I used about 25g)

Method
- Preheat oven to 160C/Gas 3. Grease a nine hole (125ml) friand or muffin tray (I used a similar sized tin meant for making eclairs). Line bases with baking parchment (I didn't!).
- Stir chocolate, butter, rown sugar, syrup and milk in medium saucepan, over low heat, until smooth. Cool 15 minutes.
- Whisk in sifted flours and egg. Stir in chopped chocolate. Divide between holes in prepared tin.
- Bake for about 25 minutes, then allow to cool a little in the tin before turning out onto a wire rack to cool.
- Melt the chocolate and pipe onto the cakes to decorate.

I had such high hopes for these - they smelled utterly delicious while they were baking. Afterwards they did sink slightly in the tins, which should have warned me.


When I cut into them, the texture was heavy and dense in the middle. I guess I should have expected this as there was only 35g self raising flour in the batter and lots of weighty ingredients like golden syrup. I think they were cooked through, but wasn't willing to inflict them on my testers - I have a reputation to uphold here ;-) so I sadly have no taste report for you.

If you don't mind heavy, dense, chewy centres, this may be the cake for you. But not for me. I think the recipes in the book are from the Australian Women's Weekly. Browsing their website for this recipe I came across a number of caramel mud cakes, (there are some here) some of which showed the texture I could see in mine (here) but some seemed to have a lighter texture (here). I don't actually know what mud cake texture should be like, so if anyone can enlighten me that would be great. I might make them again because they just smelled so delicious but instead of using 110g plain flour and 35g self raising, I might use 110g self raising and 35g plain.

So there we have my random fail for Dom's Random Recipe challenge.

Wednesday 14 March 2012

Jam Buttermilk Muffins


Brief note to self - don't bother making these again, there are better ways of using up a tub of buttermilk. I seem to be having a run of making things that just aren't quite to my taste at the moment. Hope I snap out of it soon, very frustrating!


The recipe came from 'Muffins - Fast and Fantastic'. It's the basic buttermilk muffin recipe with a tsp of morello cherry jam added before baking. There is nothing intrinsically wrong with the recipe, it just isn't to my taste. Not quite sweet enough I think, and when the muffins were baked there was a slightly odd (and offputting) appearance to the tops of them.

Eaten up happily at work, which goes to show that everyone's tastes differ.

Sunday 11 March 2012

Morello Cherry Hot Milk Sponge


I recently bought 'Bake!' by Nick Malgieri, after it was recommended by Celia. I have had a flick through it and there are a number of the recipes that I'd like to try. One of them was 'kyra's hot milk sponge cake' in the chapter on Sponge and Meringue Layers. I was interested to know how the process and texture of the cake would compare to the ones that I make as my standby recipe (Victoria sponge proportions: 2 eggs/120g fat, flour, sugar).


It is described as 'the easiest and best-tasting sponge layer you can imagine' and I was interested to see if it lived up to this claim! However, I didn't actually make the recipe from the book. By complete coincidence (and I actually can't remember how it happened - I imagine I was either reading someone elses blog, an online forum or it was something to do with Twitter) I ended up reading an article Nigella Lawson wrote in September last year about this exact recipe (here, scroll down to see the article, the page appears to be blank at first). Since she says that she had simplified the method somewhat and had also baked in two 8"(20cm) tins rather than the 9" (23cm) tins specified in the book, I decided to go mostly with Nigella on this one.


I think that next time I will perhaps allow the butter/milk mixture to cool a little more - there seemed to be a few tiny flecks of bright orange that I am assuming were cooked bits of egg in the final sponge and I would also sift my flour (I followed Nigella and didn't bother) and fold it in by hand rather than just leaving the KitchenAid running with the whisk attachment on. There weren't very many flour pockets I don't think, but any is too many really when making cakes like this.


You can see just how runny and bubbly the batter was when I poured it into my tins above.

I found my cakes took 27 minutes to bake and I was mostly pleased with the way they turned out. I filled the cakes with morello cherry jam, but didn't dust the top with icing sugar, because it has a tendency to dissolve into the cake on the way to work and is therefore a bit of a waste of time!

I don't think it was the easiest cake in the world, although it was by no stretch of the imagination difficult to make. I enjoyed it and would probably make it again. I think the texture was closer and more fine grained than the usual sponge I make, and it was interesting to try out a different way of making a sponge cake. There are plenty more recipes in 'Bake!' that I'm looking forward to making.

Thursday 8 March 2012

Hit or miss? Madeira Cake


I wonder if I'm the only one with this problem? I sometimes think that there are little kitchen fairies that you have to please in order for your baking to work out. I must be on and off the 'in favour' list because sometimes a recipe will work really well for me, and on other occasions the same recipe will be a bit of a failure. Not catastrophic, just a bit disappointing in small ways.

The example that springs to mind for me is Nigella's Madeira cake. I first made this recipe many, many years ago in a dodgy oven when I was at university. I was using the correct tin, but something went wrong and a large lump of my cake had overflowed and ended up on the base of the oven floor. I avoided the recipe for a long time after that incident.


Then a colleague asked for a Madeira cake just before Christmas and I thought it would be good to oblige. I thought of the Nigella recipe and having successfully made her rosemary madiera recipe which is almost identical I decided to give this one another chance. Complete success. Rose beautifully, gorgeous crack along the length, crusty with caster sugar. (No picture, sorry).

Decided to make the cake again, emboldened by the memory of the pre-Christmas success. Slightly disappointing. The cake did rise, but not very well, and the lovely crack of the previous cake wasn't evident. This loaf rose a little, but spread a little too, along the sides of the tin. As I said, just a little disappointing. It still tastes just as good, but I wonder why these things happen. Is it just me, or are there recipes that you use and just accept that the results are variable compared to your expectations. As for me and Madeira, I'll be trying this BBC Good Food version next time (substituting plain flour for the almonds) to see how it compares.


Apologies for the naff photos - I wasn't going to blog this so I didn't make any effort when recording how this cake turned out.

Sunday 4 March 2012

Perfect plain pittas


It's been ages since I've made anything for Short and Tweet, the twitter challenge (#shortandtweet) for baking from Dan Lepard's Short and Sweet organised by @EvidenceMatters. Not because I haven't wanted to, just because I'm disorganised! And seeing all of the excellent pictures other bloggers and twitter folk have taken of the various items that I haven't managed to bake yet is making me want to make them even more.

Lovely soft crumb

One of the challenge recipes for this week was perfect plain pitas, but because I've always known them as pittas, that's how I'm going to carry on spelling them. I very first made these years ago, pre blogging. In fact, I think they were one of the first baked items I ever took photos of, and this is simply because pittas are magic. (It was a fairly short step to both taking pictures of food and blogging it...) You place a fairly thinly rolled out dough into the oven, and then as if by magic you remove a puffed up football of a bread. Aside from the scorching heat needed for these they would be loved by small children for the visual spectacle!

Sticky, sticky dough

Since I have far too much bread in my freezer at the moment (Dill potato, rye sourdough, malted grain amongst them) I opted to make half of the recipe. When I originally made these I used the recipe here, which was originally published by the Guardian in their little 'Guide to Baking' booklet that came out in November 2007. This is a case where the book recipe is identical to the online version. In my half recipe I used 1tsp sugar and miscalculated my water, using 190ml instead of 165ml. Perhaps this is why my dough was wet and sticky. It wasn't too hard to work though. I also missed one of the kneading steps, again with no worries. I remember the pittas as being quite big, so as well as making a half batch I decided I would still make eight. This makes them a more manageable size for my lunch.

Rolled out and resting

Because the pittas need such a high heat I preheated my oven to Gas 8 (nearly as high as it will go) and placed a baking tray in it to warm up. I then shaped my pitta and placed them on a piece of baking parchment on a second tray, to use as a makeshift peel. I only baked two pittas at a time, and this method of transfering them from their unbaked state to the preheated tray was really successful, and I'll do it again.

Rolled out on a piece of parchment, ready to slide onto the waiting hot tray in the oven

When they were puffed up and baked through (6-7 minutes in my oven) I took them out and tipped them onto a napkin, covering them with a second napkin to keep soft and moist.

Puffed and golden, set against the gathering darkness, ow, ow, hot!!

Tender and chewy, these are a million miles from the long-life excuse for pitta bread that you find in the supermarkets.  They were just as successful as I remember them, and I had forgotten that they are relatively quick to make - you don't have to bother waiting for the second prove stage, and once you have a little production line going it's quite fun to keep seeing them pop out all puffed up! My one regret is that my oven has a solid door so I can't see the magic happening!

Perfect plain pitta

LinkWithin

Related Posts Plugin for WordPress, Blogger...