Sunday, 28 October 2012

Red and Blackcurrant Jelly

The first batch

I have to confess that this is not really a 'how-to-make' redcurrant jelly post. It's a 'how-I-made' red and blackcurrant jelly, based on what was available and a bit of experience.

Redcurrants aren't in season right now. Neither are blackcurrants. But by the power of technology (freezer - gasp!) I had far, far too many redcurrants and the only way I could really think of moving them out of the freezer is to make them into jelly. Redcurrants are full of hard seeds meaning that they don't really respond very well to jam making but are great for jelly, jelly being essentially refined jam.

Boiling jelly

So I dug through my freezer drawers and located the offending (in terms of taking up space!) redcurrants and found I had 1.5kg (I think - this is a while ago now). Using the basic recipe for redcurrant jelly in Pam Corbin's very lovely little book 'Preserves' (River Cottage Handbook No. 2) - I'd recommend this to anyone interested in preserving I found I needed 400ml water for every 1kg redcurrants. The currants and water are simmered until they are tender - Pam specifies 45 minutes, but I suspect mine were done sooner because the process of freezing and thawing them starts breaking down the berries anyway.

Successful wrinkle test

At this point the berries, stalks and random bits of garden (leaf, stone... don't worry, there weren't too many leaves in there) are strained out. Long time readers may remember that last time I made redcurrant jelly I bought the jelly bag but not the strainer. I decided to go for broke this time and bought the whole set - so, so much easier. I thoroughly recommend it. 

This said 104... for setting, but I wasn't quick enough with the camera

Making the jelly then involves the addition of 450g granulated sugar to each 600ml juice - you don't want to poke the bag or you won't get a clear jelly. More on that point later... You then bring it to a rolling boil and boil for 8 minutes or until a set is reached. This will occur at 104C or when a little of the jelly placed onto a cold (freezer cold) plate wrinkles when pushed with a finger. Pour the jelly carefully into sterilised jars and then add a waxed disc and seal with a lid. The jelly keeps for 12 months according to Pam.


This represents the jelly I made with the juices that dripped through the bag (there are two jars in the background too, it's not just the jar and a bit at the front). After the redcurrant mixture had cooled a little I decided to squeeze the bag and see if I could get any more juice out. The answer was a resounding yes - there was much more juice in there and I squeezed and squeezed the jelly bag until all that remained inside were dry skins and stalks. I repeated the jelly making process again for this new lot of juice (although since the previous lot had set as I was pouring it into the jars I decided to dilute this second lot with a splash of water - unmeasured, sorry) and got as much again in yield. 

Almost double the amount - both first and second batches

Yes, this second batch is cloudier, but it seemed such a shame to waste that redcurrant goodness. My thinking is that I'll use the clear batch for tasks such as glazing fancy fruit tarts (hah, in my dreams!) and the cloudier batch for adding to casseroles for depth of flavour, or for making the traditional Cumberland sauce recipe that Pam gives in the book, where the clarity of the jelly is unimportant. So my conclusion is that since I don't intend to enter WI competitions where the clarity of my jelly is all-important I'm going to carry on squeezing that jelly bag.

Random blobby jelly - definitely set though

This wasn't a problem I had last time, but this time round there must have been so much pectin in my redcurrants that the jelly actually set as I was pouring it into the jars. You can see in this small jar that the surface isn't level because I was essentially scraping solidified jelly into the jar.... certainly no worries about a set here!!! I ought to point out that although this is called red and blackcurrant jelly, there were probably about 80-100g blackcurrants mixed in with the redcurrants when I froze them, and just those few have changed the colour significantly from a pure redcurrant jelly.


I'm entering this rather unseasonal jelly into Teatime Treats - hosted this month by Kate of What Kate Baked and co-hosted by Karen of Lavender and Lovage. The theme this month is Jams, Curds, Chutneys and Conserves. Now although jelly isn't mentioned specifically I don't think I'll get booted out for submitting this one!     

Wednesday, 24 October 2012

Ginger Pumpkin Chocolate Cupcakes


When this month's We Should Cocoa was announced by the Hungry Hinny (who is guest hosting for Choclette of Choc Log Blog and Chele of Chocolate Teapot) as pumpkin, my mind immediately jumped to the recipe I wanted to use - Dan Lepard's Pumpkin Chocolate Mud Cake. And then I remembered I had already made and blogged this one - find it here. (And very good it was too).


Luckily the random collection of cells that passes for my brain recalled another pumpkin cake by Dan Lepard which I thought would be appropriate to adapt for this challenge. Originally published three years ago as a Hallowe'en treat, you can find the original recipe here on the Guardian website, but I made a number of changes to make it suitable for this challenge and to suit my ingredients and allergies...

Ginger Pumpkin Chocolate Cupcakes with Vanilla Buttercream icing
Ingredients
4 lumps of ginger in syrup, drained of the syrup
175g light muscovado sugar
200g butter
2 large eggs
150g pumpkin, grated
200g plain flour
2 tsp baking powder
1 heaped tsp ground ginger
100g plain chocolate (60-70% cocoa solids), chopped
1/2 tsp ginger extract (optional, but I used it!)

For the buttercream
100g softened butter
250g icing sugar
1 tsp vanilla extract
splash of recently boiled water

Method
- Preheat the oven to 180C/Gas 4. Line 18 muffin holes with cases - I used a Hallowe'en variety pack - black, orange and spider, plus a couple of yellow ones I found in the baking cupboard. 
- Cream the butter and sugar until light and fluffy.
- Add the eggs one at a time, beating well between each addition.
- Fold in the pumpkin, ginger extract and chopped stem ginger, then the flour and spices.

I promise there was squash in there...

- Fold in the chocolate and divide between the prepared cases. Bake for 25-30 minutes until risen and springy to touch.
- Allow to cool.
- Make the buttercream by creaming the butter until very soft. Add half of the icing sugar and start beating slowly to incorporate. Add the rest of the icing sugar and the vanilla and continue to beat until very light in colour and fluffy. I add a little water from a recently boiled kettle to let the mixture down a bit and make it softer to pipe. Some people use milk - I have found that cold milk sometimes makes the mixture split. 


I was a little ambivalent about these, although my colleagues really liked them. I loved the stem ginger in the cake and the chunks of chocolate (chocolate and ginger being my two favourite flavours of the moment) and the cake itself was lovely and moist and tender. You couldn't taste the pumpkin, but there was a slight pumpkin-y aroma when the cake tin was opened. It contributed much more to moistness than flavour. I'm not sure the vanilla buttercream was the right complement to the cake, but it was delicious in its own right! I think I was looking for a more intense hit of ginger throughout the cake, but actually, these were great anyway.


As these contain a rather seasonal ingredient, I am sending them to Simple and in Season, also hosted by Nazima of Franglais Kitchen and founded by Ren of Fabulicious Food.


I am also sending them to One Ingredient, hosted this month by Nazima of Franglais Kitchen and co-hosted by Laura of How to Cook Good Food.


And last but not least, of course these are heading to We Should Cocoa!


Saturday, 20 October 2012

Apple and Nutmeg Scones


With all of the strange weather we've had here in the UK over the growing season many crops have been early, late or just downright confused as to what they should be doing and when. One of the sad things is that this year's apple harvest is very poor and there may be shortages later on in the season. I love apples and I'm very much hoping that they will still be available for a good while yet, but I guess that some years are always going to be worse than others. It's very odd though - round here (Northwest England) other crops have been difficult - my mum's friend has a tree that is usually groaning under the weight of plums - the branches dip to the ground and have to be supported, yet this year she barely had a single plum.

Anyway, whatever happens later in the season, the new apples are here for now and I intend to make the most of them while they are around. Perfectly in season and all of the chilly weather recently (and the dark mornings closing in - I hate getting up in the dark) has put me in mind of warming autumnal flavours, and for me, that means spice.


Apples take to spicing so well, and I decided to use a combination of mixed spice and then give it a little spin with a bit of nutmeg. This is one of my less used spices simply because I'm a little lazy and nutmeg needs grating just before you use it for the best flavour. The whole nutmegs keep for years, but the fragrance and beautiful aroma of this spice is lost quickly after grating.

Apple and Nutmeg Scones
Ingredients
250g ricotta cheese
a little milk (or water)
60g caster sugar
50g light muscovado sugar
280g self raising flour
70g butter
1/4tsp mixed spice
about 1/4 of a small nutmeg, grated
2 small coxes apples, cored but not peeled, cut into small cubes
demerara sugar to sprinkle

Method
- Preheat the oven to gas 6/200C. Place a sheet of parchment paper on a baking sheet.
- Place the ricotta in a small bowl, beat in the 60g of caster sugar and set aside.
- Place the flour in a large bowl and rub in the butter (I used fridge cold butter here)
- Add the muscovado sugar and the spices to the flour and mix well, breaking up any lumps of sugar.
- Add the apples to the flour mixture.
- Add the ricotta mixture to the flour mixture and bring together as a dough. You will probably need a little extra liquid - I found my mixture quite dry and as I don't usually have milk around, I used a little water to moisten it. I didn't measure it but probably about 4tbsp.
- Tip the dough onto a work surface and knead briefly - more just turning the dough over to bring it together. Pat out into a large square about 1 1/2" or 3cm thick.
- Cut into 16 pieces and transfer to the baking sheet. Scatter with demerara sugar.
- Bake for 20-25 minutes until risen and golden.
- Remove and allow to cool on a wire rack.


It has to be said that these weren't the lightest scones I've ever made, but I'm still enjoying them very much - the warm autumnal spicing, with the unusual addition of nutmeg along with the juicy chunks of apple make a very good combination for a snack time treat or would be great served with some chunks of tasty cheese for a more substantial snack.


I am entering these into alphabakes, hosted this month by Ros of The More than Occasional Baker (cohosted by Caroline of Caroline Makes). The letter this month is N for nutmeg.


I am also entering them into Simple and in Season, founded by Ren of Fabulicious Food and hosted this month by Nazima of Franglais Kitchen

Sunday, 14 October 2012

Salted Peanut Butter Chocolate Cake


For a bit of a finale to Chocolate Week I thought I would make a layer cake - they always look impressive and I wanted a celebratory cake. Now whilst I am allergic to tree nuts I am lucky enough to be able to safely eat peanuts (and cashews) but I have never really paired them with chocolate before. I have seen many recipes where the pairing is made though, so thought it was about time I gave it a go (so many combinations of flavours, so little time to try them...).

The chocolate is my favourite standard recipe, with the added depth of muscovado sugar, and the peanut butter chocolate frosting comes courtesy of the Divine Chocolate Cookbook, which is rather appropriate given that Divine chocolate are the main sponsor/partner in Chocolate Week. I adapted the recipe to suit my tastes.


Salted Peanut Butter Chocolate Cake
Ingredients
175g softened butter
100g caster sugar
75g light muscovado sugar
3 eggs (with thanks to Suelle!!!)
155g self raising flour
25g cocoa powder
a couple of tbsp milk

Frosting
85g dark chocolate (I used 70%)
125g smooth peanut butter (mine was salted, but with no added sugar)
25g butter
cocoa powder (2tsp - optional)
icing sugar (to taste - optional)

Method
- Preheat the oven to 180C/gas 4. Grease and line two 8"/20cm round cake tins.
- Beat the butter and sugars until soft and light (the colour will change to being much lighter).
- Add the eggs, flour and cocoa powder. Beat until combined.
- If the mixture is too stiff (won't drop off a spoon), add a few tbsp of milk to soften.
- Divide the mixture between the two tins and bake for 25-30 minutes or until the sponge springs back when pressed and a cake tester comes out clean.
- Allow to cool on a wire rack.

- When the cakes are cool, or nearly cool, make the frosting.
- Melt the chocolate gently - either over a pan of simmering/hot water or in the microwave (carefully!).
- When melted, add the peanut butter and butter and beat until smooth.
- Taste the mixture and add cocoa powder and/or icing sugar to taste.
- Spread half of the mixture between the cakes and the other half on the top.

- Enjoy!


I have to say that this was a bit of a marmite type love/hate cake. Whereas most things I bake are well received this one did split the eater-ship slightly. The cake was universally liked, but the peanut butter frosting was slightly divisive, some liked it, some weren't so keen. I have to confess that I was in the not-so-keen camp, which was a little disappointing. Perhaps it's just a combination of flavours that I need to try again to appreciate more. After all, I love both peanut butter and chocolate, so they should theoretically be even better together! The other thing is that I used neither cocoa powder nor icing sugar in my frosting - it was late at night when I made it and I really didn't fancy tasting it at that point. Perhaps a touch of sugar would have made it much better because I think it was the salt of the peanut butter that perhaps skewed my taste off for this. I'll have to make it again and find out...

Friday, 12 October 2012

Squidgy Chocolate Orange Cake

Hmm, apparently my ability to take photos of brown squares of cakes hasn't improved yet...

This is the perfect cake to have in your repertoire - it's so, so easy to put together and quick to bake but the flavour and texture are just divine. I have made it a number of times before, but have tweaked slightly to suit my taste. The original recipe is from Nigella Lawson and it's the Storecupboard Chocolate Orange Cake in How to be a Domestic Goddess. It is also a very adaptable recipe - Nigella herself uses exactly the same ingredients in her Chocolate Cherry Cupcakes in the same book (swapping cherry jam for marmalade), so if you're wondering whether the recipe works as cupcakes, it does. (I have tried this out too, and the cupcakes are very good!)

When I have made it in the past I followed the instructions to use an 8"/20cm round springform tin and always found it needed slightly longer than the specified 50 minutes to bake and it tended to catch and overbrown slightly around the edges before the middle was done. I've made it in an 8"/20cm square tin and after 40-45 minutes it's perfectly cooked around the edges and in the middle - win/win.


The quality of the marmalade is important in the cake. I know that sounds like a silly thing to say because of course it will be - the marmalade is a key ingredient. From experience I know that using too bitter a marmalade will not be very pleasant - even though there is a lot of sugar in the recipe, the bitterness still comes through. This time, I had a jar of marmalade that I had used for a couple of other cakes where I had wanted that bitterness, and had found this particular jar sadly lacking. However it struck me as perfect for this cake, where I don't think you actually want a particularly bitter marmalade. I did want to make sure that the orange flavour was there though and added some of my latest favourite - orange extract (I bought mine from Lakeland - a dangerous place to shop...). This really boosts the orange without any bitterness.

Another brown square...

Squidgy Chocolate Orange Cake
Ingredients
120g butter
100g dark chocolate, roughly broken (I used Green and Blacks 85% cocoa)
245g orange marmalade (I used Bonne Maman Mandarin marmalade)
150g caster sugar
1tsp orange extract
2 large eggs
150g self raising flour

Method (this is truly simple!)
- Preheat the oven to 180C/Gas 4. Grease and line an 8"/20cm square shallow tin.
- Melt the butter over a low heat and when it is melted add the broken chocolate. Stir until melted.
- Add the marmalade, sugar and extract and stir until well amalgamated.
- Add the eggs, beating them into the mixture until well combined and then add the flour, folding it through to make sure you don't have any unmixed bits.
- Pour into the prepared tin and bake for 40-45 minutes.
- Remove from tin and allow to cool, or eat hot as a pudding with icecream.


I love this cake - it's moist and fudgy and on the start of the cake to brownie scale - at the cake end but with a slightly brownie-like texture due to the high sugar content. The peel in this marmalade is quite fine and soft - I missed the chewy texture of the peel in the more bitter marmalades I've used in the past, but I didn't miss the overall bitterness that too strong a marmalade can give. Adding the orange extract worked well here to boost the orange flavour, as I knew the marmalade didn't have enough punch. This is perfect for an indulgent treat during Chocolate Week.

This would be a great family recipe to make with little ones. The melt and mix method is easy for little hands and the chocolate orange flavour is great for children too - especially if you do what I did and use a relatively mild-flavoured marmalade and boost the flavour with orange extract. This avoids any unwanted bitterness. It's also perfect for harrassed mums who are having dessert demanded of them but haven't got time to think what to make - perfect with custard or icecream. Any leftovers are perfect as a gettting home from school treat. I really hope you make and enjoy this cake - it's one of my perennial favourites!

Thursday, 11 October 2012

Black Bottom Triple Chocolate Flapjacks


I love a good piece of flapjack (you can see more of my flapjack recipes here). There are lots and lots of recipes around for flapjack, ranging from the genuinely-good-for-you to the downright-decadently-delicious. When I was deciding how to give this batch of flapjacks a different twist I quickly remembered that this week is Chocolate Week (major sponsor Divine Chocolate - a fabulous company with great ethics and great products that I am always happy to champion). There is some really interesting info about chocolate there too. I am definitely going to browse their site for more chocolate knowledge.

So that was my decision made for me - chocolate was the way to go. I wanted to really ramp up the chocolate decadence in these flapjacks and so I decided to use cocoa powder (why have I never come across flapjacks made with cocoa powder before now? Great idea) and two different types of chocolate - white chocolate to contrast with the dark cocoa layer and butterscotch milk chocolate in the plain layer because it's downright delicious. These are definitely towards the decadent end of the scale. Oats, chocolate, butter, deliciousness. What's not to like.

Seeing the layers clearly

Triple Chocolate Flapjacks
Ingredients
125g butter
90g light muscovado sugar
150g golden syrup
260g oats
2 tbsp cocoa powder
50g white chocolate, chopped
50g butterscotch milk chocolate, chopped (or any other chocolate you fancy)

Method
- Grease and line an 8"/20cm square tin with baking parchment. Preheat the oven to 180C/Gas 4.
- Melt the butter, sugar and golden syrup over a low heat.
- When melted, add the oats and mix well to combine.
- Measure half of the mixture (this is about 300g) into a separate small bowl.
- To the mixture remaining in the pan add the cocoa powder and mix well until the colour is dark and even.
- Add the white chocolate to the dark oat mixture and very briefly mix to combine - you need to be quick because the white chocolate will start to melt.
- Spoon the mixture into the tin and level out as best you can - a bit tricky as the cocoa powder makes the mixture very thick and sticky.
- To the remaining plain oat mixture (in the bowl) add your milk chocolate of choice and again, mix briefly bearing in mind that the chocolate will start to melt quickly.
- Spoon onto the mixture already in the tin and level out.
- Bake for 25-30 minutes until the flapjack is golden on the top.
- Alllow to cool in the tin and after about 20 minutes, slice into pieces - this is much easier when the flapjack is warm than when it has gone completely cold.
- Enjoy!


Other flapjack recipes you might enjoy...
White Chocolate Cherry and Cinnamon Flapjack
Rudolph's Flapjacks
Chocolate Peanut Butter Flapjacks
Treacle and Ginger Flapjack

These are a firm, chewy (very chocolatey) flapjack, not a soft chewy one but they are definitely not crunchy. I like a bit of chewy body to my flapjacks, and these were well received by those who tried them.


I am also entering these into Fleur's Challenge Flapjack. I have no doubt there will be many delicious entries, far more creative than mine, but I'm going for the decadence angle!

Sunday, 7 October 2012

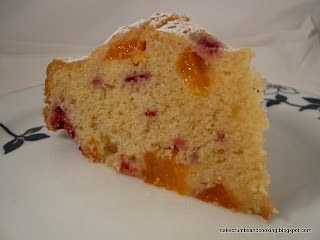
Raspberry, Apricot and Vanilla Flower Cake


I simply can't resist fresh summer fruits - all the berries and currants, the apricots, nectarines and peaches and as well as eating them raw in their natural form I especially love baking with them. This was a cake I made a few weeks ago when I had all that lovely fresh summer fruit just begging to be used. Now the weather has turned to autumn I am glad of my freezer and the ability to find little pieces of cake to remind me of the joy of fresh fruit in summer.


A simple recipe was necessary to allow my fruits to shine and I wanted to use my new cake tin. I shouldn't be allowed near Lakeland - it's far too dangerous for my bank account. Whenever I go in there they always ask when you are purchasing your goodies whether you are 'up to date with our current catalogues'. I never accept the offer of catalogues - I would spend far too much time and money just browsing through them. It's amazing what you can find that you never knew you needed....

Raspberry, Apricot and Vanilla Flower Cake
Ingredients
125g softened butter
130g caster sugar (it was meant to be 125g but my hand slipped...)
2 eggs
2tsp vanilla extract
150g self raising flour
3 fresh apricots, chopped fairly small (just normal sized ones - not tiny, not huge - I forgot to weigh them)
about half a punnet of raspberries - 100g or so

Method
- Preheat the oven to Gas 4/180C. Grease your cake tin very well. If you don't have a fancy tin, an 8"/20cm tin will be fine I think.
- Cream the butter and sugar until light and fluffy.
- Add the eggs, vanilla and flour and beat well until all combined.
- Fold in half of the apricot and raspberries and spread into the tin - it will be quite stiff.
- Scatter over the remaining raspberries and apricots and press them in a bit.
- Bake for 45-50 minutes until golden and a cake tester comes out clean. You may need to cover the cake with foil if it is browning too quickly. I covered mine after 35 minutes.
- Allow to cool slightly in the tin and then invert onto a wire rack to cool completely.


I was very pleased that the cake tin released well - I greased it generously with butter and despite some of the fruit sinking to the bottom of the cake, there wasn't a problem with releasing the cake from the tin. It also neatly divides the cake into ten portions for serving!

I do think that of all the fruits that I bake with, apricots and raspberries are particularly successful. The texture of both fruits suits baking perfectly - neither are too watery (strawberries aren't as good - they tend to collapse on baking, leaving little holes in your cake) and they both have a slightly tart flavour in comparison to the sweet cake. A thoroughly delicious experiment and a reminder of summer on an autumn day.


Wednesday, 3 October 2012

Treacle and Greengage Muscovado Muffins


When I saw that Dan Lepard's column in the Guardian a few weeks ago was all about baking with treacle I quickly investigated further - I love treacle and baking with it. So far from being a slightly 'weird' ingredient as Dan proposes, I was keen to see what he was suggesting we could use this gorgeously sticky substance for now. Both recipes appealed, but the Treacle and Caraway Apple muffins sounded amazing. Unfortunately I discovered fairly recently that I'm not really a fan of the flavour of caraway in baked goods. Perhaps it's something I'll come to appreciate more (as I get older, or should that be wiser?) but at the moment, caraway is no-go. Easy enough to leave out though. I also had a glut of greengages and decided to use those instead of the specified apples - there will be time enough for apples later in the autumn and I wanted to make the most of the last of the seasonal fruit available now. I changed the proportion of flours too, and have noted my changes here.


Treacle and Greengage Muscovado Muffins
Ingredients (for method, follow the link highlighted in the text above to Dan's recipe in the Guardian)
100g butter, melted
40g sunflower oil
50g black treacle
175g light muscovado sugar
3 eggs
2tsp vanilla extract
200g plain flour
100g wholemeal spelt flour
2tsp baking powder
around 6 small(ish) greengages, chopped into about 8 each
Oats to scatter

Since the recipe specifies scattering the muffins with flaked almonds before baking I racked my brains for a suitable alternative and came up with oats - not quite as crunchy (in fact not nearly as crunchy) but provided a little visual appeal to the finished article and a bit of a contrast of textures. I think next time I'd be a little more generous with the oats. I also made 18 muffins out of this mixture, which was perfect for me - 12 would have made very large muffins for my requirements.


These were immensely popular at work, and rightly so. The combination of flavours - the treacle, vanilla and then the soft delicate plum were great together. They were beautifully moist and the greengages worked superbly in place of apples, becoming deliciously soft and squashy. I'm sure that any soft plum would work well (although I'm not sure about those ones that are bullet hard and available year round). The treacle flavour was definitely there, adding depth and background, but if you're not a treacle fan, it wasn't overwhelming. I gave my version of the recipe to an interested colleague. I hope she enjoys them as much as the rest of us did. I'll definitely make these again and would recommend you make them too! 

LinkWithin

Related Posts Plugin for WordPress, Blogger...