Monday, 14 March 2011

The Mill Loaf - attempt #1 - a miche

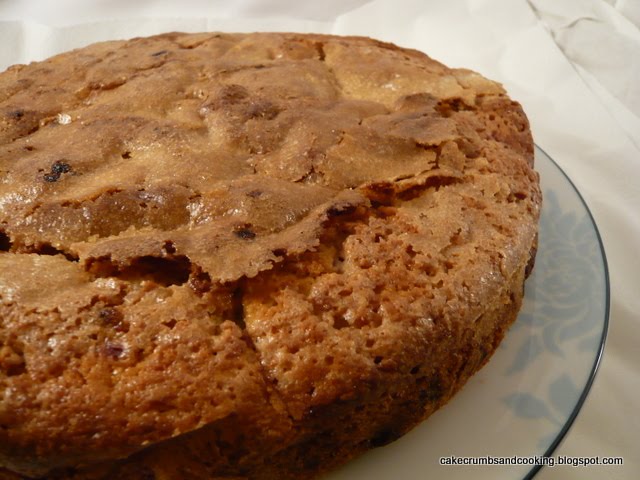
The adventures in sourdough continue. And I appear to have made a flying saucer. I will not be defeated though, I'm sure that all practice is worthwhile and that success in achieving my perfect loaf is just around the corner....
This recipe is Dan Lepard's Mill Loaf, taken from The Handmade Loaf, a book that I love looking through, if only to imagine that I could make bread that looks even halfway as good as the amazing pictures in the book.
I halved the recipe because I don't need such a big loaf, and have given half of it to J anyway. I think the only other things I did differently to the recipe were to keep the loaf in a very warm place rather than at room temperature. Perhaps next time I should just keep it at room temp and not worry if there appears to have been no growth whatsoever. (And for those who are looking for a warm place, I can vouch that my sourdough is pretty active if I put the bowl containing the dough on top of a warm hot-water bottle, incubated inside a 13.5 tog duvet..... mmm, toasty warm!)

I tried to shape the dough as a baton style loaf, as pictured in THML but after about 30 minutes I had a ciabatta slipper shape about an inch high, if that even, that clearly wasn't going to hold it's shape. I then decided to form the dough into a ball, and tried hard to create tension over the surface of the dough to form a tight ball, before placing this upside down (i.e. seam side upwards) in a 2 litre pyrex bowl, lined with a rye-floured tea towel. Sadly I didn't manage to get enough rye flour into the tea towel and when it came to turning out for baking some of the dough had stuck, as you can see in the picture above - the wrinkles are where I had to prise the dough away from the teatowel very gently. Sadly, I clearly hadn't got enough tension into the surface of the ball, it quickly slumped to a saucer. On baking there was a bit of spring, but not enough to rectify my mistakes in handling!

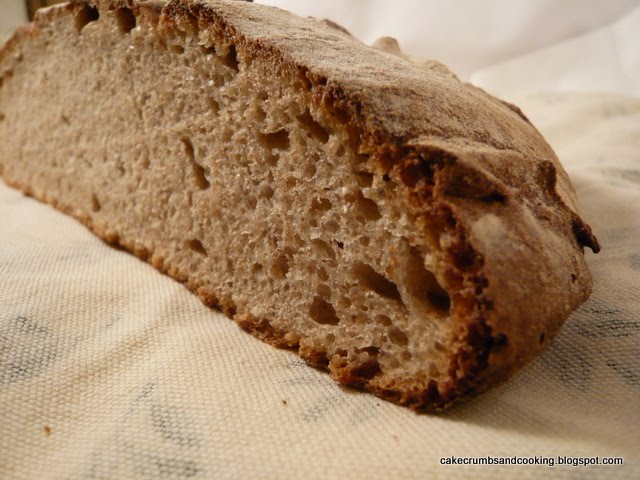
Fortunately this was a rather delicious disaster of a bread. So not really a disaster then! The taste is really lovely - tangy and sour and complex due to the mixture of flours - white, wholemeal and rye, used in the dough. I am perfectly happy to eat my way through this one in the quest for a perfect looking loaf. The texture is what I am coming to expect from my homemade sourdough - chewy and reasonably close, with an excellent crunchy, chewy crust. I guess that sourdough should have bigger holes, but next time, next time.....

Edited to add: I'm reliably informed (by Joanna) that this shape of bread is called a 'miche'. So I've managed to create a sought after shape without even trying ;-) And as I've been eating this loaf, it has really grown on me. The crust is absolutely lovely, and the crumb is lovely and dense and chewy - in a good way! and the flavour is really quite sour and complex. I'll be really sorry when it is all finished. Definitely worth another go.

Sunday, 13 March 2011

Chocolate cranberry crunchies

I love these little crunchy biscuits. I know I've made them before, but they're so versatile, quick and easy to make, and so tasty that they deserve revisiting. The recipe is extremely adaptable to the ingredients you have available, this time I chose dried cranberries and some dark chocolate chips.


I only decided to make them on a whim - I was waiting for some bread to be finished rising, and in the meantime decided to throw together a batch of these biscuits, guessing that they'd probably be pretty well received at work. I was right!

The recipe is from Delia Smith's How to Cook Book 1, in the 'Cakes and Biscuits for beginners' chapter. It can also be found online, here. Delia gives suggestions for variations on the specified chocolate and almond - apricot pecan, cherry flaked almond or raisin hazelnut crunchies, but I think that this could be a very frugal recipe - if you use raisins as the dried fruit (I think they're the cheapest dried fruit you can get hold of round here) and then a mid-range chocolate for the chocolate chips. Much as I adore 70% dark, you could substitute it here for your favourite milk or white chocolate. Yum!

Chocolate cranberry crunchies
Ingredients
110g butter
75g demerara sugar
generous tbsp golden syrup
110g self raising flour
110g porridge oats
40g chocolate chips, or chopped chocolate
40g dried cranberries

Method
- Preheat the oven to Gas 3/170C. Line a couple of baking trays with baking parchment.
- Melt together the butter, sugar and syrup over a low heat.
- Stir in the flour and oats.
If you're using chocolate as one of the add ins leave the mixture to cool a bit at this point otherwise your chocolate will melt and become a big mess (still yummy, but not as attractive)
- Stir in your chosen additions (chocolate and cranberries here)
- Form into walnut sized balls, place on the trays and squash flat a bit.
- Bake for 15-18 minutes. Next time I'll bake mine a little less (I think I gave mine 18-20 mins) because the soft middle was nice!
- Allow to cool on the tray for a while - if you try and move them, they'll fall apart and the chocolate will adhere to the tray rather than stay in the biscuit. When a bit cooler, transfer to a wire rack to cool completely.

These disappeared rapidly, and I wrote out the recipe for a colleague the day I took them in. (Another advantage of having an easy recipe - it's easy to remember the ingredients!) The next day she reported back that she'd made them successfully and her family all liked them. She used a darker sugar, being the only available one, but is going to try them again with a lighter sugar. They're much cheaper than the commercial cereal bars available, and let's face it, much tastier!

They're oaty and good, and the dark chocolate and cranberries are a lovely combination. The biscuits are still a little chewy in the middle, but crunchy round the edges. As I said above, next time I'll cook them a little less to get more chew and less crunch. But they're so easy and popular that it won't be a problem if I make them again soon!

Friday, 11 March 2011

Soured cream blueberry and raspberry cake

I'm absolutely sure that I'm not the only person with so many things on the 'to make/bake' list that only the top few are ever going to be made, no matter how hard I try to make my way through it. This cake is one that I've glanced at on many an occasion, but always glossed over. The reason is that in the picture, pretty much all of the fruit has sunk to the bottom. Generally speaking, this annoys me because the bottom of the cake is soggy and the rest of the cake boring, with no fruit, so it was easy to push this cake to one side and let others creep up the list.

What made me think again then? The Caked Crusader made and blogged about this cake recently, and it made me think again. I was also liberated by the thought that I didn't have to pile the cake with great swathes of soured cream icing, which I didn't much fancy. And since pretty much everything I've made after seeing it on her blog has been delicious I was inspired to make this cake too. That, and the pressing need to use up some of the fruit mountain that accumulated in my freezer last summer and hasn't been eaten yet. This summer is rapidly approaching (yes, really, it is.... well, at least in terms of how quickly items in my freezer get used up) and I need to use last years fruit to..... ahem, make room for this years fruit..... (yep, my mind works in strange ways). Plus I had soured cream that also had no purpose in my fridge, just begging to be used.

Lets get back to the cake now shall we? The original recipe can be found here, on the BBC Good Food website, but is also in a number of their recipe books I imagine, it's certainly in my 101 Cakes and Bakes book.

I decided to give my cake a crunchy sugar crust, achieved by a liberal hand with the caster sugar just before the cake went into the oven. I used a mixture of blueberries and raspberries, but decided to break the raspberries up a bit as they were quite big ones. This worked well, and the lovely pale pink streaks you can see dotted through the cake are probably raspberry. The original recipe states a 22cm cake tin, which is what I used. The CC used a 20cm tin, so if you want a deeper cake go for that. My cake cooked in the original specified time though, and if it had been deeper I would have had to cook it for a little longer.

I think I like blueberries - I certainly like them when they're flavoursome and blueberry-ish but I think I must have had quite a few bad examples of this fruit where there is just colour and little taste. I do think that cooking the berries helps the flavour and this is probably the case in this cake too. The juicy, moist blueberries were a lovely contrast to the soft, moist, rich crumb of the cake and the crunchy sugar topping added another texture. The sour cream definitely gave this cake an edge and I'll have to try baking with it more often.

Extremely well received, this cake gained compliments from lots of people and I was asked for the recipe too (and I think said person may even make this cake, as they seemed particularly impressed by it). I'd definitely make this cake again, I'm just sorry it's taken me so long to get round to trying it in the first place.

Mmm, crunchy sugar crust...

Saturday, 5 March 2011

Sweet potato and ginger cupcakes

I was very taken with Dan Lepard's recently published Hemp and Ginger Cake, but don't have a ready source of hemp flour nearby. And since this is the only recipe I've ever seen that called for hemp flour, I decided that although it is clearly a defining ingredient in this recipe, it was going to have to go (well, what am I going to do with the rest of the bag of hemp flour once I've done these???). Sorry Dan. But thank you for the inspiration and the rest of the recipe, which is a winner!

In the absence of two 18cm (7") round cake tins, I decided to bake these as cupcakes, but guessing that the full amount of batter would give me too much for 12 cupcakes, I decided to make 2/3 of the recipe instead. This worked well, and I got 11 tasty cupcakes out of it.

The original recipe can be found here, on the Guardian website should you wish to see it. I'll give my amounts but the method I followed was Dan's.

Sweet potato and ginger cupcakes
Ingredients
100g dark muscovado sugar
35g treacle
2 eggs
85g sunflower oil
75g crystallised stem ginger (plus extra to decorate)
115g sweet potato, finely grated
150g plain flour
2tsp ground ginger
2tsp baking powder

For the icing
125g icing sugar, plus water to mix

I baked them for 25 minutes at 180C/Gas 4. When cool, mix the icing sugar with enough water to form a stiff icing then spoon onto the cupcakes. Decorate with the extra crystallised stem ginger.
What did I learn? That grating sweet potato finely is hard work and potentially dangerous for the fingers. I'm not sure whether I'm glad that my grater is pretty blunt (given the number of times my fingers slipped with no ill effects!) or sorry that it isn't sharper, so that I could have got the job done more easily!

These are definitely ginger cupcakes for ginger lovers. I chopped the crystallised stem ginger fairly small, but the chunks were very much in evidence, and they were big enough to have to chew on, releasing all that ginger flavour and heat that I love! The cool icing was a really nice contrast to the heat of the ginger and I'm sure that had I been eating these straightaway, the suggested cream cheese cinnamon frosting would have lifted them again. A nice complex flavour to back up the ginger came from the treacle and dark muscovado sugar and these were moist soft cupcakes. Colleagues were very complimentary about these cupcakes, especially the ginger lovers! Thanks for a great recipe Dan, and sorry to have adapted it so heavily!

Wednesday, 2 March 2011

Moist muscovado mango cake

After my recent not quite successful use of my bundt tin I was a little doubtful about using it again, but it gives cakes that are such a lovely shape that I just couldn't resist. There isn't very much in the way of seasonal fruit about at the moment (barring rhubarb) but a tropical mango provided the inspiration for this cake and its beautiful yellow, sunny flesh reminded me that sunshine and warmer weather will appear again, at some stage if not soon enough! (The weather here seems to be chillier this week than it was a week ago - we surely can't be regressing to winter.... perish the thought). I had thought about making this a mango and ginger cake, and then thought that light muscovado sugar would give a lovely caramelly flavour to complement the ginger. In the event though, I forgot to add the ginger to the batter, so it's turned out as a rather moist and delicious mango brown sugar cake.

Moist muscovado mango cake
Ingredients
175g butter, softened
175g light muscovado sugar
3 large eggs
195g self raising flour
flesh of 1 large mango, diced (I ended up with 215g mango flesh)
Method
- Preheat the oven to 180C/Gas 4. Grease your bundt tin well, I lined mine with a few strips of parchment paper to help the cooked cake out if it looked stuck, which it didn't.
- Cream together the butter and sugar until really light and fluffy - the colour will change and become much lighter.
- Add the eggs and flour and beat well until combined.
- Fold in the mango flesh until well mixed.
- Spoon into the prepared tin and bake for 40-45 minutes (slight guesstimate) until a cocktail stick/cake tester inserted comes out clean.
- Leave to cool in the tin for a little while, then turn out carefully onto a wire rack to cool.

Serve as is, or with custard for dessert.


Some of the mango chunks sank, but quite a few stayed suspended, very pleasingly. This was such a soft, moist, buttery, caramelly cake with soft chunks of mango adding another dimension. I was particularly pleased with the use of the light muscovado sugar, it really did add another level of flavour to the cake. I would definitely make this again, perhaps adding that ginger I meant to add the first time round, just a tsp to add a back note of ginger rather than a full on ginger cake. I'm certainly not sorry that I didn't put it in this time though, this was gorgeous with a cup of tea and would be perfect served with custard for a lovely warming dessert to ward off our chilly weather.

LinkWithin

Related Posts Plugin for WordPress, Blogger...