Saturday, 2 August 2008

On holiday


Just look at the colour of that sky. J and I went on holiday recently to Italy, to escape the grey dullness which appears to be passing for the great british summertime (well, at least here in the northwest!). The weather was gloriously hot and dry - perfect for doing nothing and just relaxing. We visited a few cities, travelling by train between them.

Unfortunately the Euro is really strong at the moment, and it almost seemed as though we were getting euros for pounds, which was quite dispiriting and made everything rather expensive. We didn't go out for any smart meals, preferring instead to stick to local pizzerias - inexpensive but extremely tasty. No pictures of pizza though because I still feel odd taking pictures in restaurants. I guess that'll pass though, as I decide I want pictures to share on here!!!

Our first port of call was Bologna, and we stayed in a really lovely hotel, the Albergo Centrale. (Thoroughly recommended - the hotel was in a very central location (the clue is in the name!), friendly staff and a great room!) They had a lovely breakfast spread, as seen in the photo below:
and they included some lovely little pastries too - J informs me that they were very tasty, but I prefer to stick to bread and jam for breakfast, no hardship at all as the bread is so delicious and fresh.
We moved on to Bolzano (Bozen) in the mountains in the far north of Italy. We had been there before (and stayed in Hotel Feichter last time and this) and loved it so much that we wanted to go back. I feel I ought to mention the breakfast provided by Hotel Feichter too - it was one of the reasons we both enjoyed staying there so much - there is a lovely spread with fresh rolls, alpine butter, homemade jam and what looked like rhubarb compote (as well as the more ubiquitous industrially made jams in little containers), crossaint type pastries (but sweeter than French croissants), cereals, milk, yogurt, sliced cheeses and cold sliced meats, fruit juices and your choice of coffee/cappuccino/hot chocolate etc made freshly and brought to your breakfast table and probably more that I'm forgetting - we only needed a light snack for lunch!!! Bolzano is very much more Germanic than Italian, in fact the principal language seems to be German (which suits me as my German is rather better than my non-existant Italian!) which is unsurprising as the area used to be part of the Austro-Hungarian empire until relatively recently. It is slightly odd to be greeted in two languages when entering shops, museums and restaurants though! Below is a gorgeous display of bread in a shop window in Bolzano - there are so many yummy bakeries that it's hard to resist diving into all of them, and J let me peer into windows to indulge my fascination with all things bread. Yum! (If you look closely you'll be able to find the bread mouse in the basket - it's in the top right of the display!)
The rather sticky hazelnutty cakey slice above was also from one of the Bolzano bakeries.

Cantucci from a pasticceria in Florence, another brief stop on our tour of Italy - we certainly managed to cover a large area! I must find a recipe and try and make these myself, so that I can leave the nuts out (sometimes it's really irritating being allergic to stuff!) and see what they taste like for myself.

Anyway..... onto the important subject of Gelato. When in Italy, it is imperative to eat a lot of icecream. It's delicious and perfect for cooling down during the day, or eaten whilst walking back to the hotel in the evening as a way of rounding off a meal. On our last visit to Italy, we found a fabulous gelateria in Florence, which made the most delicious chocolate gelato, but sadly, when we went back this year it just didn't seem to live up to my excellent memories. I seemed to think that they included chocolate pieces in their chocolate gelato (always a bonus) but not this time. (Apologies for the shocking photo but there wasn't quite enough light and working with icecream is difficult since it has a tendency to drip and melt onto you if you take too long getting the picture!)

Perhaps the problem was that we'd been spoilt by the absolutely amazing (and I really, really mean that!) gelato that we'd had in Bologna.


This gelateria was recommended to us by a fellow traveller and was a bit of a walk (15 minutes from the city centre in 30+C heat!) but so, so worth it. Hidden away in a more residential part of the city this is an absolute gem. When you walk into the shop you can see through to the immaculate kitchens in the back where they make all of their own gelati, and the small crowd of Italians both in and outside the shop lets you know you're onto something very special.
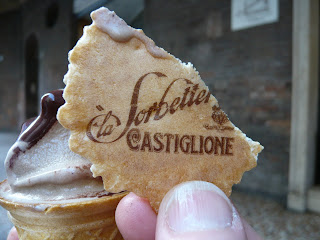


The gelati below are chocolate and espresso, no prizes for guessing which is which! This is far and away the most intense and delicious chocolate gelato I have ever tasted and so with this final picture of seductively melting and dripping gelato I will leave you to drool.......

Friday, 1 August 2008

Banana chocolate muffins - sweet and simple bakes


I made these banana chocolate muffins for the monthly baking event run by Rosie and Maria at sweet and simple bakes. They have set up a blog for new bakers in particular, but anyone who enjoys baking. You can read more about why they set up the blog here. I wouldn't say that I'm a new baker particularly, but I tend to stick to relatively simple recipes - anything calling for millions of steps involving separating eggs, repeatedly rolling, folding and chilling etc etc doesn't get a second look. Well, not until I see the usually fabulous picture, at which point the recipe gets a second look and a big sigh as I realise that I cannot hope to recreate something so fantastic! So sweet and simple is just up my street!

Ripe bananas are essential here, and the riper the better (well, until the fruit flies start circling I suppose). You can see in the top picture that my bananas were just starting to go speckled, and could have done with a few more days (which I unfortunately didn't have) so that they started looking more like the picture below.

Anyway, onto the recipe: (original here)
Banana chocolate chip muffins

Ingredients
3 very ripe bananas
125ml sunflower oil
2 eggs
250g plain flour
100g caster sugar
½ teaspoon bicarbonate of soda
1 teaspoon baking powder
150g dark chocolate chopped into chunks

Preheat the oven to 200ºC/180ºC fan oven/gas mark 6 and line a 12-hole muffin tin with muffin papers.
Mash the bananas and set aside for a moment.Pour the oil into a jug and beat in the eggs.
Put the flour, sugar, bicarbonate of soda and baking powder into a large bowl and mix in the beaten-egg-and-oil mixture, followed by the mashed bananas.
Fold in the chocolate chunks, then place equal quantities in the prepared muffin tin and bake in the oven for 20 minutes.
The recipe was very easy to follow and worked very well. I thought that the muffins might not rise very well, but they were fine, and the texture was light and moist. I used 72% chocolate because I prefer dark chocolate, but on reflection perhaps it was a little too powerful for these muffins. I have to admit that I've made banana breads to use up overripe bananas that I've enjoyed more than these muffins, but don't let my prejudice put you off making them, because they were perfectly nice and went down very well with colleagues at work.

One where the chocolate chunks started to get away.......

Saturday, 19 July 2008

Muffin mania


Having found a recipe for muffins I really like and having tweaked it to taste, I'm definitely in the muffin mood now. So quick, so easy, so tasty, what's not to like!!!
The original recipe came via Rosie, at Rosie bakes a 'peace' of cake, which is such a delicious looking blog! So thank you again Rosie. I've posted before about making blueberry muffins, which was my first attempt. The major tweak I made was to replace the plain flour with self raising and add a scant 1/2 tsp baking powder. For some reason this seems to get rid of the nasty 'fuzz behind the teeth feeling' that I sometimes find with baking powder. I also upped the vanilla extract to 1 tsp. Since then I've made fresh apricot and dark chocolate (about 100g of fresh apricots, each chopped into 8 pieces - that's about 4 smallish apricots, and 40g Lindt 70% chocolate) shown in the picture at the top of the page. Yielded seven. The picture below shows the inside of the muffin. The cake part is deliciously light and the soft apricot and slightly bitter dark chocolate are a perfect compliment to the cake. A great travelling snack, hence why the pictures aren't that great and the paper slightly crumpled on the top picture - I was on a train journey and they were very well travelled muffins!

Next up were white chocolate and dried cranberry (50g dried cranberries and 50g Green and Blacks white chocolate). Yielded six. Sorry, no pictures of these as they all went to work and were snaffled before I could get a shot of them. Then most recently, white chocolate, dark chocolate (same chocolate as before) and dried cranberry. I doubled the recipe for these (so used 100g dried cranberries, 60g dark chocolate and 50g white chocolate - using up bars left over from the previous two batches!) and got 12 muffins but for whatever reason, they didn't rise quite so much. Still tasted excellent though!

It really is an easy recipe, to the extent that I weighed out and sifted together the dry ingredients for the double choc and cranberry batch one evening, weighed and chopped the chocolate and weighed the cranberries and then covered it all until the following morning. I then measured the wet ingredients, mixed them and baked them before I went into work the next morning! (I think I only had to get up about 10-15 minutes earlier than normal, although as someone who takes forever to get ready to leave the house in the morning I guess most people still wouldn't have time!!!) One of the advantages of using sunflower oil is that you don't have to mess about melting butter or waiting for it to soften as for cake recipes, and I can kid myself that because it isn't a saturated fat they're better for me...... (I think the technical term for this is 'suspension of disbelief'!!!! don't burst my little bubble and remind me how much sugar and refined flour etc is in them!). The method of stirring together is quicker and easier than creaming with a handheld blender too - and less noisy so less anti-social early in the morning!
J had one of the strawberry and white chocolate muffins I posted about here on the flight out for our holiday so I got a picture of the inside of the muffin (and the extortionately expensive 'coffee' in the background) I perhaps should have put a little more white chocolate in them, as she didn't seem to have very many pieces of choccie!
All in all I'm sold on this recipe, and they seem to go down well at work too!

Friday, 11 July 2008

A fresh, fruity cake for summer

I originally made this cake as a birthday cake for T, way back in April. If memory serves correctly I hadn't got the fruit required by the original recipe (raspberries and apricots) which can be found here (no, I don't know what a buckle is!), so I used raspberries (in the quantity stated) and a pear, which I grated on the coarse side of a box grater. It seemed quite wet though, so I squeezed most of the excess juice out using my hands. Very sophisticated! Because it was the first time I'd made the recipe I did the crumble topping too, and I have to say, the cake was delicious. It was really, really moist and beautifully fruity, with the juicy pockets of raspberry providing a sharp berry burst to complement the soft cakey part. (I think I've mentioned before how much I love raspberries) Yum yum yum!!!
So, I decided to make it again. This time I didn't bother with the crumble topping as I was in a bit of a hurry, and again I had the wrong fruit, but the beauty of this cake is that the fruit is adaptable. I used about 90g of raspberries and two nectarines instead of the apricots. I quartered the nectarines and then cut each quarter into 6-8 pieces, depending on how much it was falling apart under my knife!
The cake is extremely easy to make and I followed the instructions as written, apart from omitting the cinnamon, which I sometimes find a little overpowering, and which my family don't really like much and leaving my cake in for nearly an hour. After the time alloted in the recipe it was still looking a little 'pale and interesting' and I prefer my cakes to be a darker golden colour, especially if I'm not planning to dress them up at all. I think this version was a little drier, but still very moist, as you can see from the photo above. My cake isn't quite as deep as the one in the recipe photo (I love recipes where they give you a photo of a finished product to aim towards) but I suppose it might have been deeper had I used more fruit. Definitely one to make again and again, and the crumble is definitely worth it if you have the time. It makes a nice textural contrast to the soft cake and juicy fruit. Below is the cake I made in April, with pear and raspberries and the crumble topping. The picture isn't great as I took it for interest rather than planning on blogging it, so it's still in the tin.

Friday, 4 July 2008

Marbled chocolate cake

A quick cake, easy to make, but quite impressive to look at. I've made this cake before, a few months ago and it was very well received, so I decided that a repeat performance wouldn't be badly received by my colleagues at work. A classic pound cake type recipe, with equal quantities of flour, butter, sugar and eggs with a little milk to loosen the mixture. You can find the recipe I used here. Although it looks like a faff to create the marbled effect, it's actually extremely easy. As the recipe explains, you make up the whole mixture as vanilla, pour/scoop half into another bowl (not so good for the washer-upper of the household, me in my case!) add a couple of tablespoons of cocoa and mix well. I suppose you should sift the cocoa to make mixing it in easier, but I didn't, and it didn't seem to matter too much. For the swirling (which I feel has come out quite well!) I blobbed (a technical term) large spatula-fuls of mixture into the tin, 6 blobs alternating vanilla and chocolate and another blob in the centre using about half of the mixture. Then with the other half of the mixture I repeated the process but opposite, so that if vanilla was on the bottom, chocolate was above it and vice versa. For swirling, the recipe recommends a skewer, but I tried this the first time I made it and it just wasn't wide enough to move the mixture. This time I used the handle of a dessert spoon, which worked well.
I think mine took about 5 minutes more to cook than the recipe recommends. It rises really well, and although the amount seems a bit mean in the tin, it looks great when it's baked, with a lovely little peak.
The photo below shows the inside marbling of the cake. Apologies for the poor photography, it was night time and so all the colours are a little odd. Lovely and moist, a very well received cake!

LinkWithin

Related Posts Plugin for WordPress, Blogger...