Tuesday, 28 August 2012

Fresh Peach and Vanilla Cake


I love baking with fresh summer fruit and finding myself with a few peaches to spare I decided to bake them into a cake. One of the nice things about baking with fruit is that it doesn't have to be perfectly ripe to make an excellent cake. I think these peaches were fairly ripe, but I have used fairly hard fruit in the past and it has still worked very well.

Fresh Peach and Vanilla Cake
Ingredients
115g butter, softened
60g light muscovado sugar
60g caster sugar
2 eggs
125g self raising flour
1tsp vanilla extract
2 peaches, chopped into decent size pieces

Method
- Preheat the oven to Gas 4/180C and line a 7"/18cm round tin with baking parchment. I would suggest not a loose based tin because otherwise your fruit is likely to leak a little juice into the oven. I actually used my Lakeland Pushpan, which although loose based is perfectly sealed (I am not on commission, just impressed by the product!)
- Cream the butter and two sugars together until light and fluffy.
- Add the eggs, flour and vanilla and continue beating until well combined.
- Scatter the peach pieces over the base of the tin and then add the cake batter on top, being careful not to dislodge the peaches too much.
- Bake for 35-40 minutes until risen and golden and a cake tester comes out clean.

Allow to cool for a while in the tin before inverting onto your serving plate.


This would be perfect served with some cream or a blob of creme fraiche for a light summer dessert, perhaps with some more chopped peaches alongside. However, it also makes a perfect teatime cake too. The freshness of the peaches is delicious and the addition of some light muscovado sugar gives the cake a caramelly depth of flavour and a gorgeous pale brown hue.

I am submitting this to Calendar Cakes run by Rachel of Dolly Bakes and Laura of Laura Loves Cakes. The theme this month is summertime, and nothing is more summery than fresh peaches!


I am also submitting it to Nazima at Working London Mummy for her 'One Ingredient' challenge this month, the theme of which is peaches or nectarines. Her co-host is Laura of How to Cook Good Food.


Lastly I am submitting it to Simply Food's 'Let's Cook with Fruit' event - because that's exactly what I've done, cook with fruit!


Saturday, 25 August 2012

Nigella's Chocolate Pistachio Fudge


I have been a little busy recently, both at work and with having the kitchen redone (there will be photos, but perhaps not yet, as it still needs to be tiled and redecorated) and my time and motivation to blog has fallen slightly by the wayside. I have still be making lots of things though, so the backlog (an ever-present problem for me) has been building steadily.

In line with needing to make something quick and easy, and not having all that much time, this post will be short and sweet, rather like the fudge it describes. I often flick through books I bought a while ago, and happened to be flicking through Nigella Express recently, not really with anything in mind, when the page with the chocolate pistachio fudge caught my eye. So pretty. So easy. And fairly quick too - just need to let it cool and set. It's the perfect thing for those in need of an easy sweet treat to make. No baking required, and only four ingredients too.


You can find the original recipe for Chocolate Pistachio Fudge on Nigella's website. Regular followers will be wondering about the pistachio of the title. No, I cannot magically eat them, but instead substituted dried cherries for the nuts. A different texture, I grant you, but not an unpleasant one. Admittedly, the contrast of the green nuts and the dark fudge is rather more photogenic than the rather unremitting brown of my fudge, but never mind. 


I adapted the recipe slightly and give my amounts here:
Chocolate Cherry Fudge
Ingredients
300g condensed milk
260g dark chocolate (I used G&B Cooks 72% chocolate here)
22g butter
90g dried cherries, chopped a bit smaller

Method
- Line a 20cm/8" square tin with clingfilm/wrap.
- Melt butter, condensed milk and chocolate in a large pan over a low heat.
- Mix in chopped cherries.
- Spoon into prepared tin and level. Allow to cool before refrigerating.
- When set, cut into 64 pieces and store in the freezer.

I have only one small gripe about this recipe - there seemed to be a slight fatty deposit on the top of the fudge which is really not very attractive. I don't know why this is, perhaps I overheated the mixture? It doesn't matter all that much because I know what it is, and it's only me that'll be eating this rather than my colleagues, but I'm not sure how to prevent it next time. 

Hmm, unphotogenic fatty bit....

That aside, this is beautifully smooth and rather more-ish to eat too. Not too sweet and the cherries add a good textural contrast. Having this in the freezer is pretty dangerous though... I wasn't convinced that it would be good to eat straight from the freezer, but it really, really is. Not too hard to bite into at all, and I can hear it calling me as I type. It'll make a great 'freezer-raider' snack!

When I thought about this fudge it fulfils the criteria for a number of the blogging challenges this month.


We Should Cocoa, hosted this month by Janice of Farmersgirl Kitchen, founded by Choclette of Choc Log Blog and Chele of Chocolate Teapot. The theme this month is cherries and although I made a lovely cake with fresh cherries in it I haven't had chance to post it and we're at the deadline now.


Forever Nigella, hosted this month by Karen of Lavender and Lovage, and founded by Sarah of Maison Cupcake, where the theme is 'Fridge Raider Snacks'.


Bookmarked Recipes, hosted by Jac of Tinned Tomatoes, because this is a recipe I've been meaning to get round to making for ever such a long time now - I don't know what took me so long as it's so simple and quick to do.


Sarah of Maison Cupcake has also launched a 'No Bake' challenge, born from her lack of a kitchen for a period this summer. I can empathise with that feeling, although mine didn't take quite as long as Sarah's to change. I feel eminently qualified to enter the no-bake challenge!


Finally, I think this would make a good 'Sporting Snack' and am submitting it to Ren's Sporting Snacks challenge on Fabulicious Food. 

Sunday, 19 August 2012

Yorkshire Teabread


I have tried quite a number of teabreads over the years and I am always game for trying a new and different one. Teabread is a useful cake to have around - it keeps well and makes a good snack, being not too sweet. I always think it's especially good spread with a good layer of butter! This recipe came from one of the Waitrose recipe cards which caught my eye as I was doing some shopping recently. I like the fact that it even states on the recipe card that it was created to celebrate Yorkshire Day on the 1st August. I may be a little late, but better late than never.


I can't find the recipe on the Waitrose website at the moment, but will keep checking to see if it's there. The recipes I usually use involve making strong tea (Yorkshire tea would be perfect here!) and soaking the dried fruit overnight. This recipe specifies making the tea and then leaving the fruit for at least an hour. I actually left mine about six hours, because I was doing other things, so it had plenty of time to plump up. I increased the spice in the recipe slightly - 1/4tsp isn't much so my 1/4tsp was rather generous! I also couldn't locate my glace cherries (for a good reason... being that most of my kitchen was relocated to my living room and things were piled on top of each other!) so used dried cranberries instead.


Quite a small loaf - just a 1lb (450g) tin and quite shallow, but tasty nevertheless. The teabread curdled quite badly as I was making it and I really wondered how on earth it would turn out to be edible, but I needn't have worried. This was really delicious. There's a lot less fruit in it than the teabreads I usually make, but this isn't necessarily a bad thing, it's just different. The most noticeable and surprising thing about this cake was how soft it was - really, really tender and delicate. I guess the curdling didn't really matter at all then! Apologies for the particularly dark photographs - as part of moving everything in my kitchen out, my usual lightbox was out of action hence the more-than-usually rubbish photos!


I am entering this teabread into the Best of British challenge, hosted by Karen at Lavender and Lovage, and organised by Karen and Fiona of London Unattached. Many thanks to them for organising this challenge, which is being sponsored by New World Appliances for the first six months.


And as it is T for Teabread, I am also entering it into Alphabakes. This month the host is Ros of The More than Occasional Baker, and her co-host is Caroline of Caroline Makes.

Friday, 17 August 2012

Mediterranean Olive Bread Scrolls - the Final Bake and a glimpse into my chaotic kitchen

Ready to proof

I have been a little busy of late. This is a bit of an understatement. In the past week my kitchen has been replaced - massive woo-hoo! The old kitchen was plain nasty and I have always been too embarrassed to share any pictures of it with anybody out there, but now that it has gone for good I feel I can admit to the mess I used to work in! Anyone who knows me knows that I am messy beyond belief - if there is a flat surface available I will put something onto it. And then something on top of that. This was massively compounded by my kitchen having far too little storage space, and even then, some of it was not usable - drawers that fall off their runners when you pull them out?!? So it is no surprise that my kitchen is was messy too. I vow to try harder now!

Nasty old kitchen!

With having no kitchen for a week, and therefore no easy means of food preparation meals have not been inspiring of late at all. However, I wanted to make lunch preparation as easy and painless as possible so I decided that interesting bread rolls that didn't need anything more adding to them were the way to go. There is a glut of peppers available at the moment and so I took my bread down the Mediterranean route - roasted peppers, tomatoes and olives and an olive oil based dough too. 


Why scrolls? Well, just because they look pretty!

Mediterranean Olive Bread Scrolls
Ingredients
3 large peppers - mixed colours if you want - I used red, orange and yellow
large handful of cherry tomatoes
green olives (or whichever you prefer)
380g strong white bread flour
10g extra virgin olive oil
270g warm water
1tsp instant yeast
1tsp salt

Method
- Before starting the dough I firstly started to roast the peppers and tomatoes. Carry on until they are soft then leave to cool before peeling off the pepper skins and chopping into pieces.
- For the bread dough, put the flour, olive oil, water, yeast and salt into a large bowl and bring together as a dough. It will be very soft and sticky. Leave it for a while (10-15 minutes)
- Grease the work surface well and knead the dough briefly. Leave 10-15 minutes and repeat the kneading process. Oil is your friend here - it will stop the dough sticking to your hands and work top and make it possible to work.
- Leave to rise until doubled (I left mine on top of the warm oven so it didn't take that long).
- Pat out to a rectangle (my dough was quite resistant, it would far rather have stayed as a ball thank you very much...) and scatter over the roasted chopped pepper and roasted cherry tomatoes leaving a gap along one side - see photo below. I also scattered over olives too - but forgot to photograph that step - you can see the olives in the slices though.
- Roll into long snake and then chop across the snake to give your scrolls.
- Allow these to proove until risen.
- Whilst prooving, preheat the oven to Gas 6/200C.
- Bake for about 35 minutes or so at Gas 6.
- Allow to cool on a wire rack.

Spread with roasted peppers and tomatoes - leave a gap along one edge

These were great - soft but resilient dough generously flecked with roasted vegetables and olives made a very satisfying lunch, and they would be great with a handful of feta cheese too. It was very easy to just grab what I needed from the freezer each morning - no hassle! They would also be perfect with soup. These were the very last thing I baked in my old oven. I'll perhaps share some photos of the new one - maybe even when it's in action... (I know that seems silly, but I'm very impressed by my new oven with its glass door and internal light! Ah modern technology!)

Ready for slicing

I have to apologise for the poor quality of the photographs - my usual method of obtaining better lit photographs was unavailable and this is the best I could do. Normal service will hopefully be resumed shortly. 

Ready for baking - puffed up

So I now have a challenge - a new oven - fan - so the next things you see (apart from those waiting in the archives) may be crispy burnt offerings as I attempt to get to grips with a foreign beast. But at least I'll be able to see when my cakes are burning..... (this is the first time I've had an oven with a glass rather than solid door!)


As peppers and tomatoes are in season I am sending these to Ren at Fabulicious Food for Simple and In Season.

JWsMadeWLuvMondays

I am also sending them to Javelin Warriors 'Made with Love Mondays'.


Tuesday, 7 August 2012

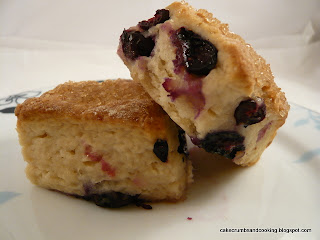
International Scone Week - Blueberry Vanilla Ricotta Scones


It's International Scone Week - hop over to Fig Jam and Lime Cordial for a bit more of an explanation! Scones are popping up all over the place Joanna has some interesting looking experimental Kombucha scones, Misky has made Celia's lemonade scones, and Heidi is making lots of scones. So as a confirmed scone lover I'm wading in with my offering this time. 

You can find all of my previous scone blog posts by clicking here.


Other scones I'd like to try from around the web...
Dan Lepard's Ginger Beer Scones 
Dan Lepard's Vanilla Almond Scones (I'll miss off the almonds!)
A savoury alternative to sandwiches Mediterranean Scones
Some with strong flour Fig and Date Scones
Celia's Lemonade Scones
A Frying Pan Pizza with a scone-like base


Blueberry Vanilla Ricotta Scones (adapted from BBC Good Food)
Ingredients
250g ricotta
120g golden caster sugar
280g self raising flour
70g butter
100g fresh blueberries
1tsp vanilla extract (or a little more)

Method
- Preheat the oven to gas 5 1/2/190C. Place a sheet of parchment paper on a baking sheet.
- Place the ricotta in a bowl, beat in 60g sugar and the vanilla extract and set aside.
- Place the flour in a large bowl and rub in the butter (I used fridge cold butter here).
- Mix the remaining sugar into the flour/butter mix.
- Add the ricotta mixture to the flour mixture and bring together almost into a dough. When it has nearly combined, add the blueberries and continue to mix.
- Tip onto a floured surface and briefly knead to bring together. (Well, not really knead, just bring it together - by squashing it a bit really)
- Pat out into a large square about 1 1/2" or 3cm thick (it's a bit vague - it sort of depends on how deep you want your scones).
- Cut into 16 pieces (the dough will be fairly dry) and transfer to the baking sheet, spacing apart a bit, as they expand during baking.
- Bake for around 25 minutes until risen and golden. I returned the centre four of my scones to the oven for an extra 5 minutes because they didn't seem quite as done.
- Cool on a wire rack.


This has to be one of my absolute favourite scone recipes, and it has made an appearance on the blog before, but I make no apologies for bringing it out again in a different guise, because until you've tried these you really don't know what you're missing. They're moist and full of vanilla flavour and juicy goodness of the blueberries and don't really even need any butter, although a good dollop of blueberry jam (Bonne Maman do one I'm particularly fond of) wouldn't go amiss.

What's your favourite scone recipe? What am I missing that I should really try?

Sunday, 5 August 2012

The Most Amazing Banoffee Chocolate Cake


This is one of the times when I genuinely wish that the pictures of this cake did better justice to the flavour of the cake. I suppose I can accept that it was never going to look absolutely stunning - loaf cakes rarely do, but this recipe is an absolute stunner and I thoroughly recommend it.

It came from one of the recipe cards that Waitrose have in their stores for customers to pick up free of charge. This one is (rather unsurprisingly) in association with Nestle Carnation. I do love a bit of Carnation Caramel, and thought I had a tin in my cupboard, so picked up this card. It turned out that my tin was over a year out of date so I ended up buying another tin anyway! I did have the requisite over-ripe bananas though so it wasn't a complete loss.


You can find the recipe here on the Waitrose website. I was slightly concerned after mixing up all the ingredients that the cake would overflow the tin, but luckily this wasn't the case. My cake neede a bit longer than the time specified and I think I covered it for the last  part of the baking time too, to prevent it overbrowning. 


Such a luscious cake - I particularly love the soft bit on the top of the loaf where it has cracked open. I used dark chocolate for the chocolate chunks and they were a great contrast to the sweet cake. Don't be mistaken, this is a sweet cake, but not excessively so and rather than just pure sweetness it is caramelly sweetness, i.e. extra delicious. My bananas for this cake were very overripe, but even so I was very struck by just how bananary this cake was - I have made other banana cake recipes with bananas of equal over-ripeness that have tasted nowhere near as bananary as this cake did. I think the combination of the caramel and the banana combined to boost the banana flavour.


I don't think this was a particularly cheap recipe (not least because the tin of Carnation caramel alone was £1.56) but it did allow me to use up three very over-ripe bananas heading for the compost heap and only uses one (expensive) egg and a little butter and sugar. I would definitely make this cake again and it was very popular at work too.

LinkWithin

Related Posts Plugin for WordPress, Blogger...