I've been meaning to try making my own bagels for a while, and a recent holiday (where I ate them for breakfast most days!) brought the idea to the forefront of my mind again. I don't quite know what it is about them that I love the most, but probably the chewiness of the crumb and the sticky, chewy crust that is slightly sweet. I'm not going to pretend I'm any sort of expert about bagels at all, so if you want some background on them, I suggest going to Wikipedia because as usual with Wikipedia, there's loads of info there. My first thought when looking for a recipe was to go to Pixie's blog, You say tomato, I say tomato because I remembered seeing a recipe for NY bagels there but when I looked more closely, it's in cups, which I dislike working with. So, when in doubt, I fall back on my trusted Dan Lepard forum, and sure enough, there was a recipe for bagels which sounded good.
I won't reproduce the recipe here, but they really weren't difficult to make. I have made bagels only once before, when I was lucky enough to go on a day-long bread making course at an artisan bakery in Kendal (I'd love to go back too - he makes the most amazing breads). The 'recipe' (and it's in inverted commas here because there was no weighing or measuring of ingredients there) was great, but unreproducible for me because it used a sourdough starter. I'd love to manage to make a viable sourdough starter, but my last attempt smelled like acetone (nail varnish remover) and grew mould so I never used it. Anyway, the point I was going to make was.... the baker who was leading the course said that the best bagels are made with very strong flour because it has a very high gluten content. I couldn't get hold of the stuff he used commercially, and made do with the Canadian Very Strong bread flour from Waitrose. I don't know if this contributed to the success of these bagels, but they were really, really great!
 Here they are after dividing the dough into six and leaving to prove.
 Shaped and poached, ready for the oven. I tried a different technique for shaping two of them which didn't work quite so well, which is why two of them are a funny shape and all irregular. Do as Dan says and just push your finger through them to make the hole, don't try anything funny like I did!
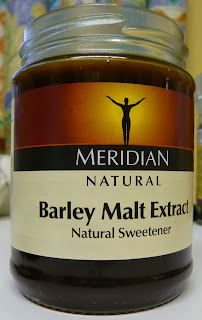
This is the malt extract that I used. I bought it from a small, independent health food shop, I'm not sure if it's available in supermarkets. A quick word of warning though. I didn't read the label properly and didn't refrigerate the first jar I bought after opening. Mistake!!! I grew this lovely little fluffy bit of mould. So that was a wasted jar of malt extract then. I've refrigerated this jar, and suggest you do the same!
 Mmmmm, mouldy!!!
 So after the dodgy picture of mould, I invite you to take a look at the delicious dense interior of my yummy bagels. I think this is just what bagels should be like (it is cut in half ready for me to make sandwiches) and you can see the lovely shiny crust from the poaching. Bagels are often cooked with toppings such as poppy or sesame seeds, which you could easily add after the poaching step. I just wanted mine plain and simple. One of the classic fillings for bagels has to be cream cheese and smoked salmon, but for the thrifty/fish hating among you, my favourite filling is cream cheese with a grinding of black pepper. What's your favourite filling?
 And a final gratuitous shot of my cooked bagels cooling down on a wire rack. These were fabulous, and I'm sorry they're all gone now. Definitely on the 'to make again pronto' list. I suggest you do the same!
No comments:
Post a Comment