Tuesday, 31 July 2012

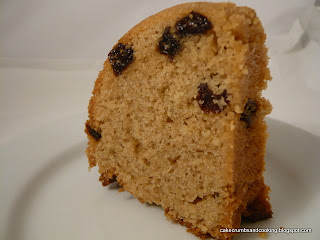
Cinnamon Raisin Bundt Cake


Although we've had a few sunny days in the past week, the drizzle is back with a vengeance and the only way to combat this is with a piece of cake and a mug of something hot and comforting. I can't believe I'm typing this as July ends, but there we are, summer this year appears to be a wash out! So, skipping straight to warming autumnal flavours for a brief interlude I decided to use cinnamon and lovely raisins. Muscovado sugar adds a depth and richness too. Not a summer cake at all, but a tasty one all the same. 


Cinnamon Raisin Bundt Cake
Ingredients
170g butter
75g caster sugar
95g light muscovado sugar
1/2 tsp cinnamon
170g self raising flour
3 eggs
75g raisins

Method
- Preheat the oven to Gas 4/180C. Grease a bundt tin very thoroughly. Mine holds 2 litres of water to the brim.
- Cream the butter and sugars until light and fluffy.
- Add the cinnamon, flour, eggs and beat again until well combined.
- Stir in the raisins and spoon into the prepared tin.
- Bake for 35-45 minutes until a cake tester inserted comes out clean.
- Leave to cool in the tin for a few minutes then very carefully invert to remove the cake (I wasn't quite careful enough and mine cracked, but at least it didn't fall apart completely!)

You may need to cover the cake part way through baking as it colours quite quickly

Golden and moist

I really enjoyed this cake, the raisin and cinnamon flavour combo was great although the cinnamon was fairly subtle. The light muscovado added a depth of flavour that was very pleasing and added caramel overtones to the cake. Yum, a delicious storecupboard cake.

A small fissure...

Friday, 27 July 2012

Random Recipes... the Cookbooks


This month Dom has challenged us to do something a little different for his random recipes challenge. Instead of the usual making of a random recipe he has invited us to share the collection of books from which these random recipes come.


I am the first to admit that I am not a complete regular when it comes to entering the random recipes challenge. I always, always look up and see which recipe I would have got according to the rules of the challenge that month, but the recipe is rarely something I have either the time, ingredients or inclination to make, and so despite my best intentions I end up skipping month after month. But not this time. With no cooking involved I thought there was no way I could miss this one.... although the amount of time it has taken me to get photos almost made me too late. The problem is not the photos so much as the gathering of the recipe books from far flung corners of the house into their home the bookshelf. Yes, I have had to tidy up! (I really hate tidying up!)


So here you can see my collection. They live on two bookshelves in my bedroom, one large one small and although there are still a couple scattered around the place this is the vast majority. None in the kitchen or living room here - just the bedroom.


I don't know if anyone else has this problem but I have no idea how to organise my books - you can perhaps see that there are a number of different attempts going on at categorisation. There are some books categorised by author - you can probably see some spines you recognise (Nigella, Delia, Hugh F-W, Jamie Oliver) etc and then there are some that are organised by genre - vegetarian for example, or baking (there's pretty much an entire shelf dedicated to those ones!) or by publisher - a series of books published by Ryland, Peters and Small, and a series of BBC Good Food 101 books. But what to do with the BBC 101 Cakes and Bakes - with the series of the same publisher or with the baking books? The series above is one I particularly enjoy looking through - the recipes are great and the photography is fab.


These are the newer acquisitions - no logical order at all. And a couple of old ones thrown in for good measure. 


Needless to say I do not cook from all of them regularly. To my shame some of them have barely been opened, but in my defence some of them are regularly opened and read, even if they are not used as much as they might be. Inspiration comes from many sources. Anyway, above are some of my most used ones. Nigella had a bit of an accident with a halogen ring that was still hot, although off, so is looking rather the worse for wear. It's not a particular surprise that my most used books are baking ones is it???


These are the newest ones - yet to be delved into thoroughly. I am rather suggestible though - someone out there (one of my particularly lovely blogging friends!) is responsible for one of these.... but I don't regret buying it!

A few of many magazines...

I confess to being one of the world's worst hoarders - I hate throwing things away and have years and years worth of various magazines on subscription that I cannot bring myself to chuck out. However, I frequently re-read them and so justify keeping them to myself. I also am lucky enough not to have any space issues - it's just storing them tidily that's the problem!

The second set of shelves - much smaller!

So there we are, a little peek into the world of my cookbooks. I've really enjoyed seeing everyone else's collections, so I hope you've enjoyed seeing mine too!


Tuesday, 24 July 2012

White Chocolate, Blackcurrant and Apricot Cake


I have seen lots of posts recently featuring blackcurrants and chocolate - there seems to be a rash of late entries into We Should Cocoa so I thought it was about time I threw my hat into the ring as it were and typed up my contribution. Choclette is the host this month and has chosen blackcurrants as the ingredient to pair with chocolate. I have to confess that I was rather relieved when this announcement was made. I haven't really relished the last couple of months challenges - firstly almonds (hmm, allergy alert!) which Laura kindly let me enter with a substitute of peanuts (no allergy concerns here for me) and then coffee - ugh. I know many out there are coffee lovers but I'm not among you!


So blackcurrants was rather welcome. I know it seems to have sparked some controversy - blackcurrants are apparently nigh on impossible to come by fresh in Australia and even here in the UK, many people have been unable to find the fresh berries and have chosen instead to use jam. As a little aside, I discovered when googling (thank you Wikipedia) that Ribena (a UK blackcurrant squash drink that used to claim 95% of the fruit grown in the UK) is so-called because the Latin name for the blackcurrant is Ribes Nigrum.


Please allow me a small moment of joy here - my garden is a complete mess (this is not the moment of joy!). I could post a photo and show you just what my lawn meadow looks like at the moment and how the hedges privet trees are threatening to take over the neighbourhood, but I won't (it's embarrassing for a start). But in amongst all the mess I fought my way towards the solitary blackcurrant bush and picked my bounty (I didn't use all of my currants in this cake) for this year. In spite of being nearly overcome by the long grass I have blackcurrants this year!


I decided to make a simple cake to show off the glory of my fresh fruit to the maximum. A combination with fresh apricots and white chocolate seemed fitting for the sunny days this weekend and so that is what I made.

Ingredients ready to be added


White Chocolate, Fresh Apricot and Blackcurrant Cake
Ingredients
125g softened butter
125g caster sugar
2 eggs
140g self raising flour
1tsp vanilla extract
50g white chocolate, chopped small
95g blackcurrants
130g apricots, chopped (this was 3 apricots)

Method
- Preheat the oven to gas 4/180C. Grease and line a 7"/18cm deep tin.
- Cream together the butter and sugar until pale and fluffy.
- Add the eggs, flour and vanilla and beat well to combine.
- Fold in the chopped chocolate
Bear with me here - the method may seem a little odd, but there is method to the madness....
- Spoon half of the mixture into the tin and spread it out.
- To the remaining half of the mixture in the bowl, add half of the chopped apricots and half of the blackcurrants. Mix gently until combined, but take care not to smash the blackcurrants.
- Spread this fruity cake mixture over the top of the cake mix already in the tin.
- Scatter over the remaining apricots and blackcurrants.
- Bake for 55-65 minutes - you may need to cover the cake towards the end of the cooking time if it is browning too much.
- Remove from the oven and allow to cool a little in the tin before removing to a wire rack.


I had wondered how to decorate this cake, but then didn't need to - the fruit that had stayed near the top had done a wonderful job of decorating the cake as it stood - no icing necessary. It was a delicious, fresh, fruity moist cake with little bursts of white chocolate sweetness that disappeared rapidly at work and was very popular. 


I am entering this into We Should Cocoa as mentioned previously. Hosted this month by Choclette of Choc Log Blog and co-hosted by Chele of Chocolate Teapot.


I am also entering it into this month's Alphabakes, where the letter is W (white chocolate). The host this month is Caroline of Caroline Makes and her co-host is Ros of The More than Occasional Baker.


Finally I am entering it into Ren's Simple and In Season, because those blackcurrants are right in season in my garden at the moment. This is hosted this month by Fleur.

Sunday, 22 July 2012

Chocolate Chunk Traybake with Fudgy Chocolate Icing


A large, yet easy to make cake to feed many hungry people...


Chocolate Chunk Traybake with Fudgy Chocolate Icing
Ingredients
225g butter
110g caster sugar
110g light muscovado sugar
splash vanilla extract
4 medium eggs
210g self raising flour
25g cocoa powder
150g 70% chocolate, chopped into chunks (I used Green and Blacks)

Method
- Preheat the oven to gas 4/180C. Grease and line a traybake tin (8x12") with parchment paper.
- Cream the butter and sugars until light and fluffy.
- Add the vanilla, eggs, flour and cocoa powder and mix together until everything is well incorporated.
- Stir in the chocolate chunks.
- Spoon into the tin and level out. Bake for 35-40 minutes until well risen and a cake tester comes out clean.
- Leave to cool in the tin a little.
- Very carefully turn out. I wasn't careful enough and mine broke up into three large slabs. This isn't the end of the world though, because the delicious fudgy frosting will glue it back together!!!

Fudgy Chocolate Icing
250g dark chocolate (150g)
125g butter (75g)
200g icing sugar (120g)
5tbsp milk (3tbsp)
Bag of Twirl bites

- Melt the chocolate and butter over a pan of hot/simmering water.
- Remove from the heat, stir and beat in the sugar and milk until well mixed.
- Leave to cool until a spreadable consistency, then spread over the cake.
- Decide how many pieces you are going to cut the cake into and then mentally mark it out. Place a Twirl bite in the centre of each piece, then cut up before eating!

I have made a similar icing to this before, but was reminded of it when I came across the Hungry Hinny's post on her fabulous Chocolate Bunny cake and realised that this icing was just what I needed for this cake. It's a lush, fudgy chocolatey icing - just perfect and lovely to work with too. As you can see from the date on the Hungry Hinny's post I made this cake a while ago (I hadn't actually realised it was that long ago!) and I recall not making quite as much as the full recipe. I think I scaled it down to 3/5 of the amount specified and have put these amounts in brackets. If this is the amount I made, it still provided a generous covering for my cake, and a little extra for the baker!


This cake was lovely, lovely! I do so enjoy a cake with chunks of chocolate in it and the fudgy icing was just the right choice too. It's very reminiscent of something my mum used to make in quantity (vast, vast quantity) for our cake stalls when my brother and I were much younger. She used to make about 120 little chocolate buns (there were no cupcakes in the days of my childhood - you had buns or fairy cakes!) spread them with Cadbury's chocolate (the height of sophistication in the 80s when all the other mums were using Scotbloc chocolate flavoured cake covering) and then top them with a little piece of Cadbury's flake. They were always immensely popular on the school fete cake stall - often manned by my mum as a stalwart of the PTA. I like to think of this traybake as a posher version of my mum's chocolate buns - it has a richer cake base with the inclusion of light muscovado sugar, and all that delicious dark chocolate with a luscious icing too, but then harks back to my childhood with the topping of a Twirl bite - essentially just a tiny bit of flake covered in chocolate.


I think this would be perfect for a cake stall so am sending it to Karen of Lavender and Lovage for her Tea Time Treats Challenge, which this month is all about Cake Stall Bakes. TTT is co-hosted by Kate of What Kate Baked.


Sunday, 15 July 2012

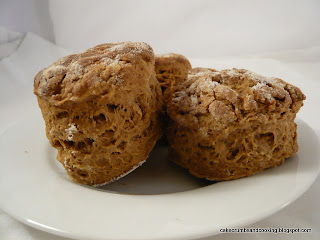
Treacle Scones and Parlies


I am full of good intentions... always. It's just that they don't always work themselves through to reality and completion.

Last month I saw that the second of the Best of British challenges was being hosted by Janice of Farmersgirl Kitchen, which I always really enjoy reading - Janice has a lovely mix of mains, sweets and baking on her blog and always comes across as being down to earth and genuine. I had intended to enter this challenge when it was being hosted by Choclette in the first month, with the region of (obviously) Cornwall. This challenge is being sponsored by New World appliances. The region this month is Scotland. I was quite excited by this, because one of my favourite food writers is Scottish - Sue Lawrence. I have mentioned her before on the blog - she has a couple of excellent baking books full of enticing recipes, but she also concentrates on her home country too. I have 'Scots Cooking' 'Scottish Kitchen' and 'A Cooks Tour of Scotland: From Barra to Brora in 120 recipes' all of which are really enjoyable to read. I love her style of writing - there is always some background given above the recipe - the history of the name of the dish, or a producer that she particularly associates with this dish, or some childhood memory that the dish brings back for her.


So needless to say I was keen to make something out of one of these books. I had plans for showcasing some of Scotland's glorious produce - the berries from Scotland are delicious and there are plenty more amazing Scottish producers and products too. However, I have run out of time to make good on my plans so instead I have gone a different route. Scotland is known for its home baking, which is perfect for my blog really, and so I decided to make something using an ingredient that I associate with Scotland - black treacle! Don't ask me why, but it seems Scottish to me, and there are certainly a lot of recipes in Sue Lawrence's books that make good use of the sticky black substance - yum!


I made Treacle Scones, which are something I've made before. These ones had a touch of mixed spice and a touch of ginger, which is lovely. I have to admit that they weren't quite as sweet as I would have liked so I'll add some sugar next time. In the introduction to this recipe Sue tells us 'I have always loved treacle puddings and bakes. Black treacle is popular in Scotland, whether in steamed puddings, gingerbread or scones. Definitely a woman after my own heart!


They rose really well and were light and fluffy. They are perfect served with plenty of soft butter and a cup of tea.


The next recipe I decided to make was for Parlies. Now I'll excuse you for not having heard of these before - I certainly hadn't until I decided to make the recipe! They are a type of gingerbread (yum!) baked as biscuits. Gingerbread bisuits sounded great to me! They are soft when you remove them from the oven but they firm up as they cool to become crisp but slightly chewy in the centre.

This is what Sue has to say on these little treats 'The name is short for parliament cakes, and it is said to derive from their popularity with members of the Scots parliament. In late eighteenth century Edinburgh, a lady called Mrs Flockhart ran a shop and tavern..... her eminent customers - including Mr Scott (father of Sir Walter) and several Lords - would pass through the shop to the back room to partake of a dram or two and some gingerbread or biscuits.'


It all sounds rather good to me and so I gave them a try. It's a simple recipe consisting of butter, plain flour, treacle ginger and dark muscovado sugar. The appearance of mine is a little uneven. I was wary of mixing them too much because it is noted in the introduction that overmixing the dough will make them tough. They were just as described, slightly crispy on the outside, but lovely and chewy within. The ginger, treacle and dark muscovado sugar combine to make them rich and treacly - perhaps not one for small children, but perfect for me - I love gingery flavours. I might have to update this when my sense of taste comes back properly though - I've got a miserable cold and have lost the ability to taste properly!


For the recipes I used 'Scots Cooking' by Sue Lawrence - I thoroughly recommend buying it (and no, this is not a sponsored post!)

I am also entering these into Jac's Bookmarked recipes event - I've had these books for such a long time without cooking anything out of them, it's almost a relief to finally be able to say they've been used.


Saturday, 7 July 2012

Vanilla and Chopped Chocolate Bundt Layer Cake


This cake came about as I found a bar of milk chocolate that I wanted to use in baking. I wasn't really in the mood for a full on moist, dark, mega chocolate cake, instead I was looking for more of a simple teatime treat. In the past when I have mixed chocolate chunks into a cake, they have all sunk to the bottom of the cake rather than remaining suspended, so I decided to try a different technique here.

I finely chopped the bar of chocolate so that it was predominantly shards of chocolate rather than lumps. Then, when layering the cake mixture into the tin, I added just under half of the mixture and then sprinkled just over half of the chocolate onto the mixture. Then the rest of the cake batter was added on top and the remaining chocolate added on top.


The original idea had been to add all of the chocolate in one layer in the middle of the cake, but after chopping it, there was just too much chocolate to put into one layer. Having sprinkled the rest of the chocolate on top of the second layer of cake batter I was worried it would burn, and so covered the tin with foil for the majority of the baking time. This worked well - the chocolate didn't scorch or burn and I was able to uncover the cake for the last few minutes to allow it to colour up.

Vanilla and Chopped Chocolate Bundt Layer Cake
Ingredients
175g butter
175g caster sugar
175g self raising flour
3 eggs
generous tsp vanilla extract
100g chocolate, chopped finely (see above) I used Green and Blacks Milk Chocolate

Method
- Preheat the oven to 180C/Gas 4. Grease a bundt tin well (mine holds 2 litres to the rim)
- Cream the butter and sugar until light and fluffy.
- Add the eggs, vanilla extract and flour and continue beating until well combined.
- Spoon just under half of the mixture into the prepared tin and add chopped chocolate until you have a covering, but not deep. Repeat with the remaining batter and chocolate. Cover the tin with tin foil.
- Bake for around 45 minutes then remove the foil and return to the oven for about 15 minutes to allow the top to colour - it will be quite pale. Test with a cake tester or wooden cocktail stick to make sure the cake is done.
- Allow to cool slightly in the tin before very carefully removing to a wire rack. I say very carefully because I wasn't careful enough and my cake broke up slightly. 


The chocolate didn't really remain in layers, but this didn't really matter because it meant that each bite got a bit of chocolate - yum! This technique of layering the chocolate into the batter worked well for me, and I might try it with cupcakes next time. As I had hoped the cake was moist and buttery and light. With the addition of chocolate this made a very good cake to have available for those snacky moments.... we all get them!

Sunday, 1 July 2012

Chocolate Chunk Peanut Butter Cake


Chocolate Chunk Peanut Butter Cake - Artist's Impression....

Sometimes there doesn't need to be a reason. This was one of those times. Chocolate, peanut butter.... always a great combination.


Chocolate Chunk Peanut Butter Cake
Ingredients
65g butter
80g smooth peanut butter (although chunky would be fine)
125g light muscovado sugar
2 eggs
125g self raising flour
40g dark chocolate, chopped or broken into little chunks

Chocolate Frosting
Hmm, coming to write this post up a while after the event I have realised that I didn't make a note of which topping I used for this cake. It was quite a rich, dark chocolatey topping, definitely not very sweet so I have a feeling that it could have been 100g chocolate melted with about 35-40g butter and then allowed to cool to a spreadable consistency before being used to top the cake. The other option would be something similar but with a little golden syrup added too. Will try harder in the future to write up posts more quickly after making and eating the cake! You could always just use your favourite chocolate frosting for this!

Method
- Preheat the oven to 180C/Gas 4. Grease and line a 7"/18cm round tin. (I used my PushPan)
- Cream the butter, peanut butter and sugar together until light and smooth.
- Add the eggs and flour and continue to beat until well combined. Fold in the chopped chocolate.
- Spoon into the prepared tin and bake for around 45 minutes until a cake tester inserted comes out clean. (I didn't make a note of the exact time my cake took).
- Allow to cool a little in the tin and then turn out onto a wire rack and allow to finish cooling.

This was gorgeous - really light and moist and the chocolate chunks provided an excellent hit of chocolate in the cake to complement the dark chocolate topping. The frosting was smooth and rich and a great contrast to the light cake. The peanut flavour was obvious without being overwhelming (although I had expected it to be stronger) and because I had used smooth peanut butter there weren't any crunchy bits in the cake.

One to make again! And remember to photograph the next time. Complete fail, can't imagine what I was thinking here forgetting the photograph!

LinkWithin

Related Posts Plugin for WordPress, Blogger...