Wednesday, 27 June 2012

Mango and Passionfruit Sorbet


Well, if the sunshine can't come from the sky, it'll just have to come from my food instead! I have been meaning to join in Kavey's Bloggers Scream for Ice cream challenge since she started it up. I have an ice cream maker that is sadly underused. It can produce fabulous ice creams but it doesn't often get the chance because I find it a bit of a fiddle having to clean everything very thoroughly before I start and then again when I finish too. This slight obsession comes from reading one of my ice cream books that emphasises very strongly the importance of keeping everything sparkling clean whilst making ice cream. Update: this seems to be me just being neurotic - Kavey has kindly commented that she does no such thing with her ice cream maker and since she makes much more than me I bow to superior knowledge! Please don't be put off making ice cream - it's fun and delicious! So I rather lazily don't bother very often. Which is why participating in Kavey's challenge is such a good idea for me!

So after reading the amazing round ups from previous months (for example March, April and May) I was determined that I would participate too. The theme for this month is Fruit, which gives a pretty wide choice! I had a look through my ice cream books (I have The Ice Cream Machine Book and Lola's Ice Creams and Sundaes) and as ever wondered why I don't make ice cream more often - there are some seriously delicious sounding recipes in both of them.


I decided to use Lola's Ice Creams and Sundaes this time round. It's a really lovely book to read - there's an introduction to the author and how she started making ice creams after buying a 1970s Mr Frosty Bedford van off eBay for £500! I wish I had the courage to do random things like that! There is a really interesting chapter on the composition of an ice cream and its components and how they all interact. The next chapter is on flavours and then a chapter on the principles of making ice cream, followed by sorbet, sherbet and granita. All very interesting reading. And then onto the recipes which are divided into:
Classics
Speedy Ices (for those who can't be bothered with custard - that'll be me then!)
Fruit (perfect for this month's challenge)
Vegetables (yes, you did read that correctly - we're still talking about ice cream!)
Nuts, herbs and spices
Celebration and dinner party
and finally, Sundaes
Then there is a brief chapter on Equipment and a final chapter of Questions and Answers - very helpful for troubleshooting if something goes wrong.

Mmm, starting to melt
For a quick idea of some of the amazing recipes in this book, here are a few that I'd really like to try:
- fresh mint ice cream with chocolate brownies
- dark chocolate, apricot and stem ginger ice cream
- seville orange marmalade ice cream
- sweet potato sorbet
- cosmopolitan sorbet
- pear sorbet, poached pears and chocolate sauce
but so many more besides!

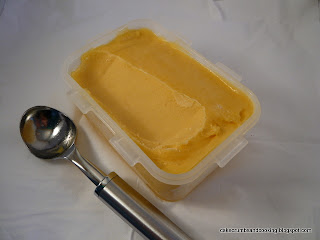
The perfect size of container!
In the end I didn't quite follow the recipe I chose exactly. I decided to make mango and passionfruit sorbet, but didn't quite have the correct quantities of the ingredients. I had one large mango (weighing about 600g before peeling and stoning) and four very wrinkly passionfruit to use up. I made up a stock syrup as instructed and allowed it to cool and then chopped up my mango as best I could. I didn't weigh it after chopping but I guess there was probably about 400g or so. I seemed to lose quite a lot of flesh to the skin and stone. The amount of passionfruit pulp was also specified in the recipe but I just used the passionfruits I had - probably not quite as much as there should have been. When the stock syrup was cold, I blitzed the mango and passionfruit juice together to a smooth puree and added stock syrup (again the recipe gives exact quantities, but for mine I used 170g stock syrup) I then churned until smooth and nearly frozen. This took quite a long time, about 30 minutes. The sorbet was then decanted into a very practical (but not very photogenic) lock and lock container and returned to the freezer to harden up.

Practical but dull..... apologies!
The photography in the book is lovely - and the shot of this particular recipe shows the sorbet in a vintage metal container with a long scoop taken out and some lovely halved passion fruit by the side. The reality in my kitchen is that the sorbet is stored in a lock and lock container which is more practical, and the passionfruit were used to make the sorbet rather than being photographed by its side. Hmm, practical rather than photogenic. My apologies!

I am the first to admit that I am not a mango connoisseur - I know that many people say that Alphonso or Keitt mangos are the best for flavour and texture in the UK, I'm afraid mine was just a standard supermarket mango. However, it was still delicious - more mango flavour than passionfruit - next time I will up the passionfruit component. But for one of my rare attempts at an iced dessert this was very successful - smooth, refreshing and fruity. I think having the ice cream machine definitely made it smoother, but ice cream can be made by hand too. Sunshine in a glass for when the sun in the sky isn't co-operating! I will have to resolve to enter Kavey's challenge more often.


Tuesday, 26 June 2012

Chocolate Banana Muffins - Forever Nigella


Seduced by a bag of bananas for a reduced price (seven bananas 59p, how could I resist?!) I found myself unable to eat them all before they became too ripe for my liking. And thus another round of the fun game known as 'Caroline hunts for new ways of using bananas creatively because she's got too many.....' was instigated. Luckily I didn't have too look too long or too hard this time. 

I recalled seeing Nigella's Chocolate Banana muffins on a blog I often visit - Kitchen Diaries Challenge 2012. I do own a copy of Nigella's 'Kitchen' but have to confess that these were a recipe that I sort of looked at with an eye to making and then thought that they looked rather dowdy in the book's photography and mentally dismissed them. However, seeing Maggie's photograph of her beautifully risen muffins restored some faith that they wouldn't look flat topped and sad. After all, if you aren't using the posh muffin cases Nigella uses you need the actual cake to do the talking as it were. 


The recipe can be found here, on Nigella's website and is also in 'Kitchen'. You can see what I mean about the photograph, although perhaps I'm being mean and it's hugely enticing to everyone else out there. Taking heed of Maggie's advice I too added some little extras to my muffins in the form of 60g of 70% dark chocolate, broken fairly small, but not into tiny pieces and 1/2 tsp of cinnamon.


The recipe was very quick and easy to pull together - and despite my misgivings over the only raising agent in the recipe appearing to be 1 tsp bicarbonate of soda these were very successful - producing nice peaks and they were actually done in the 15-20 minutes specified (I had thought at least 25 minutes would be needed, but not so). I was glad of the additions of cinnamon and especially the added chocolate because I found the actual crumb of the muffin to be slightly lacking in flavour. This is also a criticism I have read on other blogs (although I forget which ones) levelled at these muffins. It was slightly odd, they smelled more bananar-y than they tasted! The cinnamon wasn't really discernible at all using only 1/2 tsp and I think I'd add 1tsp next time. In all though, the texture was lovely and light and moist (and not at all oily, which I sometimes worry muffins made with oil will be) and the added chocolate definitely lifted them and gave them a chocolate boost of flavour.


I'm entering these into Forever Nigella (co-ordinated by Sarah of Maison Cupcake), where the guest host Fleur has chosen the theme of 'Afternoon Tea' for June's challenge. I think these would be perfect for afternoon tea - especially of the sort that requires baking at very short notice - very quick and easy to make and bake - perfect for when visitors arrive unannounced or when you've got a rainy afternoon to fill and want to have a picnic on the carpet!

Sunday, 24 June 2012

Coffee Chocolate Chunk Cookies (or Ginger for the coffee haters!)

Coffee - yuk!
I have to confess that when this month's guest host for the We Should Cocoa challenge (hosted by Choclette), Lucy, announced that this month's ingredient would be coffee my heart sank. After last month's almonds (allergy alert) I was hoping for something easier and (dare I say it) more inspiring. I really don't like coffee and depending on how the stars are aligned (?!) I sometimes don't even like the smell of coffee. Well, about once a year I fancy a coffee.... tends to be a passing fancy and it generally passes quite quickly without me actually drinking coffee (well, unless I happen to be on holiday in Italy at the time where I may indulge in a frothy cappuccino).


So I've been thinking about this one all month and wondering what on earth I could do to make the stipulated coffee palatable. (Last month I used peanut butter instead of almonds, but in the spirit of the challenge I think that if I can actually ingest something without it making me ill I ought to include it in my ingredients!) And it has now come to the deadline and I've realised that if I'm to participate at all this month I'd better get my skates on.

Ginger - yum!
I'd been thinking of coffee cakes with buttercream, mocha cakescoffee walnut cakes with a chocolate twist (another forbidden ingredient here!) and all sorts of others, wondering if I could coffee as a background flavour to simply enhance a chocolate flavour but then I hit upon the idea of making a recipe I could split in half - so I wouldn't have to eat the coffee!

Coffee again
Cookies are perfect for this - one half of the batch with the stipulated coffee flavour (to be enjoyed by workmates less fussy than myself) and one half a favoured flavour so that I can justly comment on the texture and balance of the cookie. I found myself a quick and easy cookie recipe (not quite sure where I came across it first, probably on someone's blog) and luckily because it is a Hugh Fearnley-Whittingstall recipe it is online on the Channel 4 website. (Actually, this is a bad thing because I'd forgotten about the Channel 4 site and will now want to spend lots of time browsing on there instead of doing things I ought to be doing. Hmm.)


I followed Hugh's method for the cookies, which is very quick and easy - not quite the specified ten minutes because I was messing about splitting my batch into two and so forth but still very easy and with the advantage of being able to use fridge cold butter (you melt it) - always good for when you're disorganised and have forgotten to allow the butter to soften, or when you need cookies in short order (and who doesn't at some point need cookies quickly?).

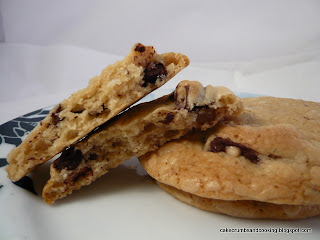
Just five on a sheet
You can find the recipe here. The recipe is also in Hugh's books River Cottage Every Day and Hugh's Family Cookbook. The only changes I made were to increase the flour by 30g to 180g (which I won't do next time as the cookies didn't spread nearly as much as I was expecting from the consistency of the dough, which is worryingly runny) and to use 50g of Green and Black's Espresso chocolate for one half of the dough and 50g Green and Black's Ginger chocolate for the other half. I also had a very small amount of crystallised stem ginger on the countertop, annoying me, so decided to chop that and add it to the ginger half of the dough too - just 15g. I also found that mine needed 12-14 minutes to bake rather than the specified ten, but this could be because I'd added the extra flour and so the cookies didn't spread as much as they should have done and therefore took longer to cook. As you can see I only baked five or six cookies on each tray but could probably have fitted more on. I made 11 ginger cookies and nine coffee ones (I'm obviously not very good at guesstimating how much of the dough was half!)

Yum - ginger!
So, after all of that, what were they like? In a word, delicious! I'm not the best at making cookies or biscuits - I have a strong tendency to overcook them and end up with rather more crispy offerings than were intended by the recipe author - pale becomes golden and golden becomes caramelised dark golden.... These were great - deliciously chewy and soft in the middle with a slightly crispy edge and top crust. I will definitely be making these again and they went down very well at work, both with the coffee lovers and the non-coffee lovers. Having not tasted the coffee ones I can't comment on the balance there, but I will assume that Green and Black's have invested some effort in ensuring that their espresso coffee is delicious, and so I will also assume that cookies made using this chocolate were also delicious. They certainly smelt strongly of coffee.

Melted coffee chocolate - more spread out
I was very impressed with my ginger idea though - the ginger chocolate was great but finding little added bits of crystallised stem ginger in the cookie too was stunning - really enhanced that ginger flavour hit. I may just have been lucky with my cookie but it had lots and lots of ginger bits in it - I think other cookies may have had less and so I think I'll add a bit more next time. Never too much ginger! It was interesting to me that the two chocolates behaved so differently whilst baking - the smooth espresso chocolate spread out widely whereas the ginger chocolate behaved much more sedately and spread only a little. I wonder if this is because the ginger chocolate contains tiny weeny little nuggets of ginger (explanation for those of you who have yet to have the pleasure of eating this chocolate!) that stop the chocolate from spreading too far when it melts? Anyway, roaring success, will be made again. So even though I don't like coffee I'm glad I participated in this challenge because I now have a very successful cookie recipe in my armoury.

As I've used a Hugh Fearnley-Whittingstall recipe here I'm going to submit this to River Cottage Rocks! which is a challenge I've been meaning to participate in for a while now. It is organised by Jo of Jo's Kitchen and the guest host this month is Charlotte of Charlotte's Kitchen Diary. The theme this month is Baking Bliss - sweet or savoury recipes so long as they are baked!


These would be perfect to make with small children - the fun of mixing everything up by hand, breaking the egg and if the butter is melted in the microwave then no dangerous heat either (I'm not a parent though so parents out there will obviously need to use their judgement and knowledge of your children's skills!). Obviously a grown-up is needed for the actual baking, but the short time between starting and eating is perfect for short attention spans. For these reasons I'm submitting these to Family Friendly Fridays held by Fabulicious Food with guest host Solange at Pebble Soup.


Saturday, 23 June 2012

Blueberry, Raspberry and Lemon Butter Cake


Even though summer hasn't arrived here yet (I am obviously being optimistic here, that summer will eventually arrive and the sun currently hiding behind the omnipresent grey clouds will once again show its face) the summer fruit is making its way into the supermarkets and I am once again tempted to buy it to bake with. I love baking cakes with fresh fruit in them - it's such a lovely combination of soft sweet cake punctuated by zesty fruity bites.

For this cake I decided to use a recipe I have used before and found to be an excellent partner for juicy fruits. You can find the original Apricot Butter Cake on the BBC Good Food website. I didn't want to make a 9" round cake and having done the calculations reckoned that 2/3 of the mixture would be right for an 8"(20cm) round cake. I followed the instructions as given on the website, but used the ingredients listed below.


Blueberry, Raspberry and Lemon Butter Cake
Ingredients
100ml milk
zest 1 lemon
200g caster sugar
2 eggs
235g self raising flour
135g butter, melted
approximately 60-70g each blueberries and raspberries

Method
I used the method as given in the original recipe but folded through lemon zest instead of adding vanilla and then at the end I folded through my washed and dried soft fruit. I think I would add a little more fruit next time though, just because it was so lovely to bite into fruit!

I decided, having prepared my 8" tin (which was admittedly only shallow rather than deep) that all of the mixture wouldn't fit and at the last minute, used some of the mixture to make 4 cupcakes too. This is where having a half size (i.e. only 6 holes rather than 12) muffin tin comes in very useful, as it will sit alongside an 8" round tin in my oven quite happily.

I can't quite remember how long the cake took to bake, but probably around 45 minutes, with the cupcakes taking about 30 I guess.


I decided to leave the cake undecorated, but cupcakes always look so sad when undecorated so I quickly made up some glace icing (icing sugar plus water or lemon juice) and poured it over and then added a decorative blueberry to finish them off!

I loved this cake - the moist buttery sponge is set off perfectly by the juicy bursting blueberries and raspberries and the lemon zest adds interest to the body of the cake itself. You could easily use vanilla if you're not keen on lemon though. Both the cupcakes with their icing and the cake alone worked well.

I am entering this into this month's Teatime Treats challenge, where Karen of Lavender and Lovage has set the challenge as berries. Her cohost is Kate of What Kate Baked.


Saturday, 16 June 2012

Creme Fraiche Bundt Cake


As I looked in my fridge the other day I realised that the pot of creme fraiche earmarked for mushroom stroganoff and rapidly approaching its use-by date wasn't destined to end up on my dinner plate paired with mushrooms, rice and all manner of other delicious things. No mushrooms for a start.... Time for a rethink, and a visit to BBC Good Food for some quick inspiration.

I didn't find inspiration to use my pot of creme fraiche as it was, but did find a recipe for a sour cream bundt cake. Well, by my logic, both soured cream and creme fraiche are dairy products with an acidic tang and since I had half fat creme fraiche it was a similar fat content to the stipulated soured cream too. The substitution seemed reasonable to me.


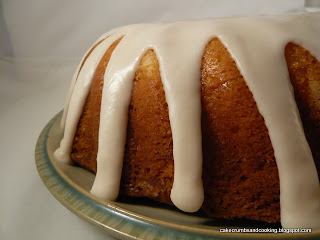
I followed the recipe pretty much as given and used my bundt tin that when full to the brim holds 2 litres of water. For the method I creamed butter and sugar as specified but then just added the rest of the ingredients in one go - seems to work fine! My ingredient modifications were to use self raising flour as I wanted more of a rise than I thought plain flour plus the specified tsp of baking powder would give, and I also used a different glaze. The glaze specified in the recipe is a butter one and it just seems to look a little odd from the photo - sort of grainy and split and not very attractive. Instead I decided to use a plain glace icing - 125g (or so, it's always a little vague when making glace icing) plus a little splash of vanilla extract (this gave a rather attractive golden hue to the icing) and some hot water. Judicious addition of the water will give you a glaze that is thin enough to spoon onto the cake, but thick enough to run down the sides attractively.


A very tasty cake - the crumb is quite close and dense in a good way. It was a richly buttery and moist cake, perfect for a slice with a cup of something hot in the middle of the afternoon. The vanilla flavour of the cake was good, but adding vanilla to the icing too really helped with the flavour - the sweetness of the icing was obvious, but the subtle hint of vanilla worked really well.


As this has vanilla in both cake and icing I am submitting it to Alphabakes this month, where the letter is 'V'. Vanilla isn't the most original submission admittedly, but I don't often use vanilla in glace icing - I will be doing in the future though as it worked really well. Alphabakes is hosted this month by Ros at The More than Occasional Baker and cohosted by Caroline of Caroline Makes.


Sunday, 10 June 2012

White Chocolate, Cherry and Cinnamon Picnic Flapjack


I think I had been dreaming of picnics and sunshine when I made these - dreaming in the middle of the downpours! These would be perfect to pack up and take on a visit to a river - plenty of energetic jumping and splashing and a little swimming followed by a picnic sandwich lunch (with my cousins to eat the spring onions and prawn cocktail flavour crisps that seemed obligatory in my childhood) and a good slice of flapjack.

These aren't too sweet, and are a more crumbly flapjack than my standard recipe which is chewier and has a much higher proportion of golden syrup and sugar than these. But don't worry, the delicious creamy white chocolate topping adds the sweetness and sugar hit you expect and need from a good flapjack.

Before topping with chocolate

I've never tried topping a flapjack with chocolate before, but I don't know why, because these are utterly delicious. The creaminess of the chocolate marries perfectly with the slightly crumbly flapjack, and the cherries add chewiness, little sweet pockets of cherry goodness (I'm sure I've mentioned how much I love glace cherries before!). Then just a little hint of spice in the form of cinnamon. I'm not always a fan of cinnamon - it's often used with too heavy a hand, but here, that hint just works. 

I think next time I'll use more white chocolate to top the flapjack, there was probably just enough, but only just. I'd recommend 200g or even 250g depending on how thick you want it. Try it, you'll not be disappointed.

White Chocolate, Cherry and Cinnamon Picnic Flapjack
Ingredients
150g butter
75g golden syrup
35g light muscovado sugar
225g oats
75g finely grated carrot
100g glace cherries, halved or quartered depending on size
1/4tsp ground cinnamon

For the topping
150g white chocolate
40g butter

Method
- Preheat the oven to gas 3/170C. Grease and line an 8"/20cm square tin.
- Melt the butter, syrup and sugar.
- Add the carrot and cherries, mix, then add the oats and cinnamon and mix well to combine. Don't worry if it's a little crumbly.
- Tip into your prepared tin and level off.
- Bake around 40 minutes until light golden brown.
- Remove and allow to cool, but leave in the tin.

For the topping, gently melt the white chocolate and butter over a pan of hot water. When the flapjack is cool, spread the chocolate over the top. You will have to be quite careful to distribute it evenly, there isn't much spare.

When the chocolate has set, remove from the tin and cut into pieces of the size you desire.


Tuesday, 5 June 2012

Jubilee Vanilla Cupcakes with Triple Coloured Buttercream Icing

New cupcake stand!

I have to say that I've really enjoyed this Jubilee holiday. No street parties or barbeques here, but just enjoying the festivities that the nation are engaged in, and the lovely, pervasive relaxed atmosphere. And watching our Queen on the television. Happiness.

Unfortunately (for my bank account) I have been well and truly sucked in by all the Jubilee merchandise. I'm sure I'm a dream target audience for marketing types - I tend to see, think 'Oh, that's nice...' and buy. Then later on think.... but I don't need two new mugs/a cake stand/teatowels/millions of themed cupcake cases/ma'amite..... Bother. I guess I'll use them up eventually, just don't be surprised when my Christmas cupcakes are still being presented in Jubilee cases! And I've used the cupcake stand for the pictures here. It's not too Jubilee, so hopefully it'll get another few outings.


I wanted a simple cupcake recipe here, because my focus was on the decoration. A while ago when my June 2012 issue of Delicious. magazine arrived I was flicking through and saw their two-tone cupcake icing (pg 88) and then later on in the issue their 'Technique of the Month' on page 101 is how to do this two-tone icing. Really wanted to try this. Then I saw Jules' amazingly decorated cupcakes. Now I really, really wanted to have a go, and the Jubilee seemed as good a time as any.

Now mine aren't a patch on Jules' version - you must hop across to see what I mean (and she has other stunning designs too) but I'm pretty pleased for a first attempt.


Vanilla cupcakes
Ingredients (makes 12)
175g Stork margarine
175g caster sugar
3 eggs (med/large)
110g self raising flour
65g plain flour
1 tsp vanilla extract

For the buttercream frosting (enough to frost 16 happily)
160g unsalted butter, softened
320g icing sugar
1 tsp vanilla extract

Method
- Preheat your oven to gas 4/180C. Place 12 (Jubilee themed) cases in a muffin tin.
- Cream the Stork and sugar until very light and fluffy.
- Add the eggs, flours and vanilla and beat well until all combined and smooth.
- Divide between the cases and bake for 20-25 minutes until risen and light golden.
- Remove and allow to cool on wire rack.

For the buttercream - beat the butter alone until light and creamy, then gradually add the icing sugar, beating well after each addition. I added mine in 4 lots of 80g. This just helps to avoid the spread of icing sugar all over the kitchen. I object to breathing icing sugar! Add the vanilla extract and a little boiled water to achieve the texture you want.

Coloured and into three piping bags

Now for the interesting bit.....
- Divide the buttercream between three bowls (or two additional bowls to the one you started out in). Add the colours you want to the intensity you want them.
- Fill three piping bags with each of the colours - one colour per bag
- Put your nozzle into a fourth bag and then place the other three inside, trying to ensure they are evenly placed and all down to the base of the bag and poking into the nozzle. 
- You're all set - pipe away!

All three bags inside the fourth

There is enough buttercream to frost sixteen cakes - I wasn't sure how much to start out with and wanted to make sure I had enough. Luckily I've had a bit of a baking day today and there were some other cupcakes sitting round ready to be iced by the time I was doing these ones, so the buttercream wasn't wasted. I'll hopefully get round to posting my other baking exploits soon, but being Jubilee themed this one is already on the late side!

Next time I will definitely invest in some gel colours - I just couldn't get the intensity I wanted using the Silver Spoon colours commonly available in the supermarkets explaining why mine are rather pink and pale blue rather than red and royal blue! I also noticed that they buttercream colours started to look a little split/curdled too. I'm not sure why this was, but hopefully gel colours will help there too. I also really, really need a Wilton 1M tip. Amazon here I come. I'm sure they'll be well received at work in spite of my perceived imperfections!


Saturday, 2 June 2012

Jubilee Blueberry, Elderflower and White Chocolate Cupcakes


I really wanted to make something that seemed seasonal, and blueberries are so appealing at the moment, so they had to be part of the baking. Elderflowers too should be in season now, but I haven't yet seen very many out in bloom near me - I think they're delayed this year, but elderflower cordial is a great way of adding concentrated elderflower flavour to cupcakes, and finally, chocolate, just because I like chocolate and I could! I decided on white chocolate because I felt it would complement the other flavours much better than the more robust flavour of my usually preferred dark chocolate, since white chocolate is more subtly flavoured.

I couldn't resist decorating these with red, white and blue sprinkles, but they aren't OTT - sure to please those who want a nod at the Jubilee celebrations but can't quite bring themselves to eat a mouthful of bright blue or bright red cake!!! Here, less is definitely more.


Blueberry, Elderflower and White Chocolate Cupcakes
Ingredients
175g unsalted butter, softened
175g caster sugar
3 eggs
100g self raising flour
75g plain flour
60g blueberries
80g white chocolate, chopped
35g elderflower cordial (approx 2tbsp)
pinch salt

Icing
about 150g icing sugar. I used mostly fondant icing sugar, just for an experiment
more elderflower cordial (about a tbsp, I didn't measure)
hot water

Method
- Preheat the oven to gas 4/180C. Line a 12 hole muffin tin with paper liners.
- Cream together the butter, pinch of salt and sugar until very light and fluffy.
- Add the eggs one at a time, mixing well inbetween additions. Add a little flour if the mixture curdles, but for once mine didn't!
- Add the flours and fold in gently but thoroughly.
- Fold in the elderflower cordial, blueberries and white chocolate.
- Divide between the muffin cases and bake for 25-30 minutes until risen and golden.
- Allow to cool on a wire rack.

- When cool ice with the icing sugar made up with elderflower and water to a very thick but still spreadable consistency. Spread over the cakes, and then sprinkle with your choice of decorations.


These are very generous cupcakes! I realised as I was dividing the batter that they were going to be pretty enormous and indeed they are. They are nice and moist - close but in no way heavy. The blueberries provide a lovely little hit of flavour when you bite into one. The white chocolate adds the occasional mouthful of intense sweetness. I have to confess that I couldn't taste the elderflower cordial flavour in the cake itself at all, but it came through well in the icing - it wasn't overpowering but the flavour developed and you finished a mouthful with the taste of elderflower.

Very good, and not all of the blueberries fell to the bottom! (This always pleases me!) These would be a sure-fire crowd pleaser for anyone on a Jubilee picnic, and the decoration is subtle enough to not enrage those who are fed up with red, white and blue everywhere. (Not me, I'm loving this and smile whenever I see bunting up, but haven't yet translated this to baking!)


LinkWithin

Related Posts Plugin for WordPress, Blogger...