Tuesday, 28 September 2010

MM4 Marmalade buttons


I've been meaning to make these for ages now, the combination of bitter marmalade, chewy peel and crunchy sugar against the background of a buttery melting biscuit was irresistible. Hmm, how did I manage to wait so long to make them?

It was partly thanks to Foodycat for bumping the thread discussing these little biscuits on Dan's forums that reminded me of their existence, in combination with an inventory of the cupboards that revealed more marmalade than one person can reasonably be expected to consume in a lifetime... ok, I exaggerate slightly but you get the picture. For this batch of buttons I chose 'Three fruit marmalade' boasting lemons, oranges and grapefruit. I complemented this by choosing lemon and orange peel to cut up. This would be my only proviso for making these; chopped mixed peel is bitter and nasty, mixed peel that you chop yourself is chewy and citrussy and sweet and delicious. It's more than worth the stickiness and time (little) that you will expend to chop your own peel for a far superior result. You know you want to...


I made the recipe exactly as specified here and used semolina rather than ground rice, because my semolina was open and the ground rice wasn't. Mine took 20 minutes to become golden brown. There are a few links to other people who've made them on the link above and Foodycat's version is here.
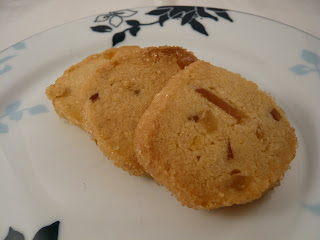

Were they worth the wait? Yes and no. They were delicious - buttery and crumbly, with a good orangey flavour from the marmalade and peel. But they were a little soft for my taste - I prefer my biscuits with more crunch than these gave. I don't feel that I could have cooked them any more though, as the more well-done ones were verging on overdone. However, I really did like the peel in them and the marmalade, so I might try applying this to a different base biscuit recipe. I was also quite pleased with the crunchy demerara crust. I have a feeling that this would have been even more successful if I'd read the instructions in the recipe that say to wet the dough log before adding the sugar to help it stick. D'oh!

Colleagues were pleased but I'll have to experiment further to find my favourite biscuit.

Friday, 24 September 2010

I should cocoa with Chocolate Raspberry Cake

I was really excited when Chele of Chocolate Teapot and Choclette of Chocolate Log Blog announced a new blog event involving, you've guessed it, chocolate! You can read all about the challenge here on Chele's blog. I was even more pleased to find that the added ingredient this month is raspberries. I may have mentioned (just once or twice...) that I really love raspberries - the sweet sharpness and the way they sort of pop in your mouth. Yum! Can't get enough of them, so the difficulty for this challenge was to think how to combine my two favourite ingredients. Eventually I decided to match bitter dark chocolate with the sharp sweetness of fresh raspberries. The cake I chose has quite a light sweetness; it's moist and delicious and sweet but isn't too rich or complex in flavour. I wanted the raspberry to shine as well as the chocolate and I think I achieved that with this cake recipe.
The recipe for the cake came from an Australian Women's Weekly cookbook 'Mix' and if you go to their website and search for 'chocolate cake', I'm sure you can probably find this recipe in there somewhere, but I'm not searching through 1003 recipes, 20 at a time to find it, so I'll give it here!

Chocolate Raspberry Cake
Ingredients
125g butter, softened
1 tsp vanilla extract
275g caster sugar
2 eggs
200g self raising flour
50g cocoa powder
160ml water
fresh raspberries to sprinkle, around 200g plus more to serve

Method
- Preheat the oven to 180C/Gas 4. Grease and line a 23 x 19 cm shallow tin.
- Beat the butter and sugar until light and fluffy.
- Add the eggs, extract, flour and cocoa along with the water and beat slowly until combined.
- Increase the speed of the mixer and beat until lighter in colour and smooth.
- Pour into the tin and sprinkle over the raspberries - some will sink but some will stay up.
- Bake for around 35-45 minutes (again I've forgotten to make a note of this time) until a cake tester inserted comes out clean.
- Allow to cool on a wire rack.
Serve as you wish - as a dessert with more fresh fruit and creme fraiche or double cream, or simply on its own with a cup of coffee.

I served it with some more fresh raspberries and it would have been perfect with either a big scoop of raspberry sorbet, or a generous dollop of creme fraiche, but my planning ahead skills didn't reach to either of these accompaniments! This is quite a sweet cake on its own, but paired with the juicy tart raspberries it is perfect, the flavours compliment each other really well. I'm really looking forward to finding out what the next challenge will be!

Tuesday, 21 September 2010

British Food Fortnight and Greengage loaf cake

It's the start of British Food Fortnight, running 18th September - 3rd October. I really feel that we are privileged to have such an abundance of fine food in the UK, passionate producers who care about their product, whatever that might be and a growing group of people who are equally passionate about what they eat - where it comes from and what it contains. As a baker many if not most of my core ingredients are not particularly seasonal; butter, flour, sugar. However, given the chance I love to bake with fresh fruit in season, and the UK plum season is currently in full swing. This cake would be great with any variety of plum or gage, or probably even damsons if you can locate them!

On an entirely different note, sometimes I worry about the things I remember. There are many things in my job that I could really do with memorising, learning, understanding and applying in practice. My brain retains very little of the information I fight so hard to push into it on a regular basis. This saddens me.... cake on the other hand seems to have found it's own little dedicated memory department. I had a vague recollection of a BBC Good Food recipe for a plum crunch cake. I seemed to recall that it was in one of my very first magazines. Not only do I still have this magazine, I could even locate it with little bother (those that have seen the disorganised state of my spare bedroom, where said magazine was located may not believe this, but honestly, it's true!) and there was the recipe I remembered, in a feature about plums and dated September 2001. Yes, my brain can remember recipes from nine years ago but struggles to remember T's phone number, various birthdays and inummerable other Important Things. I need help!

Sadly, because this is such an old recipe it isn't on the BBC Good Food website. However, I adapted it sufficiently to call it my own so here I present;

Greengage loaf cake
Ingredients
125g softened butter
175g light muscovado sugar
2 large eggs
125g self raising flour
3/4 tsp vanilla extract
150g greengage flesh, chopped roughly (about 200g greengages)
demarara sugar for sprinkling (only I could only find caster sugar - demerara was my original intention!)

Method
- Preheat the oven to gas 4/180C and grease and base line a 2lb (900g) loaf tin.
- Cream the butter and sugar until light and fluffy.
- Add the eggs, flour and vanilla extract and mix well until combined.
- Spread about a quarter to a third of the mixture on the base of the tin. Mix the greengage flesh into the remaining mixture and spread it over. I did this to try and stop the greengages sinking. It didn't work, so it's probably not worth bothering with!
- Sprinkle the top of the cake generously with sugar and then bake for 55 min - 1hr 5 min until golden and a cake tester comes out clean.
- Cool on a wire rack before slicing and enjoying!
Not quite what I had in mind when I started making this recipe up! In my minds eye was a delicious loaf cake with a neat stripe of greengage slivers running down the top of the cake. Needless to say, they sank without trace and I think ended up on the bottom of the cake, along with most of the other greengages that were added to the mixture!


However, it was a good moist cake, with quite a complex sweetness from the muscovado sugar. I possibly won't make it again as there are many other things out there that I want to try, but it was an enjoyable enough cake.

Sunday, 19 September 2010

Three chocolate squares?


The inspiration for these is another recipe from my recent purchase 'Easy baking' by Linda Collister. In the book they're called three chocolate squares - cocoa powder, dark and white chocolate, but I decided to ditch the white chocolate topping and just have the cake. I also didn't have the specified soured cream but did have creme fraiche lurking in the fridge. An adapted version was born! Ignore the uninspired title of the post, I just couldn't think of a good way to describe them!


Moist chocolate cake
Ingredients
60g dark chocolate, melted
120g soft butter
170g light muscovado sugar
1/2 tsp vanilla extract (the good stuff!)
1 large egg
220g plain flour
1 tsp baking powder
1/2 tsp bicarbonate of soda
25g cocoa powder
150ml creme fraiche

Method
- Preheat the oven to 180C/Gas 4. Grease and line an 8"/20cm deep square cake tin.
- Cream the butter and sugar until light and fluffy.
- Add the chocolate and mix to combine.
- Add the egg, flour, vanilla, baking powder, bicarbonate of soda, cocoa powder and creme fraiche and mix well, until all is combined and no traces of flour remain.
- Spoon into the tin and level.
- Bake for 40-50 minutes until just firm. (The original recipe specified 25-30 minutes, but at this point my cake was still extremely wobbly and nowhere near done.)
- Remove from the oven and allow to cool in the tin before turning out.
- Cut into 16 squares.

Wait for admiring comments!

The flavour of this cake is really good. I wasn't going to blog about it due to the lack of attractive photos (the photo at the top makes it look far more dense and brownie like than it actually was, an artifact of poor lighting) but it really does deserve a mention. I took a couple of chocolate cakes into work in close succession and the opinion was that this one was better. I'm not sure about better, but I can understand the comment. This cake is moist with quite a rich, deep sweet flavour given by the muscovado sugar. The other cake was made with white sugar, which has a much lighter sweeter flavour. I'm sure the creme fraiche also made a contribution to the moistness of the cake, even though I had to cook it for much longer than specified.

Friday, 17 September 2010

Lemon syrup cake with passionfruit icing

I love lemon drizzle cake, or lemon syrup cake, whatever you want to call it - you know the one, where you bake the cake and as it comes out of the oven, stab it all over (remarkably therapeutic!) and pour a simple syrup of lemon juice and sugar over the top, pouring on more than you think can possibly be absorbed and then leaving it in the tin to cool. Delicious. I don't make it often enough. However, the presence of lemons and a desire to make this cake made me wonder if I could tart it up a little, perhaps make it a little more presentable and fragrant? And much as I adore all out lemon for the flavour, I thought passionfruit and lemon might be a good combination too. So the cake was born.

Lemon syrup cake with passionfruit icing
Ingredients
100g softened butter
120g caster sugar
135g self raising flour
2 large eggs
grated zest of 2 unwaxed lemons
2-3 tbsp milk curdled with the juice of 1/2 lemon

For the syrup
100g icing sugar
juice 1 lemon

For the icing
200g icing sugar
15g butter
pulp of 2 passionfruit

Method
- Preheat the oven to gas 4/180C. Grease and line a small, shallow baking tin 9 x 6 1/2" (23 x 16cm) with parchment paper.
- Cream the butter and sugar until light and fluffy.
- Add the eggs and flour and mix well to combine. Add the curdled milk and mix in.
- Fold in the lemon zest (I find if I use my electric handwhisk at this stage all the zest wraps itself around the beaters, losing the point of adding it!)
- Spoon into the prepared tin and bake for 30 minutes until light golden and a cake tester comes out clean.
- While the cake is baking, heat 100g icing sugar and the juice of a lemon in a saucepan until boiling and clear.
- Stab/skewer the cake all over and then carefully pour over the hot syrup.
- Allow to cool in the tin.

- For the icing, mix the icing sugar, butter, 2tsp water and the pulp of two passionfruit in a bowl sitting over a pan of hot/simmering water, until the butter is melted.
- Allow to cool a little before pouring over your cake.

The icing does set a little, but is still very sticky. I also found that the icing sort of came away with the surface of the cake when I was trying to cut it up, making it a sticky, messy sort of job!

Yum! Really good! The cake was deliciously moist and lemony from the zest and syrup, but light too and the passionfruit icing was sticky and perfumed in a really good way, adding a different flavour to the lemon. Lemon seems to be a universally liked flavour (apart from for the Caked Crusader!) and colleagues were really impressed with this cake, with a couple of new 'No, this one's my favourite' comments being heard!

LinkWithin

Related Posts Plugin for WordPress, Blogger...