Saturday 30 October 2010

Raisin fairy cakes, simple but delicious


An unassuming title, but a delicious little cake nevertheless. I was talking about cake at work (not an uncommon occurence!) and one of my colleagues mentioned that her grandma used to make raisin buns with icing on the top and she really liked them. The idea seeded in my mind, and I thought that the cupcakes that I've been making recently from the Primrose Bakery recipe book would have just the right texture to hold the raisins in suspension.


Luckily I was right! You can see the raisins poking out from the top of the cakes, and they were pretty well distributed throughout the cakes. Success! You can find the recipe here. I actually decided that rather than make large cupcakes I wanted to make smaller buns (more like those of my childhood than the size you tend to get now) and so halved the recipe. I found that the half recipe gave me the perfect amount for 12 buns (by this I mean fairy cake size cases rather than muffin size cases). I added about 35g of raisins and chopped them in half to make them smaller and more likely to stay 'afloat' in the mixture. It didn't actually take as long to cut them in half as I had thought, and it meant that they were more evenly distributed, but if you don't want to bother you could just use currants instead. I baked them for around 18-20 minutes at gas 4. I think next time I make them I'll use a ratio of 75% self raising to 25% plain flour and see how they turn out. I'm not sure if it was making them in a smaller size but they seemed just a touch denser than I would have ideally liked. The icing was simply icing sugar mixed to a fairly thick paste with hot water and spread onto the cakes.


I really enjoyed the simplicity of these buns - they aren't rich or heavy but just a straightforwardly enjoyable cake, reminiscent of childhood birthday parties and picnics and similar happy memories. My colleagues enjoyed them too, which is always good!

Wednesday 27 October 2010

Banana, date and honey loaf


I've been pretty good with bananas recently, forcing myself to eat them when they've gone a little too far for me so that I don't end up at the end of the week with tonnes of overripe bananas to deal with. However, I was following links the other day (I'm sure I'm not the only one who wastes hours of time jumping from one place to another on the internet....) and ended up on the Lurpak website. They seem to have quite a good little recipe section for bakers and I spotted this banana, date and honey loaf. Serendipitously I had a large banana that had gone beyond the eating stage and so it was a matter of laziness to leave it for a couple more days to develop to the ripeness where it was ready for baking. A trip to work and back (I'm full of good intentions) also provided it with a couple of unappetising bruises - perfect for baking!

This was a really easy cake to make and actually baked at the lower end of the specified time, mine took an hour, and I normally end up leaving things in the oven for longer than specified. I made a couple of small changes - I ran out of butter at 140g, so that's what I used and I swapped 80g dates + 40g walnuts for 100g dates. I soaked the dates briefly in some boiling water to soften them slightly (actually, the truth is that I went and had a shower while they soaked, so I've no idea how long it was!) because they looked a little old and chewy. I also didn't drizzle with honey after baking, making things even stickier is fine if you're leaving them put at home, but if they're going on a journey, inherent stickiness will have to suffice!


Pretty popular at work, and an attractive loaf to look at, but nothing special really. I can't quite put my finger on why, but this recipe just didn't do it for me. It was quite mildly banana flavoured and the dates weren't prominent either.

Sunday 24 October 2010

I Should Cocoa - Triple Chocolate and Hazelnut Crunchies

With nuts

It's I should Cocoa time again! Last month was raspberries and chocolate hosted by Chele of Chocolate Teapot. You can see my contribution here and the round up here. This month Choclette is hosting and announced at the beginning of October that the ingredient of choice this time to pair with the chocolate of the challenge was to be hazelnuts or cobnuts.

Nut free zone

Regular readers will know that I am allergic to nuts. It was, however, inevitable that nuts will crop up in the challenge because they're often paired with chocolate, and cobnuts are very seasonal at the moment. There are a few nutty posts on the blog, when I've made cakes exclusively for others so how to combine the nuts into a bake that I could also taste in some form was my challenge. I decided not to go for something where the nuts were absolutely essential to the structure of the bake. And to make up for the fact that I couldn't go too strongly on the nuts I went over the top with the chocolate!

Mmmm, nutty

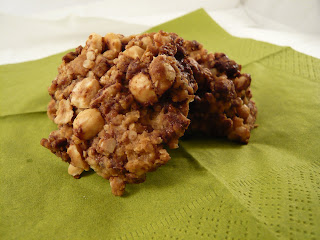
So, having had all month to think about this, I've only just managed to contribute in time (again!) with these Triple Chocolate and Hazelnut Crunchies. The recipe is closely based on this one by Delia Smith and I fancied making biscuits rather than cakes (partly because I wanted to eat biscuits at the moment) but also because it's easier to split the batch. I made up the base ingredients as given in the recipe, and then added the chocolate. I was more generous than the recipe here, using 20g each of milk, white and dark chocolate. I then used half of the mixture straightaway, pushing spoonfuls of it off to form rough biscuit rounds. I then baked these and while they were baking added 30g bashed hazelnuts (I had bought whole blanched hazelnuts) to the rest of the mixture. I then repeated the process for forming and baking the biscuits. This recipe also had the advantage of me not having to handle the nuts much - I'm such a wimp!


My biscuits took about 21 minutes to become just slightly golden. I'll have to wait until tomorrow before I can add tasting comments for the hazelnut version, but the biscuits without the nuts were chewy and chocolatey and oaty (funny that, what with containing oats and all!) and really nice. I'm guessing that the nuts will be a welcome addition, adding some crunch and a good nutty flavour to the biscuits, but I'll try and elicit comments from some of my colleagues (wish me luck!).

No nuts here....

Quick and easy and yummy, perfect to enjoy with a lovely mug of hot chocolate - well, I may as well continue the theme properly!
Edited to add: Colleagues thought these were really good - lots of positive comments. The nut ones are apparently slightly less sweet which my dedicated tester (who naturally had to have one of each batch to make a true comparison) thought was probably due to the nuts balancing the sweet chocolate (especially as I used the same base for them both!). She also liked the flapjack-like taste of the golden syrup in them. Good feedback!

Saturday 23 October 2010

Quince!


I've never managed to find quince before but am now in possession of two fine specimens. They smell absolutely gorgeous and have really odd fuzzy skin. Apologies for the poor photograph but I couldn't think of a good way to photograph an unwieldy fruit.
Ok, so has anyone got any ideas for what I can do to enjoy these fruits at their best? I understand they have to be cooked - what's your favourite way with quince? Do let me know in the comments!

Thursday 21 October 2010

Black and Blue Cakes and an Anniversary

I don't often remember anniversaries associated with my blog (having forgotten both 'blogiversaries' and my first 100!) but this post is my 200th! I have to say that when I started blogging I didn't really realise that I would keep going for quite so long, and how important it would become. I'm constantly looking for new things to make (and the list of 'to make' is getting longer the more I look at other people's inspiring blogs) and really enjoy it. I absolutely love reading people's comments here and try my hardest to comment on other people's blogs because it creates such a sense of community and getting to know people who are possibly half way around the world but share interests. So thank you for reading my blog, I hope you carry on enjoying it, commenting on it and that I carry on baking for it!

Anyway, onto the recipe now...the spark of inspiration for this cake came from a feature in the October Sainsbury's Magazine by Dan Lepard. The cover for this issue pictured one of the cakes featured in the article - a double chocolate fudge cake. I would have bought the magazine anyway, but mmmm, yum! Inside I found recipes for Mini vanilla cranberry blondies, Blueberry mascarpone cheesecakes, Lemon drizzle cakes, Sweet potato and orange cupcakes, Mochaccino walnut cakes and the aforementioned double chocolate fudge cakes. Oh to be able to eat nuts.... Anyway I digress, what really appealed to me was that the mochaccino walnut cakes were baked in 4" pork pie tins, but as someone who has baking tins to rival the local cookware department in John Lewis (or similar... actually not quite there yet, but aiming high!) I couldn't quite justify the purchase of two more tins just to make a recipe that contains things I'm allergic to.

However, the idea of almost individual cakes just wouldn't go. And then I visited J and discovered (with great excitement) that she already has these tins (and in her case it's even justified - they make perfect small Christmas cakes) and was willing to lend them to me - deal done! So now I just needed to decide what to bake in them. The ongoing 'using up out of the freezer' saga demanded some form of frozen berry be added and I also wanted to use some of the jam that is accumulating in my fridge (I think when I baked these I had about five different jars open, which is approximately four too many to my mind) so the stage was set for these black and blue cakes.

Black and Blue mini cakes
Ingredients
120g softened butter
120g caster sugar (half golden half normal because I ran out)
2 eggs
150g self raising flour
90g frozen blueberries
65g mixed fruit jam (mine was hedgerow fruit containing the blackberries of the title)

For the filling and icing
100g icing sugar
50g jam (I used blackcurrant)

100g jam to fill the cakes

Method
- Preheat the oven to 180C/Gas 4. Grease and line two deep 4" pork pie tins.
- Cream the butter and sugar until light and fluffy.
- Add the eggs one at a time, beating inbetween each addition.
- Fold in the flour until well combined and then add the frozen blueberries and finally the jam, folding both through to mix, but leaving the jam streaky. I added my blueberries frozen in the hope that they might not sink. I don't think it worked particularly well...
- Bake for 35-45 minutes until well risen and golden.
- Allow to cool a little before turning out to cool completely on a wire rack.

For the icing, mix the jam with the icing sugar.

To decorate, halve your cakes, spread generously with jam and place the top half back on. Spoon over the icing, allowing it to dribble down the edges if you wish.

I cut these into 6 pieces each, although Dan's recipe suggested four pieces for each cake - it would certainly have been easier to cut into fewer pieces! The cakes were rather flat when they came out, which was a little disappointing, but good for decorating. I did find that it was difficult to pick up the pieces of cake to eat - the top was very gooey with icing, and the bottom tended to get left behind, but they seemed pretty popular at work - sweet with jam and refreshing little bursts of blueberry.
As you can see, most of the blueberries sank! I probably shouldn't admit this but one of the most satisfying things about making these cakes was finishing two pots of jam up that had been started thereby liberating two jam jars and some shelf space in my fridge - woo-hoo! I'll have to think of another use for these tins before giving them back to J.

Monday 18 October 2010

Bran/Wholemeal Spelt Muffins


These are for J. Two years ago, we were lucky enough to go to Las Vegas for a relative's wedding (very good by all accounts although I wasn't able to go - after travelling all that way I had the most horrendous cold and stayed in bed all day the day of the wedding - typical! and I hear that the happy couple are regrettably not so happy anymore....) and made a longer holiday of it. When we were there we decided to ignore the all you can eat for $10 breakfast buffets (neither of us is massive breakfast eaters and wouldn't have got our money's worth) in favour of a yummy carbohydrate fest in the form of muffins, scones or bagels from one of the outlets in the Caesar's Palace Forum shops. Even just writing this brings back all the lovely memories of the holiday - it was just so hot there - unseasonably hot even for Vegas I believe, but coming from somewhere where mid 20's Centigrade is considered a hot day, hitting 37C was just unbelievable!!! One of my favourite memories is walking down the Strip in the middle of the day (madness in itself) and spotting the entrance to one of the air conditioned (naturally!) casinos. With barely a glance at each other J and I both made a beeline for the entranceway just so that we could stand in the draught of the cool air being pumped out. While we were standing there a mother and her young daughter did just the same - it turned out they were from Alaska and not used to the heat either!

Gratuitous holiday pic from the bottom of the Grand Canyon

Anyway, apparently it isn't just me feeling nostalgic about the holiday (well, it is just over two years ago now, and after while I tend to think about the holidays I've enjoyed....) because J kept mentioning the bran muffins she enjoyed so much for breakfast in a wistful manner. So I resolved to try and recreate the flavours she enjoyed so much. To do this I looked at a number of different muffin recipes and then basically created my own based on all of them, adding dried fruit, bran but only a very little spice because those were the flavours J remembered about the muffins. She has since admitted that she can't really remember the flavours very well, so I'm on a hiding to nothing trying to recreate them accurately, but I can still hope for a good flavour!

The other defining feature of these muffins is their size. Not your standard muffin cup, but larger (well, larger is almost always better isn't it!). While in Las Vegas I discovered the most amazing kitchen shop - probably well know to all of you in the US - Sur La Table. I had such a lovely time browsing there and one of my (many) purchases was this jumbo muffin tin:

Just the job for these bran muffins. I can't obtain liners for this size of tin very easily in the UK, so I decided that baking parchment would do instead, and this worked admirably, whilst looking pleasingly rustic!


Bran/Wholemeal Spelt Muffins
Ingredients
300g wholemeal spelt flour
1 generous tsp baking powder
120g dark muscovado sugar
1/2tsp mixed spice
1/2tsp (scant) bicarbonate soda
150g fat free yogurt*
50ml milk*
80ml sunflower/olive oil
2 eggs
140g raisins
*You could use 200ml buttermilk if that's more convenient.


Method
- Preheat the oven to 200C/Gas 6. Grease and line a tin with 6 jumbo or 12 standard muffin holes.
- Sift flour into a large bowl, adding the bran back to the flour. Crumble in the sugar to get rid of any lumps, add the baking powder, bicarbonate of soda and mixed spice, mix well to combine.
- Beat the eggs in a jug and then add the milk, yogurt and oil. Mix well to combine.
- Pour the liquids into the dry mix and mix briefly to combine, adding the raisins during the last few strokes. Lumps are fine - good even, unmixed flour less so - try to avoid unmixed flour without overmixing. Tricky!
- Pour/spoon mixture into the holes - they should be almost full to the brim.
- Bake for 30-35 minutes for jumbo muffins (and guessing 25-30 minutes for normal sized muffins).
- Turn onto a wire rack and allow to cool slightly.

I imagine these would be truly delicious dripping with melted butter whilst still warm from the oven, but T has just informed me that they're really excellent cold out of the tin too. I would say to freeze any not eaten on the day of making - muffins don't tend to keep very well.

So the big question is.... did J like them? Well, she tells me so, which makes me a very happy bunny (and makes her happy too I guess!). I think she must like them because I gave her the recipe and she's already recreated them once so they have the seal of approval.

Further gratuitous holiday pic - this is the Bellagio and I could seriously have spent all night watching the fountains in front of the hotel - they perform to pieces of music and it's absolutely amazing!

Sunday 17 October 2010

Primrose Bakery Lemon Cupcakes


Well, it's apparently Chocolate Week this week and I am a bad blogger because I have nothing chocolate to blog about at all. This is a pretty poor admission for a confirmed chocoholic (a day does not pass without the divine brown substance passing my lips!). However, there are plenty of chocolate treats already on the blog, so you can peruse them here if you wish! Why am I talking about chocolate in a post on Lemon Cupcakes? Well, if I'd made these a month ago I could have blogged about them in National Cupcake week (13th - 19th September) - I'm really not very organised at all am I!?!

I was visiting J a couple of weeks ago and whilst shopping together I spotted one of my favourite cheap bookshops so made a beeline for the entrance, and then (naturally) gravitated quickly to the cookery section (with J sighing in the background). I saw lots and lots of books that I wanted to buy, but managed to restrict myself to just two (with J asking whether I really needed any more cookery books - no, I don't ever need any more, I just want them!). One of these was 'Cupcakes from the Primrose Bakery'. I was slightly doubtful about buying this book, I do already have quite a few cupcake cookery books and even I wondered if this purchase was going to be justified or not. I'm pleased to report that my first recipe has definitely made me glad that I bought the book (and at a bargain price too!).

I have enjoyed the cupcakes from the Hummingbird bakery book, which are so light they almost dissolve in your mouth as you eat them, but these are different. I can't think of a complimentary way to say this but they are denser, with more weight and heft to them. You feel like you've eaten something rather than just inhaled it, and I rather like this about these cupcakes. So now I feel that I've got two good recipes for cupcakes depending on the desired texture in the resulting cake. Win! I'm looking forward to trying out some of the different flavour combinations in the book too - Honey and Granola, Earl Grey, Caramel, Pumpkin - yum!

I followed the recipe as printed, even warming my milk up to room temperature in the microwave (loving my new microwave! - haven't had one for about seven or eight years). I omitted the specified tbsp of sour cream as I didn't have any, and added a little more milk. These appeared to be done at 25 minutes (as specified in the recipe) by the skewer test, but were very pale so I left them in for a further 5 minutes to brown a little more.


The texture of the cake is lovely and close - dense, but in a really good way! As you can see, I didn't make a buttercream for the top, instead choosing a refreshing glace icing made with lemon juice. Delicious, and colleagues agreed - these were very popular!

Thursday 14 October 2010

Mocha cake with coffee buttercream

And now for something more successful.... (and where is October disappearing to so quickly? my time seems to be vanishing into a big black hole at the moment!)

I'm not a big coffee drinker and don't particularly enjoy the flavour. However, I sometimes really fancy a bit of coffee, don't know why, but I do like the smell, especially on holiday! But I feel I ought to try and come round to this 'adult' flavour so occasionally when the craving hits I make something coffee flavoured. Because I don't drink it, I struggle to know how to add coffee flavour - ground coffee directly into the batter? instant coffee made up strong? In the end I chose instant espresso powder, made up fairly strong to add my flavour. I also wanted to add chocolate, and so added a little cocoa powder too, pretty much making it up as I went along!


Mocha cake with coffee buttercream
Ingredients
200g softened butter
200g light muscovado sugar
3 eggs
1 tbsp cocoa powder (this was 9g)
1tsp instant espresso powder made up in a little boiling water, allowed to cool slightly
225g self raising flour


For the buttercream
100g softened butter
225g icing sugar
1 tsp instant espresso powder made up in a little boiling water, allowed to cool slightly
a little dark chocolate to decorate

Method
- Preheat the oven to gas 4/180C. Grease and line an 8x12" (20x30cm) traybake tin with silicon parchment.
- Cream the butter and sugar together until light and fluffy.
- Add the eggs, one at a time, beating well until mixed and adding a little of the flour to prevent the mixture curdling if it threatens to do so.
- Add the cocoa powder and flour and mix to combine. Fold in the coffee.
- Spoon into the prepared tin and level out. Bake for 40-45 minutes until well risen and lightly golden brown.
- Remove to a wire rack and allow to cool.

For the buttercream, beat together the butter and icing sugar until extremely pale and fluffy, adding the coffee a little at a time as you do so.

When the cake is cool, trim the edges and cut in half lengthways so you have two long pieces of equal width. Spread half of the buttercream onto one piece of cake, place the other piece on top and spread with the remaining buttercream. I had such a good time doing this, it felt like bricklaying and it was really hard to just leave the buttercream alone once it looked done, I kept wanting to rearrange it!!! Grate a little dark chocolate over the top of the cake to decorate.

Wait for admiring responses!


I'm not quite sure exactly what it is about using coffee in cooking but I always seem to get a really, really light cake when I do a coffee cake. I can make quite reasonable plain vanilla or chocolate cakes in the same manner, but when coffee is added the resulting cake always seems to be lighter. I've spoken to J about it and she agrees that her coffee cake is always really light in texture. I wonder if anyone else has found this? Let me know in the comments below!

Anyway, what did it taste like? Fab! I'm still not sure if I'm a fan of coffee flavour in cakes and I suppose this cake is only gently coffee flavoured - if you're a coffee lover I think the flavour could definitely be ramped up to please you, but it was still quite nice. As mentioned above, the texture was really light and moist and I felt that the ratio of buttercream to cake was just right - enough to add moisture and richness and interest but not so much that it was sickly or oversweet at all. I couldn't detect any chocolate flavour at all, but wasn't really surprised about this. I guess it might have added depth of flavour to the coffee, along with the muscovado sugar but this is not a chocolate lovers cake!


Friday 8 October 2010

Blackberry and pear cake - disaster

This was theoretically a really good idea, and I might get round to repeating the combination of flavours, but just to show that sometimes the smallest ingredient can be the most important here we have my latest complete disaster. Next time I'll follow the recipe including the... baking powder. D'oh!!!
Needless to say I didn't taste it!

LinkWithin

Related Posts Plugin for WordPress, Blogger...