Saturday, 30 October 2010

Raisin fairy cakes, simple but delicious


An unassuming title, but a delicious little cake nevertheless. I was talking about cake at work (not an uncommon occurence!) and one of my colleagues mentioned that her grandma used to make raisin buns with icing on the top and she really liked them. The idea seeded in my mind, and I thought that the cupcakes that I've been making recently from the Primrose Bakery recipe book would have just the right texture to hold the raisins in suspension.


Luckily I was right! You can see the raisins poking out from the top of the cakes, and they were pretty well distributed throughout the cakes. Success! You can find the recipe here. I actually decided that rather than make large cupcakes I wanted to make smaller buns (more like those of my childhood than the size you tend to get now) and so halved the recipe. I found that the half recipe gave me the perfect amount for 12 buns (by this I mean fairy cake size cases rather than muffin size cases). I added about 35g of raisins and chopped them in half to make them smaller and more likely to stay 'afloat' in the mixture. It didn't actually take as long to cut them in half as I had thought, and it meant that they were more evenly distributed, but if you don't want to bother you could just use currants instead. I baked them for around 18-20 minutes at gas 4. I think next time I make them I'll use a ratio of 75% self raising to 25% plain flour and see how they turn out. I'm not sure if it was making them in a smaller size but they seemed just a touch denser than I would have ideally liked. The icing was simply icing sugar mixed to a fairly thick paste with hot water and spread onto the cakes.


I really enjoyed the simplicity of these buns - they aren't rich or heavy but just a straightforwardly enjoyable cake, reminiscent of childhood birthday parties and picnics and similar happy memories. My colleagues enjoyed them too, which is always good!

Wednesday, 27 October 2010

Banana, date and honey loaf


I've been pretty good with bananas recently, forcing myself to eat them when they've gone a little too far for me so that I don't end up at the end of the week with tonnes of overripe bananas to deal with. However, I was following links the other day (I'm sure I'm not the only one who wastes hours of time jumping from one place to another on the internet....) and ended up on the Lurpak website. They seem to have quite a good little recipe section for bakers and I spotted this banana, date and honey loaf. Serendipitously I had a large banana that had gone beyond the eating stage and so it was a matter of laziness to leave it for a couple more days to develop to the ripeness where it was ready for baking. A trip to work and back (I'm full of good intentions) also provided it with a couple of unappetising bruises - perfect for baking!

This was a really easy cake to make and actually baked at the lower end of the specified time, mine took an hour, and I normally end up leaving things in the oven for longer than specified. I made a couple of small changes - I ran out of butter at 140g, so that's what I used and I swapped 80g dates + 40g walnuts for 100g dates. I soaked the dates briefly in some boiling water to soften them slightly (actually, the truth is that I went and had a shower while they soaked, so I've no idea how long it was!) because they looked a little old and chewy. I also didn't drizzle with honey after baking, making things even stickier is fine if you're leaving them put at home, but if they're going on a journey, inherent stickiness will have to suffice!


Pretty popular at work, and an attractive loaf to look at, but nothing special really. I can't quite put my finger on why, but this recipe just didn't do it for me. It was quite mildly banana flavoured and the dates weren't prominent either.

Sunday, 24 October 2010

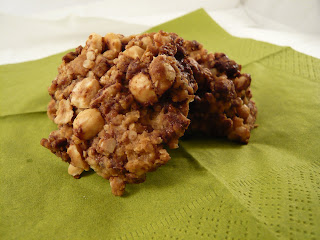
I Should Cocoa - Triple Chocolate and Hazelnut Crunchies

With nuts

It's I should Cocoa time again! Last month was raspberries and chocolate hosted by Chele of Chocolate Teapot. You can see my contribution here and the round up here. This month Choclette is hosting and announced at the beginning of October that the ingredient of choice this time to pair with the chocolate of the challenge was to be hazelnuts or cobnuts.

Nut free zone

Regular readers will know that I am allergic to nuts. It was, however, inevitable that nuts will crop up in the challenge because they're often paired with chocolate, and cobnuts are very seasonal at the moment. There are a few nutty posts on the blog, when I've made cakes exclusively for others so how to combine the nuts into a bake that I could also taste in some form was my challenge. I decided not to go for something where the nuts were absolutely essential to the structure of the bake. And to make up for the fact that I couldn't go too strongly on the nuts I went over the top with the chocolate!

Mmmm, nutty

So, having had all month to think about this, I've only just managed to contribute in time (again!) with these Triple Chocolate and Hazelnut Crunchies. The recipe is closely based on this one by Delia Smith and I fancied making biscuits rather than cakes (partly because I wanted to eat biscuits at the moment) but also because it's easier to split the batch. I made up the base ingredients as given in the recipe, and then added the chocolate. I was more generous than the recipe here, using 20g each of milk, white and dark chocolate. I then used half of the mixture straightaway, pushing spoonfuls of it off to form rough biscuit rounds. I then baked these and while they were baking added 30g bashed hazelnuts (I had bought whole blanched hazelnuts) to the rest of the mixture. I then repeated the process for forming and baking the biscuits. This recipe also had the advantage of me not having to handle the nuts much - I'm such a wimp!


My biscuits took about 21 minutes to become just slightly golden. I'll have to wait until tomorrow before I can add tasting comments for the hazelnut version, but the biscuits without the nuts were chewy and chocolatey and oaty (funny that, what with containing oats and all!) and really nice. I'm guessing that the nuts will be a welcome addition, adding some crunch and a good nutty flavour to the biscuits, but I'll try and elicit comments from some of my colleagues (wish me luck!).

No nuts here....

Quick and easy and yummy, perfect to enjoy with a lovely mug of hot chocolate - well, I may as well continue the theme properly!
Edited to add: Colleagues thought these were really good - lots of positive comments. The nut ones are apparently slightly less sweet which my dedicated tester (who naturally had to have one of each batch to make a true comparison) thought was probably due to the nuts balancing the sweet chocolate (especially as I used the same base for them both!). She also liked the flapjack-like taste of the golden syrup in them. Good feedback!

Saturday, 23 October 2010

Quince!


I've never managed to find quince before but am now in possession of two fine specimens. They smell absolutely gorgeous and have really odd fuzzy skin. Apologies for the poor photograph but I couldn't think of a good way to photograph an unwieldy fruit.
Ok, so has anyone got any ideas for what I can do to enjoy these fruits at their best? I understand they have to be cooked - what's your favourite way with quince? Do let me know in the comments!

Thursday, 21 October 2010

Black and Blue Cakes and an Anniversary

I don't often remember anniversaries associated with my blog (having forgotten both 'blogiversaries' and my first 100!) but this post is my 200th! I have to say that when I started blogging I didn't really realise that I would keep going for quite so long, and how important it would become. I'm constantly looking for new things to make (and the list of 'to make' is getting longer the more I look at other people's inspiring blogs) and really enjoy it. I absolutely love reading people's comments here and try my hardest to comment on other people's blogs because it creates such a sense of community and getting to know people who are possibly half way around the world but share interests. So thank you for reading my blog, I hope you carry on enjoying it, commenting on it and that I carry on baking for it!

Anyway, onto the recipe now...the spark of inspiration for this cake came from a feature in the October Sainsbury's Magazine by Dan Lepard. The cover for this issue pictured one of the cakes featured in the article - a double chocolate fudge cake. I would have bought the magazine anyway, but mmmm, yum! Inside I found recipes for Mini vanilla cranberry blondies, Blueberry mascarpone cheesecakes, Lemon drizzle cakes, Sweet potato and orange cupcakes, Mochaccino walnut cakes and the aforementioned double chocolate fudge cakes. Oh to be able to eat nuts.... Anyway I digress, what really appealed to me was that the mochaccino walnut cakes were baked in 4" pork pie tins, but as someone who has baking tins to rival the local cookware department in John Lewis (or similar... actually not quite there yet, but aiming high!) I couldn't quite justify the purchase of two more tins just to make a recipe that contains things I'm allergic to.

However, the idea of almost individual cakes just wouldn't go. And then I visited J and discovered (with great excitement) that she already has these tins (and in her case it's even justified - they make perfect small Christmas cakes) and was willing to lend them to me - deal done! So now I just needed to decide what to bake in them. The ongoing 'using up out of the freezer' saga demanded some form of frozen berry be added and I also wanted to use some of the jam that is accumulating in my fridge (I think when I baked these I had about five different jars open, which is approximately four too many to my mind) so the stage was set for these black and blue cakes.

Black and Blue mini cakes
Ingredients
120g softened butter
120g caster sugar (half golden half normal because I ran out)
2 eggs
150g self raising flour
90g frozen blueberries
65g mixed fruit jam (mine was hedgerow fruit containing the blackberries of the title)

For the filling and icing
100g icing sugar
50g jam (I used blackcurrant)

100g jam to fill the cakes

Method
- Preheat the oven to 180C/Gas 4. Grease and line two deep 4" pork pie tins.
- Cream the butter and sugar until light and fluffy.
- Add the eggs one at a time, beating inbetween each addition.
- Fold in the flour until well combined and then add the frozen blueberries and finally the jam, folding both through to mix, but leaving the jam streaky. I added my blueberries frozen in the hope that they might not sink. I don't think it worked particularly well...
- Bake for 35-45 minutes until well risen and golden.
- Allow to cool a little before turning out to cool completely on a wire rack.

For the icing, mix the jam with the icing sugar.

To decorate, halve your cakes, spread generously with jam and place the top half back on. Spoon over the icing, allowing it to dribble down the edges if you wish.

I cut these into 6 pieces each, although Dan's recipe suggested four pieces for each cake - it would certainly have been easier to cut into fewer pieces! The cakes were rather flat when they came out, which was a little disappointing, but good for decorating. I did find that it was difficult to pick up the pieces of cake to eat - the top was very gooey with icing, and the bottom tended to get left behind, but they seemed pretty popular at work - sweet with jam and refreshing little bursts of blueberry.
As you can see, most of the blueberries sank! I probably shouldn't admit this but one of the most satisfying things about making these cakes was finishing two pots of jam up that had been started thereby liberating two jam jars and some shelf space in my fridge - woo-hoo! I'll have to think of another use for these tins before giving them back to J.

LinkWithin

Related Posts Plugin for WordPress, Blogger...