Wednesday, 11 April 2012

Dark Chocolate Cake with Plums


Ah Chocolate Cake, I am forever seeking a new variation on the most desirable of cakes. This one came about because I wanted to try a recipe with a higher proportion of flour than normal, in the hopes that it would support the weight of a fruity topping. As you can see I am able to confirm that it did :-)


Dark Chocolate Cake with Plums
Ingredients
120g butter, softened
120g caster sugar
160g self raising flour
20g cocoa powder
2 eggs
40g 85% cocoa chocolate, chopped into little chunks
2 large plums

Method
- Preheat the oven to Gas 4/180C. Grease and base line a deep 7"/18cm tin. I used my new PushPan from Lakeland.
- Cream the butter and sugar until light and fluffy.
- Add the flour, cocoa powder and eggs and beat until well combined.
- Fold in the chocolate chunks.
- Spoon into the tin (it will be quite stiff) and level. Slice the plums finely and arrange neatly on the top of the cake.
- Bake the cake for around 35-40 minutes (but here my notebook fails me, these timings are from memory - the cake may need a little longer).
- Allow to cool a little before removing from the tin.
- Enjoy!


In all, a pretty delicious cake. It would be lovely served warm for dessert with some warm plum compote and a scoop of creme fraiche, but it was pretty good just eaten as it was for afternoon tea. As you'd expect the cake didn't taste of plums but they made for a good textural contrast to the top of the cake, and looked attractive too. The cake itself was soft and inviting, and the chocolate chips were well dispersed through the cake mixture. Biting down on a little piece of 85% cocoa chocolate in a cake is my idea of pleasure, so it was an excellent addition to the cake. Mmmm, chocolate cake!

Sunday, 8 April 2012

White Chocolate Easter Cake


A sweet and simple cake to fill you and your family with sweetness and light this Easter.

The recipe comes from BBC Good Food and can be found here. It was originally intended to be a charity baking recipe to raise money for BBC Children in Need in 2010. I modified it only slightly by adding 140g chopped chocolate to the cake batter before baking, and then iced it with a different frosting.


White Chocolate Icing
150g white chocolate (I used Lindt)
40g unsalted butter
vanilla - see below
- Melt the chocolate and butter together over a pan of hot (or simmering) water. Do not allow to overheat.
- Allow to cool to spreading consistency, and spread over the cake.
- Decorate with mini eggs. Cadbury's are my all time favourite.

The frosting wasn't really a particular success - there wasn't quite enough to go around and I had to leave part of the cake bare. I'd use 200g at least in the future. Or use the recipe supplied by BBC Good Food!!! I added a little vanilla to the melted chocolate and butter mix, but I don't recommend this because it caused the previously smooth mixture to seize and go grainy. It still tasted good, but didn't look great. I used it anyway.

Chocolate mostly at the bottom of the cake....

Quick and easy (well, if you've remembered to soften your butter sufficiently, I hadn't really!) and therefore perfect to whip up at the last minute to feed a houseful of visitors over this Easter weekend. It will be much appreciated by the small, sweet loving people in your life. This is a lot of white chocolate and is therefore really quite sweet! Moist, light and chocolatey this was appreciated by my colleagues as a pre-Easter treat. Expect to find most of the chocolate at the bottom of the cake (annoying!). I had to very carefully prise the cake off its parchment lining and still lost a fair amount of the chocolate on the way.


Happy Easter everyone, I hope you have a peaceful time with family and friends, celebrating and eating chocolate.

I'm entering this cake into TeaTime Treats, run by Kate of What Kate Baked (this month's host) and Karen of Lavender and Lovage.

Saturday, 7 April 2012

No-Knead Mini Hot Cross Buns


Can I confess to a little secret? My favourite hot cross buns are were from Marks and Spencer. I predominantly love the softness of them. I think this is mostly confined to hot cross buns, because I'm more than happy with my delicious homemade crusty bread, sometimes with a soft crumb, and sometimes a sourdough with a sturdier crumb. But when it comes to hot cross buns all I really want is a soft bun, and sometimes that's hard to achieve at home.


I think it's years since I actually bought hot cross buns, so at least I am trying to make my own! My hot cross buns from 2010 and 2009 were really excellent, and whilst they tasted lovely, they didn't quite achieve the desired softness that I'm seeking.


I decided to take the recipe from 2010 and tweak it a little more to try and achieve that elusive combination of utterly soft crumb with the excellent taste that comes from homemade breads. This is what I've come up with. I think it helps that this must be pretty much the easiest sweet dough I've ever made. These really are pretty much effortless - no kneading at the beginning and just the tiniest amount to gently remove some of the air before shaping the buns.

I think that in the past my efforts towards the perfect hot cross bun have been hampered by baking for too long, and at too high a temperature, worrying the crumb would be undercooked. This time I decided to cook lower and shorter. I also decided that whilst making this a milk based dough to add richness I would also add a little cornflour - a technique that contributes to the supersoft texture of these soft white baps.

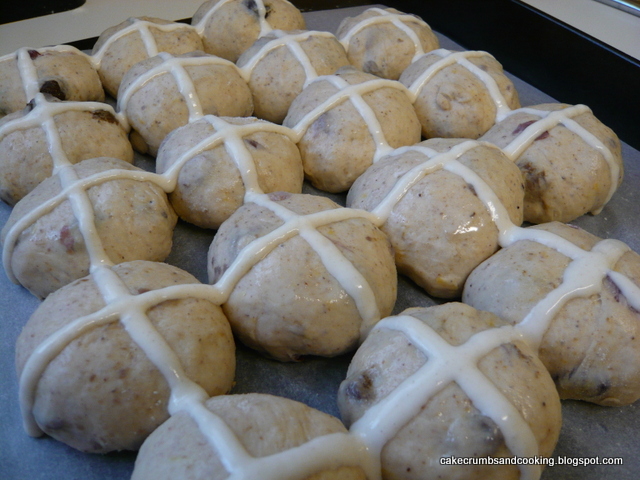
Crossed and ready to bake

No-Knead Hot Cross Buns
Ingredients
150g extra strong flour (Canadian)
175g plain soft flour
25g cornflour
1tsp salt
2tsp mixed spice
generous tsp fast yeast
25g caster sugar
zest of one lemon
180ml milk (I used semi-skimmed)
100ml water (see method below)
30g butter
85g raisins
40g dried cranberries

Method
- Soak the raisins and cranberries in some boiling water (just to cover) for about an hour. You can skip this step if you want, but it just makes the fruit soft and juicy in the final buns.
- Scald the milk (i.e. bring almost up to boiling point), add the butter, allow it to melt and the milk to cool until it is just warm (so as to not kill the yeast).
- Mix all flours, sugar, salt, yeast, mixed spice and lemon zest together in a large bowl.
- Add the milk/butter mixture, 100ml of water (I used the water that had had the raisins and cranberries soaking in it) and mix to a soft dough. The dough will be very sticky - don't worry, you don't need to knead it!

After mixing, before rising

- Cover the bowl with clingfilm and leave the dough for 1 1/2 to 2 hours (I left mine about 2 hours while I went out to do some shopping).
- The dough will have grown significantly.

After rising, before shaping

- Tip onto an oiled surface and knead very briefly and gently to remove the air.
- Divide the dough into buns of your chosen size. I made 10 buns of 40g and 8 of 50g, but you could obviously make them bigger if you want.
- Space them on a baking tray - close together to maximise the soft edges (batch effect) or further apart for separate buns. A no-brainer for me - close together for maximum softness!

Before proofing

- Allow to proof for around 45-60 minutes until they have grown together. During this time preheat the oven to Gas 6/200C.
- Make a paste from a little flour and water, transfer to a plastic food bag and snip off a tiny (and it really does need to be tiny, especially for mini hot cross buns such as these) corner to form a piping bag. Pipe crosses over your buns.

Half way

Piped and ready to go into the oven

- Bake in the preheated oven for 18-20 minutes. I used steam in the oven for these. Remove to a wire rack and allow to cool.
- To glaze, warm the golden syrup in a small pan and brush over the buns.
- Split, butter and enjoy! Or toast if you prefer.

Before glazing

Fabulous hot cross buns. I'm so,so happy with this dough and the way they turned out. I think this will definitely be my go-to recipe now. I can see it being very happy to accept all sorts of variations - different spices, different dried fruits (apple, pineapple, cherry, whatever you care to use) and perhaps even fresh apple too. I meant to add candied peel this time round and forgot - I'm not usually much of a candied peel lover (in fact the pre-cut stuff is revolting, only the stuff you chop yourself is nice) but I think it'd definitely be a good addition here, and if you like another tsp of spice these buns would take it.


Soft, spiced buns spread generously with butter, with a sticky glazed top - an utterly amazing way to start the day! I don't think I can sufficiently express how good, and easy these are. Give them a go, it doesn't really matter that Good Friday has been and gone, you won't regret making these.

Thursday, 5 April 2012

Mixed Granary Bread


I wanted a quick(ish) everyday loaf, predominantly based on white flour, yeasted and with a little interest added in the way of a proportion of granary flour. This is what I came up with. I'm not sure why I bought the potato flour but I thought I'd add a bit here and see what it did to my loaf, as adding cornflour (in combination with other ingredients admittedly) creates a very soft crumb, adding milk makes the crust colour and the crumb softer, so I was interested to see what potato flour does.


Mixed Granary Bread
Ingredients
100g granary flour
280g strong white flour
25g potato flour
300ml lukewarm water
8g salt
1 generous tsp fast action yeast

Method
- Combine the flours, salt and yeast. I used my danish dough whisk for this.
- Add the water and whisk this in. You will have a wettish, sticky dough. Leave for 10 mins or so.
- Knead briefly (30s-1min) using oil on your surface and hands to prevent the dough sticking.
- Leave for a while (10mins, 20 mins, not too important). Knead again briefly.
- Leave for a bit longer (probably about 20 mins)
- Dough looked very active so now was a good time to shape. I made a stubby sort of loaf shape.
- Leave in a warm-ish place to allow to increase in size.
- Preheat the oven to Gas 7/220C.
- Bake for 12 minutes at Gas 7 then reduce the heat to Gas 6/200C and continue to cook for a further 25 minutes, turn upside down and leave for 10 min more.
- Remove and allow to cool on a wire rack.


For the second proove, I only had to give this loaf about 35 minutes - yeast was very active, perhaps I'd put a little more in than usual, perhaps my yeast loves granary flour, I don't know. I think I picked almost the right time to bake - the slashes opened up beautifully. It could perhaps have been prooved a little longer though, there is some ripping around the base of the loaf (see picture above). It makes a change from my usual mistake of leaving the loaf for far too long, and then being disappointed that there is no oven spring!

The pictures don't seem to show the granary nature of the loaf - I promise it is in there! This was a very good loaf - an everyday loaf with a slightly chewy rather than crispy crunchy crust and a soft interior. I'm not sure what, if anything, the potato flour added to the loaf. I wonder if it made the crust chewy rather than crispy, but I'm not sure. Quite a bit of potato flour to use up now though!

Sunday, 1 April 2012

Black Bread - Short and Tweet


This week's selection included suggestions for a number of different breads from @EvidenceMatters - you can find the Short and Tweet schedule for April here. You can find out more about the challenge and how to participate here. So this week's selection included Spelt and Ale loaf (I've just finished my spelt flour!), Walnut loaf (out for obvious reasons round this way), Soya and Linseed Loaf (I have recently baked, but not blogged about a soya containing loaf so didn't want to duplicate the bread in my freezer), Multigrain and Honey loaf and Black Bread. Both of these remaining breads included ingredients I'm really not sure that I'm keen on. I don't really do seeds very much and the Black Bread is full of slightly weird and wonderful ingredients.

Having recently aquired some caraway seeds I decided that it would be the Black Bread for me. Helpfully it didn't require the sponge stage that the multigrain and honey loaf needs. Helpful because I am not organised and have only just finished baking this loaf!


The loaf derives the intense black colour from a mixture of rye flour (although you can choose rye, spelt or wholemeal), black treacle, cocoa powder and instant coffee powder, plus there are additional flavours from the seeds - caraway, fennel and cumin are the suggestions so I decided on caraway. There is also an option on the starchy root vegetable too - carrot is suggested and is what I used, but I'm sure that parsnip, swede, turnip or even potato would work equally well. I guess that with all of these variations each loaf of black bread will be fairly unique to the baker making this particular recipe.

I halved the recipe - partly due to storage issues (again) and partly because I'm not sure that I'll like the end result! Having said that, when I halved the ingredients I was mean with the seeds, using just a scant tsp, mean with the coffee, using just over a half a tsp instant espresso powder (I really don't like coffee at all, even as a flavouring in cakes, but having successfully made Dan's Black Pepper Rye Bread that has coffee as the liquid component, I suspect that the coffee will add to the complexity of flavours rather than overwhelm the loaf), and used about 20g butter.

Cooked rye, muscovado sugar and yeast.

Leaving the yeast to sponge briefly with a portion of the rye that is cooked.

The same mixture after being left for almost an hour.

Lots of random ingredients, ready to be heated.

All in, now to mix...

Mixed up dough, rough and ready before kneading.

Just before shaping. I chose a baton shape rather than the specified round.

After prooving.

Dusted and slashed. I didn't coat mine with the specified sesame seeds, because as I mentioned above, I don't really do seeds.

Just out of the oven.

The crumb is so, so soft. I'm really pleased with the way this has turned out - I chose the right time to bake and was rewarded with oven spring and my slash opening out well, and the crumb is moist and even.

I baked for 10 minutes at Gas 7/220C, then 30 minutes at Gas 6/200C, followed by a further 10 minutes at Gas 6/200C upside down to crisp the base of the loaf.


Amazing looking bread - I haven't had any of it yet, but will update with tasting notes as soon as I can.

Edited 02/04 It's a stunning bread to eat - soft and moist but not pappy soft. The flavour is certainly unusual. The combination of rye, coffee, cocoa and treacle all sort of magically meld into one seamless complex whole - of those flavours I could probably have identified treacle as one but the others were mingled. I'm sure this is just how it is meant to be - after all, the coffee in the Black Pepper Rye bread isn't noticeable as coffee either. I'm glad about this as a non-coffee lover. The next thing I say may sound obvious to many of you, but bear with me, because I've only ever used caraway seeds once before in my life! The choice of seeds in the recipe is caraway, fennel or cumin and I chose caraway, simply because I had them available. The caraway flavour is still very prominent after baking. I thought that this may be the case, because it is a strong flavour, but wondered if it would be tempered by all of the other flavours in the loaf - not so much is the answer! This is fine and great if you love caraway, but I'm still not so sure. I guess this means I'm perching on the fence with this loaf. So it's a stunning loaf - visually, texturally and flavourwise, but use seeds that you know you like the flavour of. Next time I'll make it without seeds I think! I had mine with hard cheese, but think it would actually be much better with a cream cheese.

I'm also entering this into Alphabakes, hosted by Caroline at Caroline Makes and the host this month, Ros at The More than Occasional Baker. The Letter this month is B. So I think my Black Bread qualifies there! 


LinkWithin

Related Posts Plugin for WordPress, Blogger...