Showing posts with label piping. Show all posts

Wednesday, 26 September 2012

Mojito Cocktail Cupcakes


The best chocolate blogging challenge around is now two! Happy Birthday We Should Cocoa. Set up by Choclette of Choc Log Blog and Chele of Chocolate Teapot WSC has now been going for two years, and I'm proud to say that I've been there since the start (although I haven't participated in all of the challenges!).

When Choclette announced that the theme for this month was Cocktails I have to admit that my heart sank. I don't think I've ever knowingly drunk a cocktail, or at least not a proper one. I may have had one or two mocktails in my time, but even those are infrequent. I was thus utterly stumped for inspiration on this one. I let the thought slide because my time has not been my own recently, but as of now (well, for a little while anyway) my exams are over and I can bake as I wish.


And so I didn't really think about this challenge at all. Since my exam date and the deadline collided exactly and since I have been at home on study leave and not really able to make cakes (and certainly not make them for colleagues) I thought I would bow out of the challenge. And then I remembered that Choclette had named me as one of the first month's challenge participants. And so the pressure to participate grew.

Fortunately inspiration struck just in time. I was thinking about the chocolate I like to eat most, and after unflavoured chocolate my favourite flavour is mint. I think this is because the sweet fruity centred chocolates are not my scene and nuts are off limits. So I always hope that if someone is buying chocolates for me they go for the mint box because then I can be a greedy piglet and hog them all to myself!
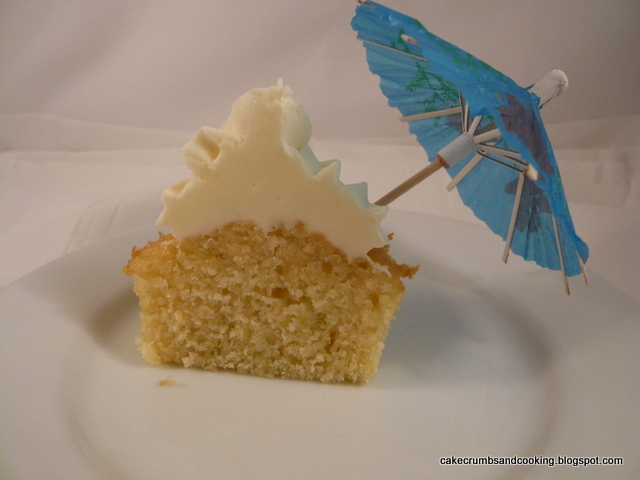

And to go with mint I thought of lime. Mint and lime, yum and then rounded off with white chocolate so the flavours don't clash with the strong dark chocolate. But how to combine them. I decided on a lime drizzle cupcake base and then a white chocolate and mint buttercream in luscious swirls on the top. Most decadent and most appropriate for WSC's second birthday. Mint and lime are the flavours of a Mojito, so these are my mojito cupcakes.

All kinds of green

Mojito Cocktail Cupcakes
Ingredients
125g unsalted butter
125g white caster sugar
2 eggs
125g self raising flour
about 3tbsp milk
grated zest 1 lime

For the drizzle/syrup
Juice of the lime plus 40g icing sugar

For the buttercream
75g unsalted butter, softened
150g icing sugar
40g white chocolate, melted
2 tsp peppermint extract
white chocolate chips to scatter

Method
- Preheat the oven to 180C/Gas 4. Line a 12 hole muffin tin with ten liners.
- Cream the butter until light and fluffy. Add the lime zest and continue to mix.
- Add the flour and eggs and beat well, then add the milk as necessary to make a softer mixture.
- Divide between the cases and bake for 25-30 minutes.

While they are baking make a simple syrup from the icing sugar and the juice of the lime - bring to the boil and simmer a couple of minutes. Allow to cool slightly.

- When the cupcakes are baked, prod all over with a wooden cocktail stick and carefully spoon over the syrup. Allow to sink in and allow the cupcakes to cool.
- In the meantime, make the buttercream icing by beating the butter and icing sugar together, adding the slightly cooled white chocolate and 2 tsp peppermint essence to the mixture.
- Pipe onto your cupcakes, scatter over white chocolate chips and admire.


What I have learnt from making these: that 6 hours in exams and a 90 minute journey home through driving rain does not necessarily mean you cannot bake when you get home. You will struggle to write the post up too though... thanks to Choclette for allowing me to be a little late.
Don't melt white chocolate in the microwave, well, at least not 40g for a minute on full power unattended. Cue smoke streaming out of the microwave and frantic (and ineffectual) wafting of teatowel to avoid setting smoke alarm off.


I'm pleased to say that they were delicious. The sponge was beautifully soft and moist and slightly lime-y and then the sweet buttercream was the perfect complement - rich and smooth and then minty too, but not overwhelmingly so. Just right for celebrating the end of my horrible day of exams! A celebration of two years of We Should Cocoa - here's to the continuing success of the challenge.

Friday, 22 April 2011

Easter Cake Bake 2011 - White Chocolate Mud cupcakes with Vanilla Buttercream frosting


When I saw that Julia over at A Slice of Cherry Pie had announced her annual Easter Cake Bake, I knew that these rather delicious cupcakes would be the perfect entry! I've been meaning to make a white chocolate mud cake for ages now, in fact, I think I did make this recipe ages and ages ago, but couldn't remember what they tasted like, so now seemed a good time for a repeat.  


The recipe comes from the ever reliable Australian Women's Weekly.

White Chocolate Mud Cakes with Vanilla Buttercream Frosting
Ingredients
125g butter, chopped
80g white chocolate, chopped
220g caster sugar
125ml milk (I used semi-skimmed 2% fat)
75g plain flour
75g self raising flour
1 egg

Buttercream frosting
100g butter, softened
220g icing sugar
vanilla extract to taste

To decorate - mini sugar coated chocolate eggs, as desired

Method
- Preheat the oven to Gas 3/170C. Line a 12 hole muffin tray with paper cases.
- Combine butter, chocolate, sugar and milk in a small saucepan.
- Melt over a low heat until smooth. Unfortunately my white chocolate refused to behave and melt properly so I decided that the best thing to do was get my immersion handheld blender and whizz until all the white chocolate had gone. This left the mixture a little frothy, but got rid of the lumps (large!!!) of white chocolate.
- Leave to cool for about 15 minutes (but I didn't).
- Whisk in the sifted flours and egg.
- Divide between the cases. Bake for about 30 minutes.
- Allow to cool.

- Make the buttercream frosting by beating the icing sugar into the softened butter, adding vanilla to taste and a little milk or water if required to get a pipe-able consistency.
- Pipe baskets of buttercream onto your cupcakes, fill with eggs and wait for admiring comments!


Mmmm, luscious, soft buttercream, just ready to dive into! The cake is quite sweet, as is the buttercream, but I think that the celebration of Easter demands a little richness, after all, those with stronger wills than I will be breaking a period of frugality and celebrating the joy that Easter represents. The cake is soft and moist, and the flavour of the white chocolate comes through surprisingly well - creamy and vanilla-y richness. The tops of the cupcakes were a little crisp rather than being very soft, but this actually worked really well with the soft buttercream and soft cakes, so I was a happy (Easter) bunny!


Beware the chocolate eggs if your teeth aren't the best though - one of my colleagues crunched down a bit too enthusiastically on a mini egg and his teeth weren't too happy about it!

Sunday, 27 March 2011

Forever Nigella 3 - Ciao Italia

I'm cutting this rather fine, because despite all my good intentions to make something Italian from Nigella early in the month, I only made my submission this afternoon. So, as you've no doubt gathered, this month's Forever Nigella is Italian.

There were many Italian recipes to choose from, but fewer baking recipes. I ended up plumping for Nigella's Italian biscuits from How to be a Domestic Goddess. Although there is no picture of them I was drawn to them by the memories I have of the little bakeries in Italy where these are sold, as Nigella says, by weight. I've not had them from Italy, but next time I go, perhaps I will, just to compare!
I will give the recipe here, because although Nigella's in essence I had to modify it to make it work for me.


Italian Biscuits

Ingredients

110g butter, softened

75g caster sugar

1 medium egg

zest of 1/4 lemon

175g plain flour

2g(1/4tsp) baking powder

glace cherries - enough to cut in half to decorate


Method

- Preheat the oven to gas 4/180C. Line a baking tray with parchment.

- Cream the butter and sugar together until very light, almost moussy, with an electric whisk.

- Add the egg, lemon zest and beat to combine.

- Add the flour and baking powder and beat to combine.


Tricky bit - you need the dough to be soft enough to pipe. I tried with 1/2 egg in the mixture and there was no way it was going to pipe through a nozzle. I added the extra 1/2 egg plus probably about 2 tbsp water too to get a consistency I could pipe.


- Pipe swirls and decorate as desired.

- Bake for 18-20 minutes (Nigella says 12, but mine were nowhere near done).

- Allow to cool on a wire rack.

- Makes about 20 - I got 19!


Taste? Well, I probably wouldn't make them again. They're nice, and perfect with a good espresso (note the sad lack of crema on my espresso - this is what comes of not having a proper machine to do it with!). I can quite well imagine countless people across Italy enjoying these with a morning espresso or cappucino. They are slightly crisp round the edge, but deliciously crumbly within, finished with a good, chewy red cherry. They are buttery and not dry, but perhaps not quite as sweet as I would have liked. However, Nigella does say that these aren't as sweet as some biscuits. I'm glad I made them though, because they were great fun to pipe!

As an aside - Nigella says that if you want to make these slightly differently, use vanilla extract in the dough and top with Minstrels. I had run out of cherries, but did have some minstrels so decided to give this idea a go. I think that since How to be a Domestic Goddess was published in 2000, the recipe for minstrel colouring/composition must have changed. My minstrels looked most peculiar when they were cooked. So much so that I picked off the minstrels on the biscuits waiting to be cooked and replaced them with Silver Spoon chocolate sugar beans, seen below. Not mini Smarties, though, because their natural colourings don't survive the oven any more either!


Saturday, 26 March 2011

Chocolate cupcakes with chocolate lime buttercream


It's that time again - We Should Cocoa! This month's challenge was set by Chele over at Chocolate Teapot - she announced that the challenge this month was to be lime! Lime isn't a flavour that I'm very familiar with, I am more often to be found zesting lemons and oranges, so this was a good challenge for me.

It seems at the moment that I'm obsessed with buttercream frosting - what can I say? Well, I guess after years of thinking that I really don't like buttercream all that much - too sweet and sickly, I've come to appreciate a swirl on top of a cupcake can be a good, in fact, great thing indeed. I still don't want too much, which is why you can still see cake around the edges - too much is still too much, if you see what I mean...

So, in line with my current obsession I decided to make chocolate cupcakes with chocolate lime buttercream frosting. If you look really carefully you can see tiny little flecks of green in the buttercream - it is there, I promise!

The cupcake recipe is Nigella Lawson's cupcake base from her Night-and-Day Cupcakes, which she has apparently shared with Good Morning America - so I'll point you there for the method, and for cup measures if that's your thing. If not, the measurements are given below:

Night-and-Day Cupcakes
Ingredients
2 scant tbsp cocoa powder
2 tbsp boiling water
75g golden caster sugar
50g dark muscovado sugar
125g self-raising flour
2 large eggs
125g very soft butter
1tsp vanilla extract
1tbsp milk, plus more if necessary to achieve a dropping consistency.

For the buttercream
75g very soft butter
150g icing sugar
zest and juice of 1 (very large, or 2 smaller) lime(s)


These were very popular and disappeared rapidly at work. The lime was subtle perhaps I need to add it to the cake batter as well next time, but these were delicious as all chocolate cupcakes are!

Wednesday, 23 March 2011

Maple, Apple and Cranberry Cupcakes with Maple Buttercream Icing

T was lucky enough to visit Canada recently. Canada is on my list of 'all time top places to visit just as soon as I can afford it....'. I'm not sure how near to the top of this list it is, but pretty close. Although I've never visited my mental picture of Canada is an absolutely stunning country - beautiful green, lush scenery, fantastic rocky mountains covered with snow and shimmering in the sunlight, vast plains stretching for miles... as far as the eye can see. I'd love to visit the bustling cities and experience the cultural side of the country as well as the scenic, outdoorsy side (although I'd absolutely love to ski in Canada - I've never skiied before in my life, well, not on real, proper snow - that brief flirtation in Scotland at the turn of the Millenium on melting slush doesn't count...). Where is all this picture painting leading, you wonder? Having established that I've never been to Canada and know little of it, the thing that I do associate most strongly with the country (aside from polar bears and grizzly bears) is maple syrup.

Rather embarrasingly, I'd not tried maple syrup until recently, so I didn't even know if I liked it when I asked T to bring me some back from his jaunt abroad. Don't misunderstand me, I had a strong suspicion that I would like it.... and I'm right! Yum, delicious. The sweet, smoky flavour really appeals to me, which is great because T brought back a rather large container of maple syrup for me, just as requested. He's a star! (N.B. The bottle pictured here came from Canada via Waitrose, rather than via T, but I already had it and thought I'd better use it first!)


To start my adventures with maple syrup I decided to make something with a definite flavour of the syrup, but without using too much of the precious liquid. After flicking through various baking books (oh how I love doing this!) I settled on a recipe for Maple, Pecan and Apple cakes with Maple Frosting. The recipe is one from the Australian Women's Weekly baking books, and can be found here. I followed the recipe as stated apart from substituting 40g dried cranberries for the pecans. I chopped the cranberries finely with scissors, which helped them to stay suspended in the cake mixture. I opted not to make the caramel shards but simply to pipe the buttercream in an elegant swirl.

The recipe worked really well, and although a little on the small side, these were delicious. The apple made the cupcakes moist and the cranberries stayed suspended in the mixture, adding chewiness and texture (although in honesty I think that they would have been better with the crunch of the originally specified pecan nuts - somehow the chewiness of the cranberries wasn't quite right) which was pleasing. I used light muscovado sugar, which in combination with the maple syrup, lent a lovely musky, smoky flavour to the cupcakes and a darker crumb. This was complemented perfectly by the sweet buttercream which had just a hint of smokiness from the maple syrup in it - you could definitely taste it, but it wasn't overwhelming.

I'm looking forward to using maple syrup more in my baking and cooking - have you got any favourite recipes to recommend?


Thursday, 14 May 2009

Blueberry Vanilla Hummingbird Cupcakes

Well, I promised last time that there would be some non-chocolate posts coming so here we are. Can't get much healthier than the 'superfood' that is blueberries ;-)

Truth be told though - I had some rather lovely blueberries that I wanted to bake with, and the vanilla cupcake recipe from the Hummingbird Bakery Cookbook was firmly planted in my mind as the next recipe to try. So I adapted. I made the recipe as stated in the book, but added 4 blueberries to the base of each case (inspired, it has to be said by the strawberry cheesecake cupcakes in the book) and then when I made the vanilla frosting, I coloured it purple and topped with the remaining 12 blueberries - I had just the perfect number in the punnet (allowing for the few that made it to my mouth during the process....).

Hummingbird Bakery Vanilla Cupcakes
Ingredients
120g plain flour
140g caster sugar
1 1/2 tsp baking powder
a pinch salt
40g soft unsalted butter
120ml whole milk
1 egg
1/2 tsp vanilla extract
125g punnet blueberries (mine were large berries)

Vanilla frosting
250g sifted icing sugar
80g unsalted butter
25ml whole milk
few drops vanilla extract
violet food colouring

Method
- Preheat oven to 170C/Gas 3. Line a 12 hole muffin tin with paper cases.
- Reserve 12 nice big blueberries and divide the remaining ones between the 12 cases.
- Put the flour, sugar, baking powder, salt and butter in a large bowl and beat on a slow speed with an electric hand mixer (or put into a stand mixer - oh for a stand mixer!!!) until well combined and a sandy consistency. This was messy and got all over the work top. Ah well.
- Whisk the egg, milk and vanilla extract together in a jug and add half to the dry mixture. Beat slowly to combine and then more quickly to beat out any lumps.
- Add the remaining liquid mixture and beat slowly to combine. Do not overmix.
- Transfer (I found semi-pouring/semi-spooning the best way to go as the mixture is quite slack) the mixture into the cake cases until 2/3 full and bake for 20-25 minutes in the preheated oven until they spring back to the touch. A skewer inserted should come out clean (provided you don't stab a blueberry!)
- Remove from oven and allow to cool on a wire rack before frosting.


- For the frosting, beat the butter and sugar together until well combined. The mixture will be crumbly.
- Add the milk and beat to combine. The mixture will come together into a big lump. Add the colouring cautiously, beating until you get the desired colour. Keep beating for a few minutes, you will see it get lighter in colour and texture.
- Spoon or pipe onto the cupcakes.


Finally, top each of the cupcakes with one of the reserved blueberries. Sit back and admire your delightful creations.


As with the chocolate version, these cupcakes were delightfully light and moist, and the blueberries at the bottom provided a luscious gooey contrast to the cake. These went down an absolute storm at work - I think they were the most rapidly disappearing cakes I've ever taken in!!!

Make them, you won't regret it!

Friday, 1 May 2009

Vanilla buttercream cupcakes - Sweet and Simple


Welcome to this month's Sweet and Simple Bake. For me, buttercream iced cupcakes are the essense of sweetness and simplicity - a light, fluffy vanilla cupcake topped with a decadent swirl of light-as-a-feather buttercream is perfection.


I have a small confession to make, but I'm sure Rosie and Maria will forgive me! I looked at the recipe when it was first mentioned at the beginning of last month and thought yum, cupcakes. I then promptly forgot all about it for a few weeks and finally got round to making these a week ago or so. I didn't look at the blog again and so just used the cupcake recipe that lives in my head, which is 4oz (or about 115g) each of butter, sugar and self-raising flour and two eggs. Plus a tsp of baking powder and a tsp of vanilla extract. Now, this is the same recipe that Rosie and Maria give on the recipe blog here, but scaled down. Perhaps that's why my cupcakes aren't exactly overflowing their cases, although I actually think they're a pretty good size for a quick midmorning pick-me-up! So if you want to follow their recipe (which I'm sure will work perfectly), please do. For the recipe I used, click here!


I decided that I wanted to have some fun decorating my cupcakes, and chose red food colouring to give pink buttercream, which I piped on using one of the nozzles I bought a while back. I love piping buttercream, it's just such good fun. Sadly, I underestimated how much butter I needed and used 90g butter plus 180g icing sugar. I think for 12 cupcakes piled gloriously high with buttercream (like here) I would have needed about 120g butter and 240g icing sugar.

These disappeared as if by magic when I took them into work, even the one above, which was the last lonely cupcake to be iced and I really was running out of icing! However, I got no complaints about it, and plenty of praise so it does seem to show that the simple things in life are the best sometimes!

Saturday, 11 April 2009

Hot Cross Buns


Yes, I'm a day late with these, but they're so good that I'd make them again immediately (perhaps without the crosses) just as a good fruit bun.

I followed Dan Lepard's recipe for hot cross buns here, with a few minor modifications. I'm going to give my ingredients list, but since I followed Dan's recipe exactly for the method, I suggest you visit his forums for the method.

Hot Cross Buns (I made 12 rather than 9)
Ingredients
75g butter, melted
2 level tsp mixed spice
300g strong white flour
100g wholemeal flour
1 tsp fine salt
zest 1 lemon
2 tsp (I was generous here) easy-blend dry yeast
275ml barely warm whole milk (I used semi-skimmed as that's what I had in)
200g raisins
3 tbsp golden syrup


Risen dough - it was larger than it seems in this picture.


Shaping the buns - kneading them at the same time.


One hand doing the kneading.


Shaped, prior to proving.


Risen after about 3 1/2 hours (I had to go out, and that's how long they got - I really think it helped with the texture of the buns - I made the same recipe last year but they were much denser than this time round).


With the flour and water paste piped on to form the crosses. This year I made the paste in a small bowl, which allowed me to beat out the lumps before I transferred it to a plastic bag with the corner snipped off to make a piping bag. This worked much better than last years paste where I attempted to make it in the plastic bag - the lazy approach doesn't work!


Baked to perfection. I started the buns at gas 6, as specified in the recipe, but then after 10 minutes I turned it down to gas 5 (recalling the burnt incident of last year) and left them a futher 15 minutes. I then turned them over and gave them 10 more minutes. I felt they were pretty much perfectly cooked.

I loved the texture of these hot cross buns. The crumb is light and moist and packed with the perfect amount of juicy raisins. The spice is a subtle but delicious background note along with the lemon zest.


Gorgeous shiny hot cross bun with glaze. These were really successful. The texture was perfect and the taste was great. I think that next year I might add a little chopped mixed peel and perhaps a bit more spice, although Dan mentions that spice retards the action of the yeast.

I'm really looking forward to eating the ones that made it to the freezer (sadly not all that many!). I'd really recommend making these, they're great.

Saturday, 31 January 2009

Chocolate Cupcakes with Chocolate Buttercream icing

Mmmm, chocolate buttercream. Just imagine your teeth sinking through the smooth richness of the buttercream before coming into contact with the soft, moist and yielding cake. Well, why aren't you in the kitchen already then? Oh, right, you need the recipe first!

I have a small confession to make. This recipe was a rescue effort (a successful one I hasten to add) due to a lack of care and attention on my part. I had halved the recipe from a printed one I was following, but inadvertently forgot to halve the melted butter component, realising as I poured the butter into the mixture and looked at a pool of melted butter forming that something had gone wrong. So, making the best of a bad job, I added a little more flour to soak up the excess butter and the rescue was complete. No-one other than me (and, well, you now!) was any the wiser as they still tasted great. In for a penny, in for a pound as they say, and having added extra butter to the cake mix I decided to go for full-on buttercream topping for these beauties.

Chocolate cupcakes with chocolate buttercream icing
Ingredients
2 large eggs
85g caster sugar
75g self raising flour
18g cocoa powder
90g butter, melted
1/2 tbsp hot water

For the buttercream icing
75g butter
150g icing sugar, sifted
50g dark chocolate, melted

Method
- Preheat oven to 180C/Gas 4. Put 9 muffin cases into a muffin tin. Alternatively grease a 9 hole friand pan.
- Beat eggs in a bowl with an electric mixer for about 5 minutes until thick and creamy. Beat in the sugar a tbsp at a time until dissolved.
- Fold in the sifted flour and cocoa, the butter and the hot water.
- Divide between the cases. They won't be very full but it doesn't matter.
- Bake for 12-15 minutes until the cakes spring back when touched lightly. Remove from tin/pan to a wire rack to cool.

For the buttercream icing, cream the butter and icing sugar together with an electric whisk until very light and fluffy. Add the melted chocolate and continue to beat until the mixture is very pale. Transfer to a piping bag with the nozzle of your choice on it, and pipe to your heart's content.
I used 85% cocoa chocolate to try and make the icing a little less sickly sweet. I'm sure 70% would also work well though.

These have a lighter, more open texture than the recipe without the extra butter and flour, presumably due to the presence of extra raising agent in the flour.

Naked cupcakes before receiving their complement of rich buttercream. They have risen a little more than the original recipe ones, but not so much as to make icing them difficult.

Needless to say, these disappeared in a trice at work - diet be gone!!

Friday, 2 January 2009

2008 - The best bits

I haven't been blogging for a year yet, but have really enjoyed the time I've spent doing it and have read some really inspiring posts this past year. I'm really looking forward to creating more delicious things for the blog this year, perhaps with some forays into savoury cooking too. Anyway, here are my favourite posts of the past year, seven, randomly enough! Some of them are favourites because the outcome was utterly delicious, some because they represent something I learnt and others because I actually managed to get a decent shot of them. I hope you enjoy them. What were your favourite posts this past year?

These Butter Whirls were the first time I've successfully managed to use a piping bag. Great fun to make and delicious to eat, what's not to like.


Marbled chocolate cake - so simple to make, looks impressive and so easy to eat.

Although I have no idea what these coffee walnut cupcakes with coffee buttercream icing taste like personally, I'm guessing they're delicious from the speed they disappeared at work. These represent the first time I successfully piped buttercream icing to look as luscious and inviting as I wanted it to.

A combination of a fantastic recipe and some luck meant that these chocolate custard muffins were some of the best muffins I've ever tasted. Thanks to Dan Lepard for the recipe! I was really impressed that they turned out just like the photo.


The ginger spice cupcakes with lemon icing that I made in November were possibly the most more-ish cake I made this year. The sweet-sour icing perfectly offset the spicy soft cake underneath to perfect effect. Definitely on the to-make-again-ASAP list!

Both of the last choices come from December. It was a good month for baking. J enjoyed the Stollen I made as part of her Christmas present (thanks are again due to Dan Lepard for his fantastic recipe):


And all of us enjoyed this delicious Rosemary and Rock Salt Foccacia with our mushroom risotto on Boxing Day. (I sound like a record that's got stuck, but it just goes to show that Dan Lepard produces consistently good recipes!)


I hope you all had a great year in 2008 and here's to an even better 2009!

LinkWithin

Related Posts Plugin for WordPress, Blogger...