Sunday 29 January 2012

Cardamom and Orange Banana Bread


And following on from the spectacular fail that was my attempt at Chelsea Buns, we'll move onto something altogether more successful.

I spotted this recipe a while back in the February 2012 issue of BBC Olive magazine in a feature on cooking with oranges and lemons, and really fancied making it as an alternative to the other banana bread recipes I've tried in the past. The recipe can be found here, and I made a few small changes to it. I somehow thought that I had run out of light muscovado sugar, with only about 80g left in the packet. I was sure I had some more, somewhere, but in the disorganisation of my kitchen I couldn't find it and so decided to substitute the remaining amount of sugar with equal quantities of dark muscovado and normal caster sugar (so that the treacly dark muscovado didn't take over the flavour of the cake). This worked fine, and added a treacly depth of flavour to the finished cake. I found the other packet of light muscovado sugar as soon as the cake was in the oven....

I didn't bother with the candied orange to sit atop the cake - I'm not all that bothered by decoration of that sort and worry that the decoration will sink into the cake. I wanted a success, not a failure! Besides, I love a loaf cake with a beautiful crack down the centre. Instead of using cardamom pods and crushing the seeds, I used a scant 1/4 tsp of ground cardamom, only had two ripe bananas rather than the specified three, and missed out the walnuts altogether. Hmm, perhaps these weren't only minor changes! Never mind, they didn't affect the outcome of the adventure, and the resulting cake was excellent.


I really liked the combination of flavours - the orange, cardamom and the dark sugar all blended together really successfully. The cake wasn't too moist or heavy, as can sometimes be the case with banana loaves (possibly because I didn't put as much banana in it!) but it was still lovely and moist and a great cake to take to work, being perfect for a break with tea. It rose well, and was quite tender - the slices were apt to break if handled too roughly, but since the cake didn't last long, this wasn't a problem! Might try adding a bit of chocolate next time. I think chocolate and cardamom are supposed to be a good flavour combo....

Saturday 28 January 2012

Chelsea Buns - Fail


Edited 30/01/12 in response to an anonymous comment. Please see end of post.
I guess there isn't really much to say about these, but I'm going to anyway. I wanted to make a sweet yeasted dough to enter into the Teatime Treats challenge that is run each month by either Kate of What Kate Baked or Karen of Lavender and Lovage. This month's theme was sweet doughs or pastries and I fancied trying my hand at Chelsea Buns. I have in fact made Chelsea buns before to a different recipe, but haven't yet blogged them. In the interests of this blog being a record of the recipes I attempt and how they turn out (good or bad, but happily rather more of the former than the latter) I am including this recipe.

It is from a trusted source, and so I can only imagine that it was a combination of errors on my part and perhaps the recipe that caused the result to be so disappointing. The recipe can be found here, and I think is also available in a published recipe book.

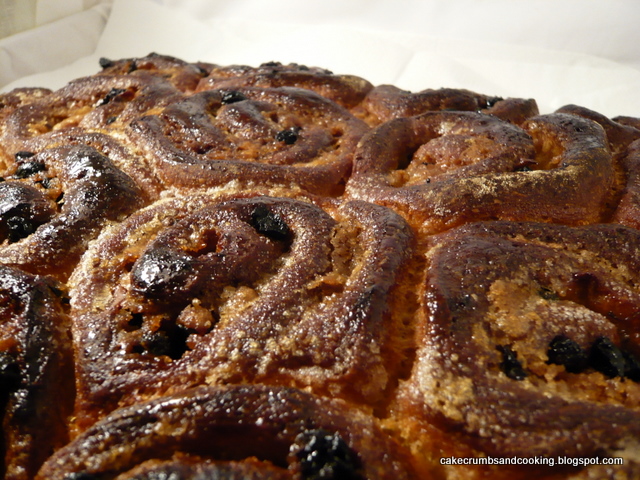
I did follow the recipe, but not to the letter. My dough had rather more time to rise at all stages as I was distracted by various other things and at the final stage the oven was occupied by something else when I needed to bake these. However, I reduced the temperature given in the recipe slightly, and baked for less than the initial time stated. When I tentatively opened the oven door (my oven has a solid, not a glass door, which is a pain in these cases) the buns were already over-browned.

I wish I could say that these were only cosmetic problems. When the buns were baked it was too late to try one, so they had to be left until the next day. By the time I started to split them it was immediately apparent that they were almost stale, and once split into separate buns they staled very, very quickly indeed. Perhaps this is a characteristic of this recipe, but if so, it is not a desirable one to me. I have to confess that I was so disappointed with the appearance of them and the rate at which they staled that I didn't even bother to eat one. So I suppose they may taste fantastic, but this is not a recipe I shall ever repeat.

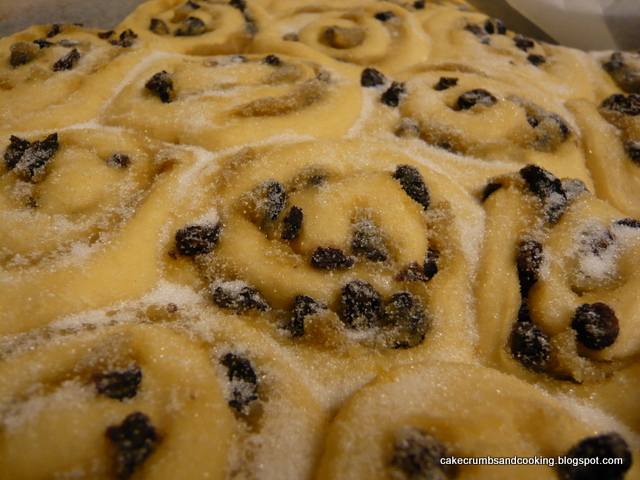
Just typing this up is making me feel sad and disappointed, disillusioned with baking. They looked so promising before baking. I hate it when things go wrong at the last stage. So much time and effort wasted. But I have other, more successful recipes to share soon, and will move on from this disaster. I would love to know whether simply leaving the dough to proove for too long caused all my problems... any thoughts?

Edited 30/01/12 in response to an anonymous comment.
Anonymous said...
You imply that you didn't in fact follow the recipe, that in fact you left the dough for too long at every stage. Given that it's a yeasted dough, this would mean that the dough was exhausted by the time that it got into the oven, and so the failure, I'm afraid, is yours... the buns were not stale, you'd simply let the dough "die" before it got to the oven. Always unfair when someone does this, then tries to blame the recipe.

I'm glad that you felt able to comment on my blog, I like reading all of the comments I receive and try to respond to them all. I felt that this comment warranted a fuller reply than I could give in the comments section.

Firstly, I do not imply that I have not followed the recipe - I am clear that the dough had too long at all stages, an outright statement is not an implication. Secondly, I understand that over-proofed dough would have no oven spring, this was not a complaint I made of the recipe. I was unaware that overproofed sweet dough, or any dough for that matter, goes stale quickly. I have not experimented and have no evidence to suggest this is either true or false. Having read other people's comments it does in fact seem to be a characteristic of these sweeter doughs to stale more quickly. Finally, I have not blamed the recipe in the slightest. I have been careful to present a balanced view, that it is likely to be a combination of factors that have led to my failure with this recipe. I think you have misunderstood me. Just because I have failed with this recipe does not mean that it is the recipe's fault, and I have accepted that as the baker, I am partly to blame. However, my blog is a record of the things I have baked, successful and not - I like to remember what I don't want to repeat and it makes a change from always successful. My gripe with this recipe is that the temperatures and times given are too hot and too long for a sweet dough baked in my oven. Perhaps a misjudgement on my part to not reduce the temperature further, but if I had I would have strayed even further from the recipe - it seems I cannot win.

I would be happy to correspond with my anonymous commenter if they care to get in touch - my email details are in the side bar.

And a final thought - wouldn't life be boring if everything were to be perfect the first time round!

Thursday 26 January 2012

Peaches and Cream Upside-Down Cake


Actually, that's a blatant lie. There are no peaches in this cake at all, it's just that there were supposed to be, and 'peaches and cream' somehow sounds better than 'apricots and cream'. Or it does to me anyway.

Right, I'll stop rambling about the relative merits of the names of stone fruits when combined with the word 'cream' and tell you more about this rather attractive and delicious cake. I was lucky enough to receive many lovely presents over Christmas (was that really only a month ago? - it seems a lifetime ago now!) but not a single cookery book. I'm not complaining in the slightest. I think my family have (rightly) given up buying me cookery books because they assume that I will probably already own them. This is a pretty safe assumption, because when publishers release their 'Christmas' (it feels so, so wrong to be talking about Christmas in January!) crop of cookery books around September time, I am powerless to resist buying them for even a few weeks, let alone wait months for Christmas to come. So it's pretty inevitable that I have already aquired the books I'm interested in by the time Christmas rolls around.


Where is this leading? Well, Random Recipes is where! This month's theme is 'New Year, New Book'. Shortly after Christmas I found myself in a book shop.... and shortly after that I found myself a few pounds poorer and a cookery book richer. The book in question was Edd Kimber's 'The Boy Who Bakes'. For those not already aware, Edd was the winner of the first series of the Great British Bake Off (much enjoyed by me, and millions of others!). He blogs over at The Boy Who Bakes so head over to see some of his recipes.


My random recipe from this book was the aforementioned Peaches and Cream Upside-Down cake. Edd says this would be a lovely recipe for a summer afternoon, and I'm sure it would, but with only minor tweaks it was a lovely recipe for a wet January day too. Edd's tip at the bottom of the recipe is that you can make the recipe yours by using all sorts of different fruit. In my cake I decided to use apricots. Now, apricots are just as much out of season round these parts as peaches, but I used tinned apricots. This may sound slightly over the top, but using tinned apricots was a revelation. Tinned peaches really don't have very much flavour at all (although I do actually happen to quite enjoy them!) but apricots seem to fare much better when tinned.


So how did it go and how did it taste?

The recipe calls for the grated zest of an orange, and I was worried that this would completely overpower the fruit, but actually it was one of those wonderful occasions where the flavours were complementary and more than the sum of their parts, which I really hadn't expected. Because I had such a large orange, I did only use the zest of half and felt that this was just right. I used one 400g tin of apricots, drained, in place of the specified peaches.

The cream of the recipe name is in the form of soured cream in the batter, which adds a beautiful richness to the cake, to contrast with the freshness of the fruit flavours. There is also a caramel topping, but once again I am reminded that I must either invest in a solid tin, or some all-in-one liners, because the majority of the caramel escaped from my tin. Luckily I had anticipated this and covered the outside of the tin with foil to catch the sticky juices.


My cake took rather longer than the specified 55 minutes to bake (I probably gave it an extra 15-20 mins covered with foil) but it was well worth the wait. I was so pleased with the way the apricots looked arranged on the top of the cake - it reminded me of the rays of the sun, and was just what I needed on a dull January day to remind me that the sun still exists, even if hidden for now. A really lovely cake, a worthy submission to Dom's challenge and I'm looking forward to making more of the recipes in the book.

Sunday 22 January 2012

Spelt Ginger Cookies and Rye and Raisin Cookies


This weeks Short and Tweet challenge (#shortandtweet) organised by @EvidenceMatters (blog here) was either Spelt Ginger Cookies (page 245) or Rye and Raisin Cookies (page 247). Or both, if you're greedy and fancy both recipes like me!


I had seen the rye and raisin cookies before, but for some reason they hadn't really appealed to me. However, this time round the recipe looked like just the ticket. I think that the use of an egg white had put me off in the past - I'm not very good at using up the components of eggs separately - I don't go for recipes where they need to be separated (having had a few failures with cakes needing whisked egg whites in the past) and hence have no repertoire of recipes to use up excesses of either yolks or whites. Happily though (and I presume deliberately) the recipes chosen complimented each other perfectly - the spelt ginger cookies requiring the yolk! Very satisfying.


Both of these recipes came together very quickly and easily - I baked them on Sunday morning and was done well before lunch, including the need to bake trays of cookies separately - I think I had about six trays worth of cookies! The spelt ginger ones especially so as they didn't require softened butter or any creaming in the technique. I have to confess that I did actually weigh out the dough into the specified size, so I got almost exactly the number of biscuits given in the recipe. I found that they took seven minutes to bake and achieve the required slightly golden colour.


For the rye and raisin cookies I wanted smaller cookies than specified, I made some with 35g of mixture and some with 25g of mixture, spacing them fairly far apart for the first batch. I didn't have any problems with these running together. I then realised that I had forgotten the bicarbonate of soda specified in the recipe and added it to the remainder of the mixed dough. I don't know whether it was for this reason, or perhaps just that the mixed dough was waiting around for a while, but the next couple of batches seemed to spread quite a bit more - with the result that the second tray had quite a few cookies making friends with each other. I preferred them less spread out, so if this was the effect of adding the bicarb, I'd give it a miss next time - I shall have to peruse other people's blogs to find if their cookies also spread out or not! I also found that inspite of making my rye and raisin cookies smaller than the specified size, they took longer to cook. Hmm, don't know why! I baked mine for about 20 minutes - at the specified 12-15 mins they looked very soft indeed.


I was prepared not to like the rye and raisin cookies. I don't really know why. Perhaps it's the slight nubbliness of the rye flour (which didn't really come through in these cookies), or my sort-of-indifference to raisins in some situations. Dan notes that if you don't have a very sweet tooth you can reduce the sugar slightly. I reduced the quantities of both types of sugar by about 15g and thought the cookies were still lovely and sweet. Well, I was pleasantly surprised because these were delicious. The rye, raisin and chocolate blended really well flavourwise, and the texture of slightly crispy and sugary and then chewy raisin was great.


I hadn't seen the recipe for the spelt ginger cookies before (I don't think it's a recipe from Dan's Guardian column) but a little googling will find it without too much trouble. I have to say that of the two recipes, this is the one that really, really appealed to me. And I wasn't let down. I love ginger flavoured cakes and biscuits and these were really good. I had a couple almost straight out of the oven and they were utterly delicious - slightly crispy edges and a great chewy centre, gently spiced with ginger and lovely little nubbles of stem ginger to add a bit of bite. My only regret was that after only a couple of days they had softened significantly and were just chewy without the delicious contrast of crispness round the edge that I had so enjoyed the first day. I wonder if they could be re-crisped in the oven? It seems a shame because the recipe makes quite a large batch and it would be nice to keep them for a week or so. Aside from this they were superb.


The use of wholemeal flour (rye or spelt) in these biscuits doesn't make them health food by any stretch of the imagination, but the knowledge that you are taking on a little more fibre than might be expected from a sweet treat does no harm, and without being told that these recipes were made with wholemeal flour you certainly wouldn't have guessed. I fear that I am beginning to sound like a scratched record, but both of these recipes were excellent and I wouldn't hesitate to recommend them (oh, and recommend buying the book too!).

Thanks to EvidenceMatters for excellent choices for this week, which again, I probably wouldn't have made on my own.

Saturday 21 January 2012

Triple Chocolate Banana Cupcakes with Chocolate Buttercream Frosting

These were born out of the desire to use up various bits and pieces that were lurking in the fridge and around the kitchen. Tiny bit of creme fraiche, check... very overripe banana, check... and so we come to the recipe!

Triple chocolate banana cupcakes
Ingredients
90g butter
130g caster sugar
40g creme fraiche
2 eggs
1 medium banana, mashed
125g self raising flour
25g cocoa powder
1/2tsp baking powder
40g each white and dark chocolate, chopped

Chocolate buttercream to decorate
Dried banana chips to decorate

Method
- Preheat the oven to gas 4/180C. Place 12 liners in a muffin tin.
- Cream together the butter and sugar.
- Add the creme fraiche and eggs and beat well.
- Add the flour, cocoa powder, baking powder and mashed banana and fold/beat together until well combined.
- Fold in the chopped chocolate and divide between the paper cases.
- Bake for 20-25 minutes until a cocktail stick comes out clean.

When cool make up the chocolate buttercream (I use about 90g butter and 180g icing sugar plus a little cocoa powder for chocolate colour and flavour) and pipe on in a swirly manner.


I have to confess that these are from the archives and I don't remember very clearly what they tasted like, but soft chocolate sponge dotted with little chunks of chocolate and a hint of banana can't possibly be bad can it! I wouldn't hurry to make them again specifically, but it was an excellent use of ingredients that I couldn't find another use for.


I bought the brown cupcake cases from Lakeland and I haven't been very impressed with them at all. Whichever recipe I cook in them, the buns start to pull away from the cases. I had tried the bun cases in a recipe prior to using them for this one, and having remembered this annoying state of affairs I hedged my bets by only baking six in the brown cases, with six in other cases. As you can see the normal cupcakes are fine. I wonder if anyone else has bought and used these cases (they weren't cheap!) and if you've had problems with them or not? I'd love to hear any comments on this! 

Edited to add: These aren't silicon cupcake cases, they're paper ones, but a smooth case rather than the pleated ones I usually use.

My colleagues were very happy, and these went down very well, in spite of my annoyance regarding cake cases!!!

Sunday 15 January 2012

Soft White Baps


These were one of the choices for this week's Short and Tweet challenge (organised by @EvidenceMatters, you can find the blog here) baking from Dan Lepard's book Short and Sweet. The other choices were Superwraps and Cider Vinegar Muffins, both of which I also want to make, but ran out of time (and freezer space for storage!).

I have made these before from the recipe published on the Guardian website here, and you can see what I thought of them then here.

Some more thoughts on the dough and the process this time. I used my danish dough whisk to mix the sponge ingredients and rather lazily left it in the dough so I could use it to mix in the remaining ingredients. It amused me greatly to see it gradually disappear until only the imprint of the whisk was left as the sponge rose!


Going...


Going...


Gone!!!
I followed the recipe ingredients fairly closely, but my timings were all over the place. I left the sponge for far longer than it should have had (closer to 5 hours!), the intervals for mixing the dough were rather stretched, but the final proove of the buns was much shorter - they just seemed to grow quickly and although I was aiming for the batched effect I didn't want them to become one ginormous bun!
Just before baking, dusted with lots of flour

I found that the dough was incredibly sticky to work with - I really needed my dough scraper to have  a hope of kneading it that first time, but after the first time the dough was much better behaved and less sticky, but still very soft and floppy. Looking back at the notes I made last time, I also found this to be the case then.

Sticky bowl - very soft dough
The changes I made to the ingredients are that I halved them - I made nine buns out of my half, each ball of dough weighing around 85g, which will be a good lunch size - the original nine would be massive and I'd need to snooze after lunch, which I'm not entirely sure would go down well with my colleagues! I used 30g butter rather than 37g, and reckoned on a tbsp of cornflour being 15g (this is probably incorrect, but I used the weights rather than measuring). I also cut the sugar and used 15g rather than 25g.

I baked at 200C/Gas 6 for 20 minutes, after dusting the buns heavily with flour to protect the tops from burning. When I'm having soft white bread I don't really like a dark crust. These tactics worked well and I have ended up with beautifully soft white bread with a close crumb, delicious for sandwiches.

Since I'm a little late getting this post up I will have to add further notes about taste and texture when I've actually had a chance to eat them, but they do feel just as soft as I remember them - i.e. the softest buns I've ever made! I think it might be interesting to try this recipe as half wholemeal or half spelt and see if the cornflour has the same softening effect when combined with a partly wholemeal flour - healthier too!

Update 16/01: Well, these are delicious and my lunch today was very enjoyable. A truly soft squashy bun, but springy too, in the sense that once you've squashed them they don't disintegrate to a disgusting dough texture (supermarket buns I'm looking at you) but spring back to be soft and squashy again. Win! These would be perfect rolls for a child's lunchbox if you have a fussy wholemeal hating child who wants shop bought bread and to be identical to their friends. The only difference is that these taste homemade - i.e. delicious. They are unashamedly a white yeasted roll though - there is none of the complexity of flavour that you get from the incorporation of other flours or any seeds or using sourdough rather than yeast and so forth, but they certainly deliver what they promise. They'll certainly be welcome in my lunchbox this week.

Thursday 12 January 2012

Malted Grain Bread in a Pullman Tin


When my lovely brother asked me what I would like for Christmas, my thoughts sprang, as ever, to baking. I have been very fortunate and have amassed quite a lot of baking kit - tins and cake cases and so forth, perhaps what I really need is more time to make things and experiment, and people on whom to test my experiements. But T couldn't really buy me some time for Christmas! So my next thought was the Bakery Bits website, treasure trove of amazing products for the home baker. I have seen other bloggers making breads in Pullman tins before, and have also seen homemade/makeshift versions of pullman tins, with more or less successful results. It seems that bread dough is extremely strong when it is rising and the oven spring of a good loaf is enough to dislodge a baking sheet held down by a housebrick or two!


Having seen these attempts at Pullman loaves, I thought it would be one to skip until I had the right tin for the job. And this Christmas I was lucky enough to receive one of these. Since there is a need to have the correct volume of dough to fill the tin and give the characteristic square shape, it made sense to attempt the recipe linked to on the Bakery Bits website. You can find the recipe here on the Bakery Bits blog. I adapted it slightly as I didn't have all of the specified ingredients, but stuck to the main proportions of ingredients.


Malted Grain Bread
Ingredients
400g strong white flour
100g malted grain flour (I used Dove's Farm)
20g olive oil
300ml warm water
scant 2 tsp dried yeast
10g salt (although next time I would reduce this slightly I think)

I essentially followed the method given on the Bakery Bits website, which follows the usual method I use for bread - Dan Lepards method of fairly minimal kneading. I didn't think that the dough was particularly softer than any of my usual bread doughs, but this could well be due to my changing the recipe!


When it came to shaping the loaf to go into the tin to prove, I greased the tin lightly with butter rather than use oil and just rolled the dough up and plonked it into the tin. I then pressed it down to try and make it more even, with some of the centre dough pushed to the ends, because the middle always seems fatter! I then left it to proove while I did other (baking) things. When it came to sliding the lid on, the dough had almost reached the top of the tin in the centre so I had to be a little careful.

The bread was then baked at 200C/Gas 6 for about 40 minutes. After this I tipped it out onto a tray and continued to bake for around a further 10 minutes to colour the three sides of the loaf that hadn't really coloured. The top seemed to have browned quite well anyway but the other sides were pale.


I loved this loaf - absolutely amazing! I made a 100% malted grain loaf with the same bag of flour a few weeks ago and it was a complete chore to eat my way through it - the malted flavour didn't seem as strong for some odd reason, and the bread hadn't risen very well. This loaf was the complete opposite! Somehow, having less malted flour makes the taste more prominent when you bite into a grain, and the crumb was beautifully soft and tender. I left the loaf until the following day to slice and it was so easy to cut into even slices - brilliant. It made the perfect sandwich loaf, and would be ideal for children's packed lunches (or mine, come to that!). An added bonus was that the crusts of the loaf, which I adore, are huge - in a normal tin loaf, the crusts tend to be quite small, but not here!

The tin worked so well, I can see myself adapting lots of recipes to use it. I'd like to try a sourdough in it, but will have to wait a while for that - my starter is *ahem* inactive at the moment. I certainly won't be using it exclusively, as some breads work so well without a tin, and sometimes you want a different kind of crust but this is definitely a most successful Christmas present - thank you very much T, and to Bakery Bits for starting to stock this smaller size tin - the larger one would make far too much bread for me! 

I am going to send this to Helen at Fuss Free Flavours for her Frugal Food Friday blog event (the current Linky is here) - I think that making your own bread is certainly frugal (plus more satisfying and delicious - although I appreciate it's not for everyone), even if this magnificent tin wasn't (although it will pay for itself over time!).

Monday 9 January 2012

Clementine shortbread


The skies may be grey and rain falling by the bucketload where I am, but at least the middle of winter brings bright colourful relief with the citrus fruit season. We now have beautiful lemons and oranges, satsumas, tangerines and the lovely clementines I used to make these shortbread, and hopefully the blood orange season is just round the corner. I adore blood oranges, for the novelty of the colour, but the flavour is superb too, nicer than ordinary oranges in my opinion.

This recipe comes from the wonderful 'Cakes' book in the River Cottage series, written by Pam Corbin (and slightly modified by me). Thanks Pam!


Clementine shortbread - makes lots!
Ingredients
150g unsalted buter, cut into small pieces, softened
75g caster sugar
150g plain flour
75g cornflour
zest 1 clementine

Selection of cutters (I used my new star shaped ones)

Method
- Preheat the oven to 170C/Gas 3.
- Beat the butter until softened. Work in the sugar until well mixed.
- Sift in the flour and cornflour, then add the clementine zest and mix until smooth - keep going, it will all come together although it doesn't feel like it will. You can use your hands to gently bring the dough together - try and knead it as lightly and as little as possible.
- Lightly flour the surface and roll out the dough, I wanted fairly thick biscuits, so didn't roll too thinly.
- Cut out biscuits with cutters of your choice, or just cut into pieces with a knife if you have no cutters!
- Bake for around 20 minutes until very lightly coloured - I think mine needed a little longer to get to a stage of done-ness I was happy with, but be careful not to colour them too much.
- Allow to cool on a wire rack.


The shortbread will apparently keep for up to four weeks in an airtight container - if you can resist it for that long!

They are beautifully crumbly, tender biscuits. The clementine is quite subtle - you get the flavour of the clementine straightaway and then the buttery shortbread takes over - yum! I think I could definitely add more zest next time for a stronger flavour. This would be a very good recipe to have in the 'basics' repertoire. Very successful!


I'm submitting these to the #citruslove event being co-hosted by Baking Addict at The more than occasional baker, check it out here.

Saturday 7 January 2012

Spelt honey cake


This is another of the type of cakes I regard as everyday 'snacking' type cakes. The ones that you keep in the cake tin to grab a piece of as you pass by. Not a posh dessert, but something simpler, just to keep you going. But this cake was no less delicious for that.

I would almost call it frugal - it felt that way to me because I was using up lots of bits of ingredients that I had lying around the place, as you will be able to tell from the ingredients list! However, I don't think it was a particularly cheap cake to make - it still contains butter and eggs and the spelt flour isn't exactly a routine ingredient for many people. Frugal in spirit I think (and the pictures are certainly frugal - please excuse them!).


The spelt flour was a new product that I had seen in the supermarket and wanted to try. I have enjoyed cakes and breads made with spelt flour in the past and wondered what the Dove's Farm flour would be like. Although I have only used it for this cake, I'm pleased with it. One of the brands I have bought in the past is full of bits of husk, which pretty much necessitates sieving it, and then picking through the bran to get the husks out and then adding the bran back in so as not to lose the weight of flour, or the nutritional benefits of that part of the flour. It's a pain! But the Dove's Farm flour doesn't seem to have husks in as far as I can tell.


Spelt honey cake
Ingredients
175g butter, softenend
80g caster sugar
90g honey, melted *
100g plain flour
100g wholemeal spelt flour
scant 2 tsp baking powder
3 eggs
60g buttermilk (the end of a pot used for a different cake)

* I used a runny honey, but it had crystallised and wouldn't squeeze out of the squeezy nozzle (I'm going to stop buying squeezy honey - I never get it all out before it crystallises), so I chopped the top off the bottle, spooned it into a pan and melted it very gently over a low heat, just to get rid of the crystals.

Method
- Preheat the oven to Gas 4/180C. Grease and line an 8"/20cm square tin. Mine was a shallow rather than deep tin.
- Cream the butter and sugar until slightly lighter in colour.
- Add the flours, baking powder, honey (which was warmish), eggs and buttermilk and continue to beat until well combined.
- Spoon into the prepared tin and level. Bake for 40-50 minutes (ish, I can't quite remember!) until well risen and golden and springy to the touch.
- Allow to cool on a wire rack.


As I said above, I hadn't intended this to be a decorated cake, and was more interested in the flavour that the honey and spelt flour gave the cake. To this end I should really have used a more interestingly flavoured honey! It was  a lovely, moist tasty cake. There was a slightly wholemeal flavour, which was good, and the honey was discernable but subtle. I  think I'd definitely make this again, but would use a better honey to get a more obvious flavour. I think mine was just a fairly generic runny honey.

Nice cake, went down well at work!

Wednesday 4 January 2012

The Alchemist's Chocolate Cake


I have wanted to make this cake for such a long time, and really don't know why I haven't got round to it before now. The recipe was first published in the Guardian here, in June 2008. Why, oh why haven't I made it before now? And indeed, why now after all this time? Well, this is one of the three cakes in this week's Short and Tweet challenge - there are some choices of what to make each week from now on. You can see the January schedule here. So again, thanks go to @EvidenceMatters for the prompt and prod to finally get round to making this cake. I won't be doing the other two cakes for this week though - I don't do coconut and the Saffron Peach cake, delicious though it sounds, relies on almonds for flavour and texture to an extent that I can't really sub them out.


There are some small changes from the online recipe to the one printed in Short and Sweet, and I used the book version - you'll have to buy it to find out what they are, presumably Dan tweaked it to make a better cake before publishing it in printed book form.

The alchemy of the name presumably comes from the making of a delicious, moist, marvellously chocolatey cake (can you tell that I liked this one yet?!) that is very low in fat (only 50ml of fat in the whole cake!) but doesn't taste in the slightest bit 'worthy'.


It was nice and straightforward to make - one of those cakes where it's almost more work to line the tin than make the cake (note to self, buy some of those handy silicon cake tin liners from Lakeland!) but I found that mine needed quite a bit longer for me to be sure that it was cooked. I think that actually, it possibly was cooked at the time specified in the recipe, but I probably left it about 20 minutes longer, covered with foil, to make sure it was done. The moistness doesn't seem to have suffered from this prolonged stay in the oven. The only substitution I made was to use a light olive oil instead of the specified walnut oil, for allergy reasons. Perhaps I did lose a little of the subtle flavour, but at least I could eat the cake!!!


The crumb is quite sturdy, which is perfect for me to take to work. I guess that the removal of fat means that a soft, crumbly crumb is the forfeit. I suppose I could have used some of my chocolate essence to enhance the chocolatey flavours, and maybe next time, but for the first time I just wanted to experience the cake as it was intended. The cake was lovely and chocolatey and I couldn't really taste pears at all, which I guess is the idea. I could detect a slight graininess from the pears though, which I didn't mind, as I knew what it was, but I suppose it might be slightly odd if you didn't know where it had come from.

The day after it was baked it had developed a very shiny surface. Not sure why this was, but it was actually quite pretty. I cut my cake into 16 (anticipating work colleagues not wanting cake at this time of year!) and this means that a slice of cake works out at fewer calories than two digestive biscuits. And who would choose to eat two boring digestives when they could have a slice of delicious chocolate cake instead!!!


So, since this is positively health food I'm also submitting it as my 'We Should Cocoa' entry this month. Chele at Chocolate Teapot is our host for January and the theme is chocolate with a health concious slant. I think this fits the bill perfectly!


Since I've genuinely had this bookmarked for years and years, I'm entering it into Jac's Bookmarked Recipes linky over at Tinned Tomatoes. I'm very glad I finally got round to making it and would recommend it.

LinkWithin

Related Posts Plugin for WordPress, Blogger...